
Hope you’ve been having a nice weekend! I’m one fitting and knitting a 40s pullover series post away from my sleeve tutorial. I really appreciate the comments I’ve received on my posts and on Instagram and Facebook. I can’t tell you how happy it makes me to hear I’m helping someone come to understand knitting just a little more (knitting math! it’s a good thing!), or helping someone to attempt a technique or alteration they maybe didn’t feel they had the confidence to do before. That feels great. 🙂
So today, we’re up to the neckline.
The neckline – making changes to the size and shape
The Cable Pullover pattern has a pretty high neckline as you can see.
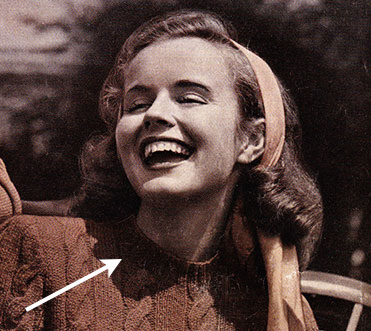
And actually, the construction is a little unusual. Instead of picking up stitches around the entire neck at the end and working ribbing, you work it on the front and back separately when working those pieces, then seam it all together. Personally, given the fact that it’s just a plain ribbed neckline, I wouldn’t bother doing it that way since it’s just more fussy than it needs to be. I’d rather pick up around the neckline and knit the ribbing that way. But I want to lower the neckline a little, so I’m just scrapping the neckline instructions!
In general, for a normal round or v-neckline, resources generally say to divide a third of the stitches between each shoulder and the neckline. That’s a pretty good rule of thumb. This goes for the front and the back, since you want the shoulders to be exactly the same on the front and back. You have to have the same number of stitches to seam the front and back together. Make sense?
However, in practice, this rule of thirds on me works out to shoulders that are about an inch wider than I like. For a normal fitting sweater, I go with about 3.5 inches for each shoulder. So I sometimes add a few more stitches to my neckline (taking them away from the shoulders). This is another point where measuring a sweater that fits you well is a great idea. Have a neckline in your closet that you really like? Measure it, and mimic that in your knitting.
Determining where to start the neckline
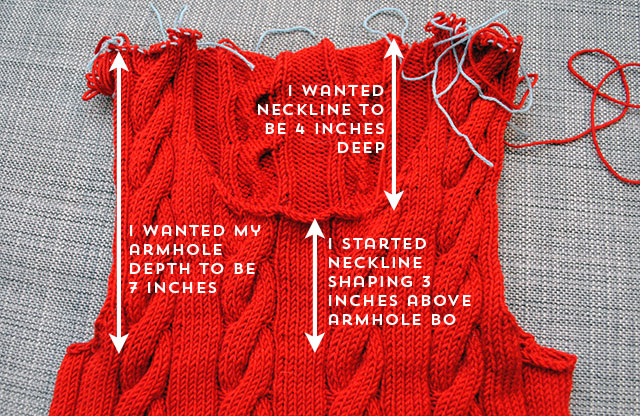
I decided I wanted my neckline on the front to be about 4 inches down from the shoulder shaping. That’s a good number for a medium round neckline. (For reference, I went with 3 inches down on my last two sweaters for a higher crew neck. But this puts you dangerously close to not being able to get your head inside unless you use a really stretchy bind off.)
Since I wanted a 7 inch deep armhole, that meant I started the shaping for the neckline 3 inches above the armhole bind off row. Make sense? Here’s the sweater, unblocked, to show you:
Deciding how to shape the neckline
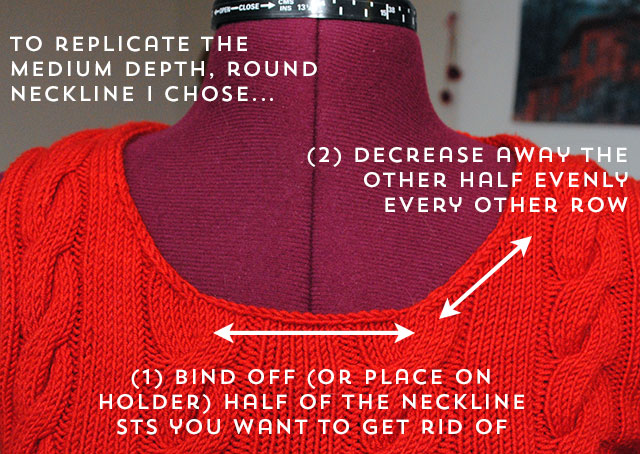
Once I knew where to start the neckline shaping (in my case, 3 inches up from the armhole BO rows), I had to figure out how to shape it. For a kind of typical looking round neckline, BO or place on a holder half the amount of stitches you’re going to decrease away to get up to the shoulders. (I bound off in this case, but sometimes it’s better to place these on a holder, especially if it’s a higher neckline. It makes it more stretchy so you can get your head in!)
And it’s easy enough to do this. You more or less follow like how you’d work it in your pattern, but instead, using your own stitch count so the neckline is just the way you want it!
On the front, you work you armhole shaping and then when you get to the depth where you want to start the neckline (that’s 3 inches above my armhole bind off row in my case), you work in pattern across the front left (from the wearer’s perspective), bind off half the neckline stitches, and work in pattern across the front right (from the wearer’s perspective) stitches. You’re then only going to work on those front right stitches on up to the shoulder, and then when you’re done you’ll pick back up on the front left stitches and do the same.
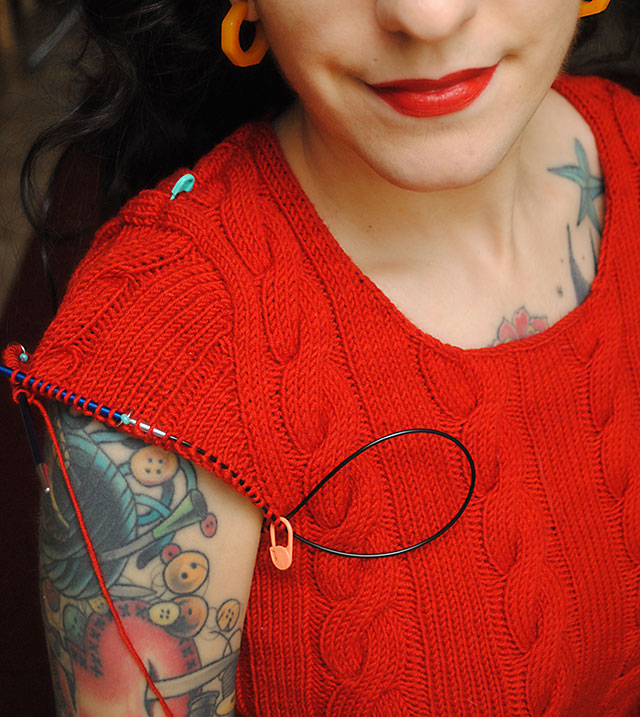
I know I remarked about it when I showed you my Dragonflies Jumper, but if getting your head into a pullover is ever an issue, definitely try out Jeny’s Surprisingly Stretchy Bind Off. It’s really helpful for lots of 1940s sweaters that have high necklines. I lowered the neckline in the Cable Pullover pattern by about 2 inches, and there’s no way I could have gotten the original over my head unless I used a bind off like that! Just something to keep in mind.
Next time
By popular request, the last big post in this series (except for showing you the finished sweater) will be a tutorial on how to work set-in style sleeves down from the armholes. Here’s a little preview…
Stay tuned!
these tutorials are great, thanks!
Once again great help from these posts. Thank you.
Gorgeous shade of red! It’s like the best vintage lipstick or nail polish colour transformed into a wool.
♥ Jessica