
Ta da! My yellow spring topper from Simplicity 3541 from 1950 is done. And I love it!

It was a pretty short project all things considered, taking me about a week to actually sew. Although it probably took another week to make the muslin and get all the pattern pieces ready (I talked about that in my last post). Sometimes I forget how labor intensive the prep is for coats! Lined things have so many pattern pieces and if you change the length or fit on the coat, you have to change it on the lining pieces too. Takes awhile.
I really do love this topper. I like it better than when I was in the middle of making it, and as much or more than I expected in my head. Definitely a win!

It was my first time doing welt pockets on a finished garment (I’d done test ones in the past, for a coat I never made because the muslin was beyond fixable). That was a design feature I added myself, since I lengthened the original pattern, so it needed pockets. I used this tutorial from the Clare coat which I find very easy to follow. (That was the beyond fixable muslin, by the way. But I borrowed the pocket pieces from it for this.)
I did sample welt pockets in both muslin and the wool, but when I was finished, even though I felt like I’d technically made them as perfect as I could, I was disappointed at some of the lines in the corners once the welts were hand sewn (and ripped out and hand sewn again).
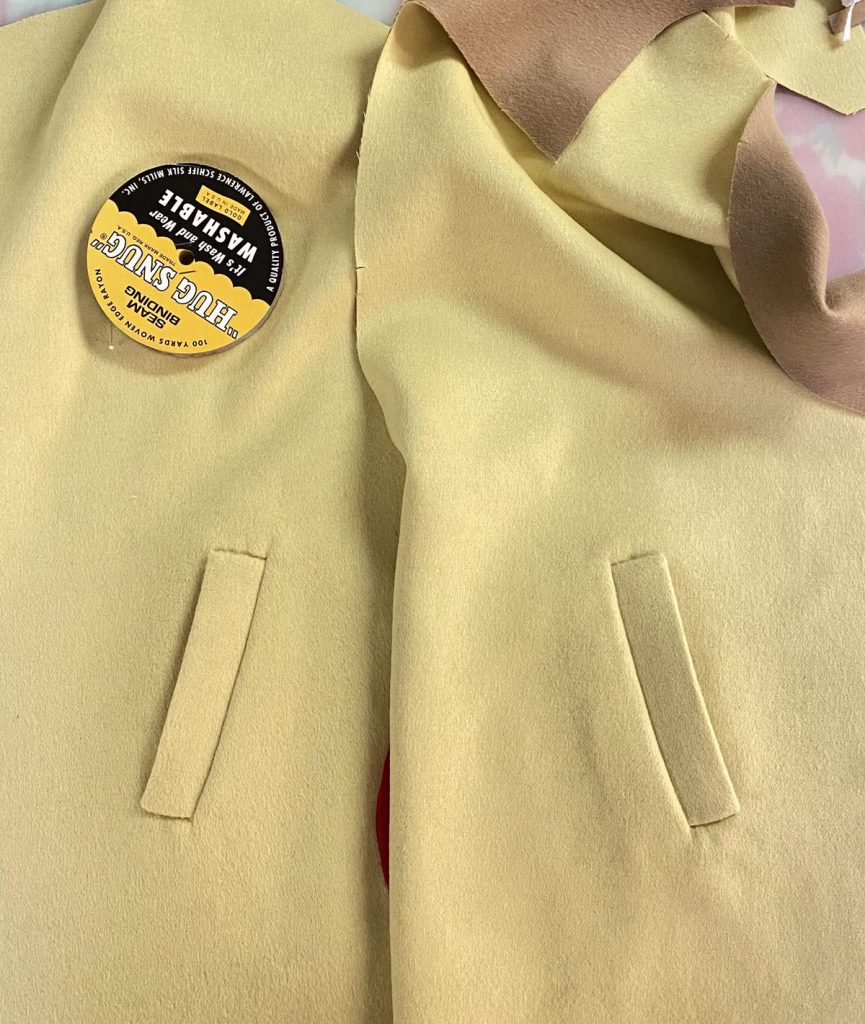
Knowing myself, I figured this would bother me less once more of the garment was assembled, because the welt pockets are one of the first things you do when nothing is assembled, the fabric is still perfect and flat, and hasn’t taken on any characteristics of being a real garment (wrinkles, drape, etc). And it’s such a light fabric so it shows every little thing! But I was right about not caring as much as I went along, because as soon as it was assembled, I wasn’t even thinking about that. I’m just enjoying the pockets.
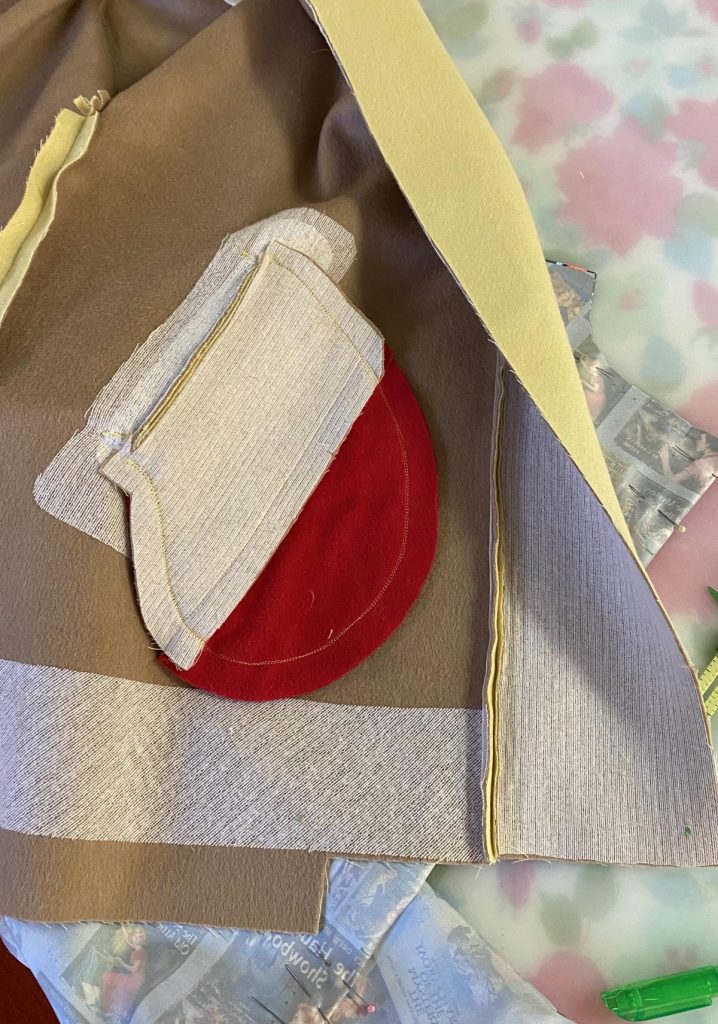
Anyway, welt pockets, you were a pain, but I’m pleased with you in the end and very happy with where I placed you. Also happy I made you in flannel, because I dislike pockets feeling cold when they’re made in lining fabric. The flannel is the red fabric in the below photo. The interfaced part is the facing, in the shell fabric.
Probably the thing that was the most exciting while making it? Finally unlocking the secret to machine-finishing the tricky hem bit at the bottom, between the lining and the facing, when you bag a lining. Almost every tutorial about bagging a lining has you hand stitch this area, and that’s always how I’ve done it. I knew from my well-loved Palmer/Pletsch book Jackets for Real People, there was a way to do it by machine (which of course they do in RTW), that they discovered after decades doing it the other way.
But every time I made a coat, I looked at their instructions and just… didn’t get it. There were a few drawings that made sense, but a photo that just did not and always threw me off. Well it turns out I just needed to ignore the photo! It’s so simple I can’t even believe it. I covered up the photo with a post-it in my book and wrote “ignore this photo” on it.
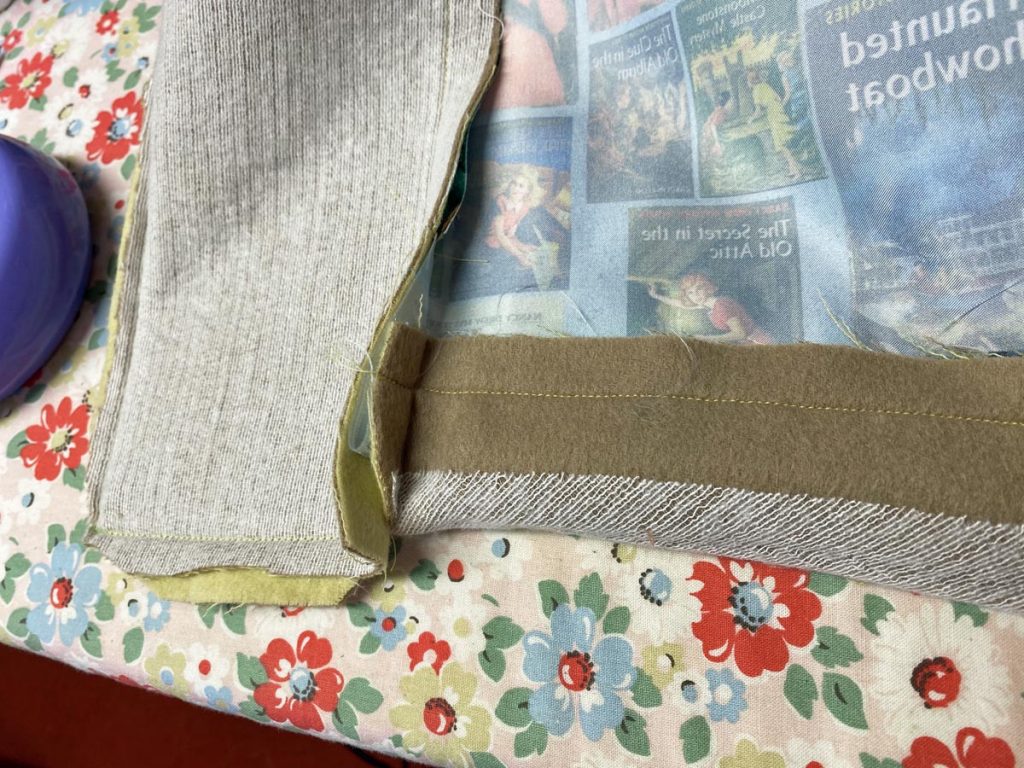
And here we go, a comparison of by hand and machine. Machine isn’t better per se, but it’s so satisfying to have unlocked this ‘secret’! Below, the dark coat is my short version of this topper where I did that tricky hem bit by hand, compared to this one by machine.
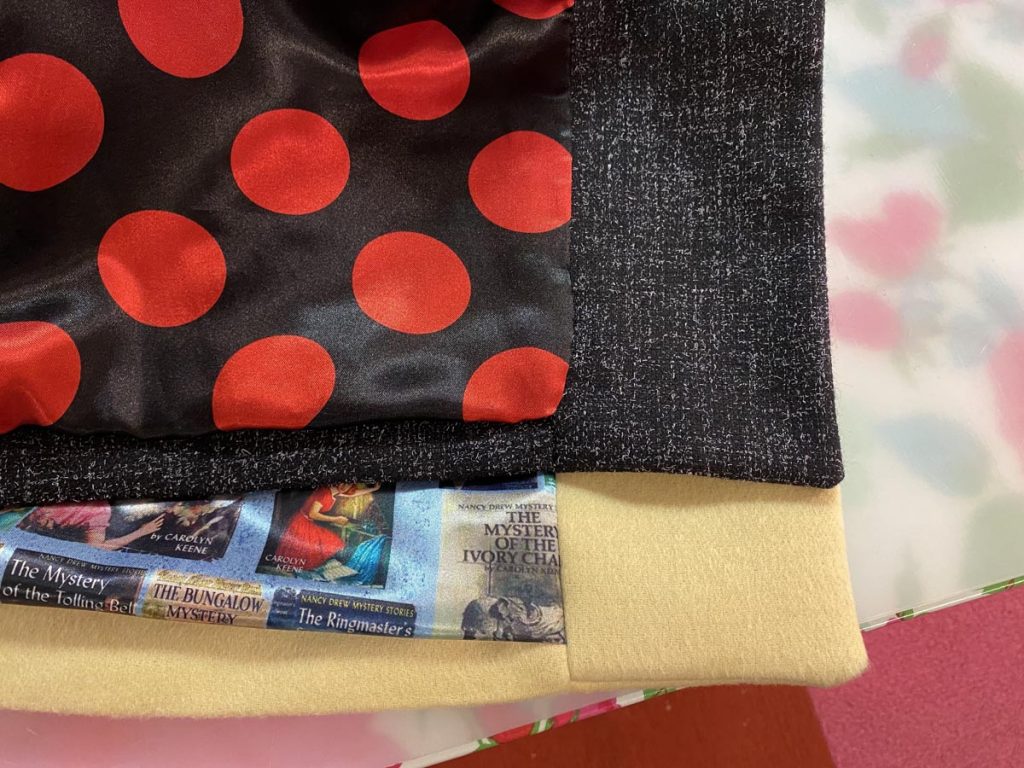
You snip the coat front seam allowance only to the end of the stitching line at the facing (at the hem dot, if you’re following P&P terms), then with the lining side facing up, fold up the hem allowance on the hem line. The lining folds under inside that naturally, just make sure it’s all smooth. Then you fold back the facing towards the other side to get it out of the way, and stitch down from the lining/facing seam where you left it open, to the bottom. Grade the seam allowances like normal. That’s it.
This photo doesn’t really show it very well but that’s what it all looks like after you’ve sewn the open lining/facing bit shut. I can’t believe it’s as simple as this, but it is. Never not doing this now!
I didn’t fully interface all the coat pieces with fusible interfacing (just the facings and bias cut interfacing on the hems) and I had a few moments where I felt like that wasn’t a great call, but overall in the end it was fine. I’m glad I’ll be doing it for my Charm Patterns swing coat though.
I made one change from my original plan, I decided not to interline it. Once I had the shell assembled, I just felt like with interlining, it would be too warm for spring and fall. I’m glad my plan was to cut the interlining out after, since then I didn’t waste anything!
Here’s a view of the coat from the back so you can see the cut-on sleeve and the cool standing collar.
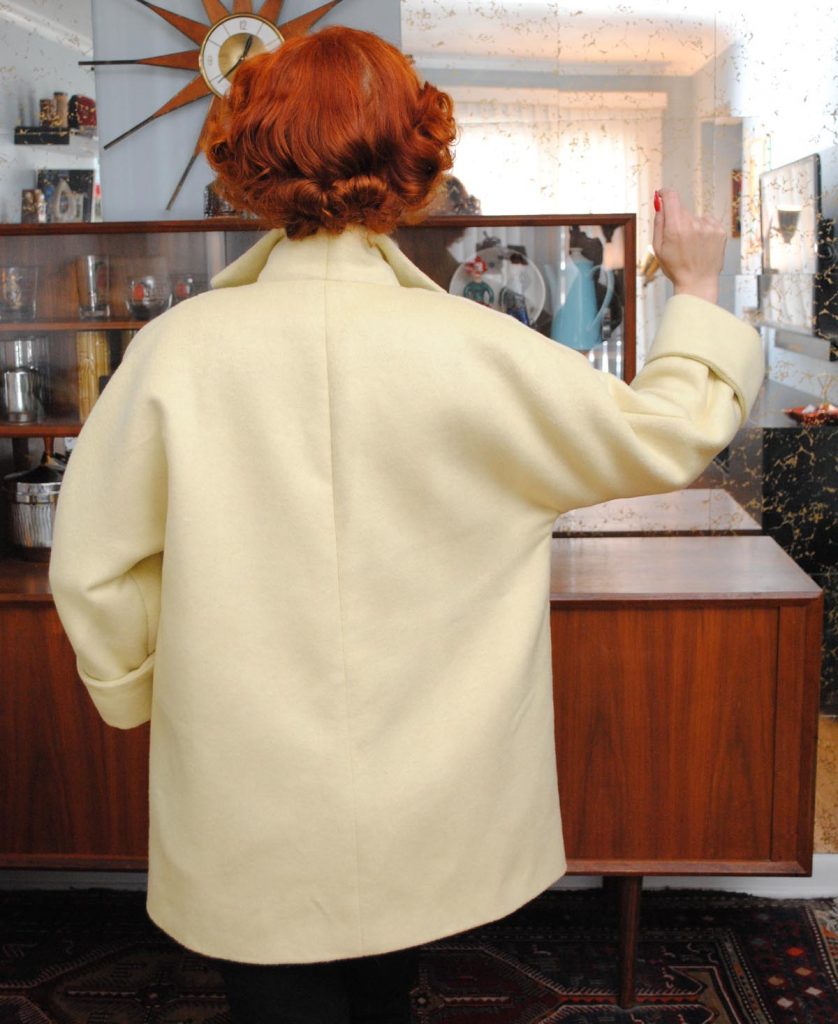
I love the shape of the coat, not exactly a swing jacket but relaxed and perfect with cigarette pants, which was what I had in mind to wear with it.

I mean not to wear in the house obviously, but it’s the ugly defrosting stage of late winter/early spring and not conducive to taking photo outside in the yard.


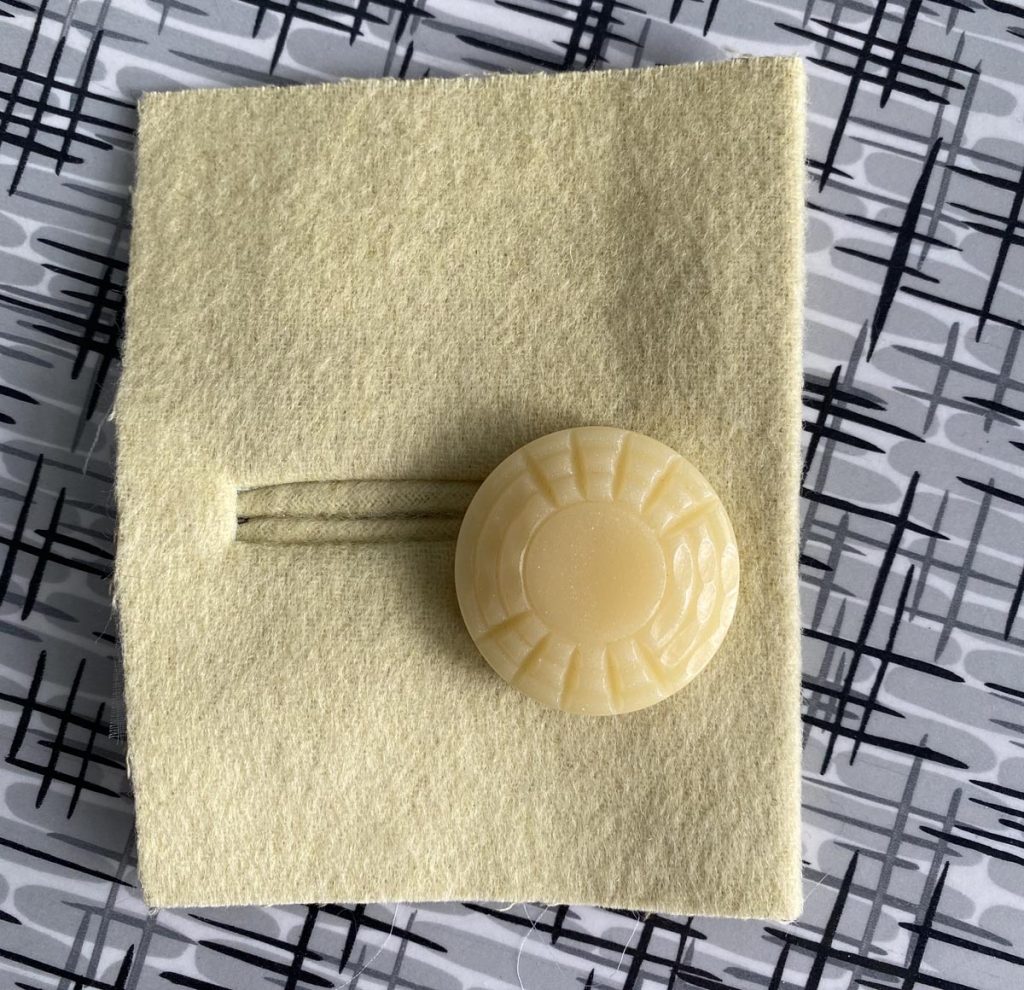
And it’s nice buttoned too, with that button I made!


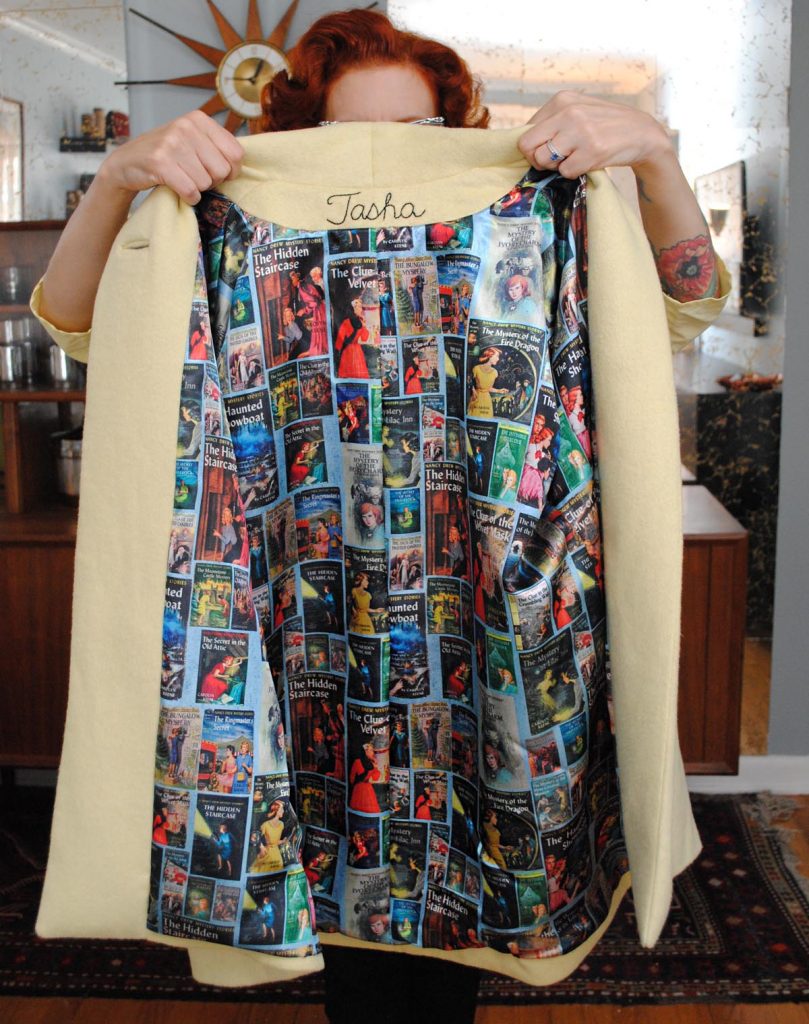
But the lining, you have to see how the custom Spoonflower lining turned out! I adore it. Could it be more perfect, I think not.
Overall any minor quibbles I had in the sewing process (and there were several) have melted away. I only foresee fearing slushy or rainy walks and splashing up onto the light yellow wool of my lovely new coat in my future. 😉

What a beautiful job sewing this! And did I read right that you made the button? Please tell us about that!
Thanks, Vicki! Yes, I talked about it briefly in my last couple of posts, but it’s a resin button that I made, having made a mold from a vintage button first.
Fabulous job. And the color is wonderful on you!
Thank you! 🙂
What a great colour! Beautiful coat! 🙂
Thank you! 🙂
I LOVE this coat!
Thanks, me too! 🙂
It’s beautiful! You did a wonderful job!
Thanks so much!
Beautiful coat! Your attention to detail really paid off. Living in the northeast, I need a coat like that. Today it was 70. Tuesday we’re getting snow. Talk about March madness.
Thanks! And yes, very familiar with drastic weather here! A few afternoons ago I sat outside with just a sweater. Today it’s snowing.
This is such a lovely coat, and the colour is perfect for Spring! And I am amazed at how the one button keeps it closed.
I am bookmarking this post for the hem bit too…
Thanks, Cynthia! Yeah the one button is really enough to keep it closed surprisingly. On my shorter one I went with two like the original pattern, but I decided one would be nice for this as a change.
And yes, that hem trick is a total game changer!
That coat is perfection! The color, the Lining, and that BUTTON. And your name!! It’s all swellarrific. I have dreams of making a coat someday. I never ever find what I really like in the stores, so I’ll be haunting your posts in the future.
Delighted to see this post. I have been waiting & hoping you would do one, don’t know how I didn’t see sooner?! You have done a fantastic job and thanks for all the pointers as I have a similar pattern to make & feel I should have a stab at it now. Your instructions are beautifully clear as always, much appreciated.
Super beautiful coat, and I love the “ignore this photo”, I have to use it too. I’ve also seen such photos and having no clue, then I play with the pieces and suddenly it comes to me. 🙂
Lovely coat and even more lovely to see you back to blogging. I was looking for a robe pattern and got directed here (via Mood fabric) and was delighted to see new posts.
I had planned to sew a coat in Jan 2020, didn’t bother and have barely worn a coat since then but will review all your tips before I embark.
Thanks