Yesterday in the fitting and knitting a 40s pullover series was Part 1 of my chat about of resizing the body, and I showed you some ideas on how gauge can be used to resize the body of a knitting pattern.
Now it’s time to talk about how I’m actually going to do this with the Cable Pullover pattern!
Remember one thing that I’ll keep occasionally pointing out: this series isn’t meant to show you every possible plan of attack for how to re-work or resize a vintage (or for that matter modern) knitting pattern. But I hope that following through a real live example will help get some of these ideas swimming around in your head next time you approach a pattern that isn’t quite what you want.
Let’s get back to it! Jump on board my knitting deconstruction/reconstruction train! 😉
A quick recap about my gauge
So you don’t forget how I arrived here, a recap: I’m aiming for a gauge of 6 spi using DK weight yarn (one weight heavier than the pattern calls for). I multiply the stitch gauge (6 stitches = 1 inch) by the finished size I want (34 inches) to see how many stitches that means I need on the needles at the bust.
34 inches x 6 stitches per inch = 204 stitches
The original pattern in the 34 inch size has 214 stitches at the bust (107 front / 107 back). So at my gauge and my desired finished size, I need approximately 204 stitches on my needles at the bust. Why do I say approximately? Because I might fudge this slightly depending on how it works out with my particular pattern. But I’m using it as my starting point.
Plotting out size changes with the actual pattern
Since I still want the finished sweater to be 34 inches, I have to do some math to get me there.
I like to go about this in different ways, depending on what ends up working best for the pattern at hand:
- Write out the stitch pattern on a piece of paper
- Chart the stitch pattern
- If either of these fails: I swatch it first
Why do I do this? Well, recall that the original pattern is 214 stitches at the bust, but we now know I need 204 stitches at the bust to hit 34 inches at my altered gauge of 6 spi. This is how I start to figure out where to get rid of those 10 stitches!
So I look at the pattern and figure out what’s going on. Right after the ribbing, I see that it says Cable Pattern, and that’s my cue. It spells the pattern out exactly for the back. I can see right off the bat that the full repeat is over 12 rows… it says “Repeat these 12 rows for pat.”
But for some reason I was having a hard time wrapping my brain around where the repeat was within each row since there were stitches before and after the repeat, so I took to paper and pencil. This is a scan of what I wrote out. No cleaning up, just exactly how I did it! The thicker lines helped clear up the repeats, the beginning and the end for me.
Doesn’t have to be pretty, just has to make sense to you personally! Writing or drawing it out helps me literally see the pattern. (Note: if you’re actually looking at the pattern and trying to decipher my notes, ignore the fact that I put a bracket around 2 repeats and wrote “full rep. 4 times”, the bracket should only have been around one section.)
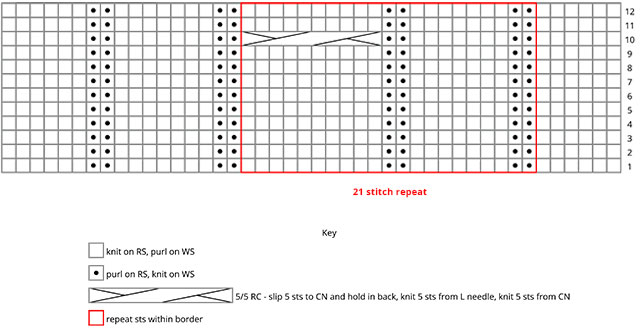
Once I figured it out, I was able to turn it into a little chart. If you’re at all familiar with charts you’ll see this is kind of silly… there’s not really much reason to chart this out when there’s only one row (Row 10) that’s different than the others. But it’ll help me show you a few things.
Keep in mind the chart is for the back only, and since the back and front are essentially the same up to the neckline in this pattern, the same goes for the front, too.
I didn’t indicate it on the chart since it’s just for illustration, but since I plan to knit this in the round, the right side indicates the beginning of each row. And in case you’re curious, I used a charting software called Stitch Mastery.
How do I get rid of those 10 stitches?
The pattern is written flat so the front and back are separate, but I’ve been talking about all of the stitches together as a total. As I said, I plan to knit the body in the round up to the armholes, and since I’m changing the gauge, I don’t really care about seaming (aka selvage) stitches. I’m just trying to hit 34 inches at the bust for my version.
The pattern as written for a 34 inches bust has 214 total stitches, and I need to get down to 204 stitches.
So I have to get rid of 10 stitches. Divided over the front and back, that’s 5 per side. I want 5 stitches less on the front and 5 stitches less on the back than the original pattern. (Note: you don’t actually have to distribute this evenly if you want the front to be slightly larger, but I’m giving the simplest example, and what I usually do.)
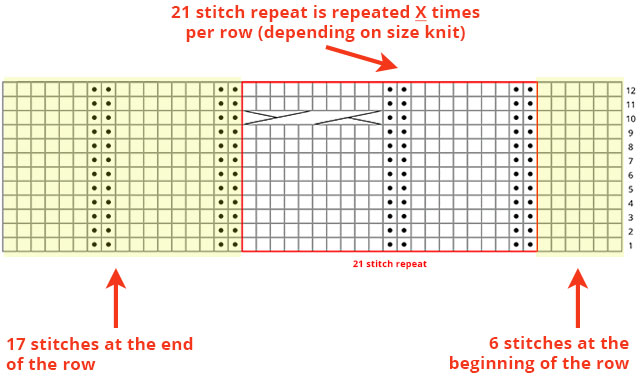
It’s fairly easy but may take a bit of staring at the pattern for awhile. I first like to figure out what’s repeated in the pattern, so I know how many times it’s repeated. I know I worked it out in the chart above, but let’s continue with that in more detail. You can see from the highlighted part below that the repeat is worked 4 times… yes, it says 3 where my arrow is, but that’s because it just told you to work it once. So 1 + 3 = 4.
Not all patterns tell you how many times a repeat is repeated across a row. Sometimes the language will say “repeat from * to end”. But if you figure how many stitches are in the repeat, and you know how many stitches total are on the needle, you will be able to figure it out. It’s important to know this if you’re trying to change the size by monkeying with the stitch pattern.
With the Cable Pullover pattern, A RS (right-side) row for the size 14 starts with 6 stitches, then repeats the 21-stitch repeat 4 times total, then finishes with 17 stitches. When you look at the chart, you can visualize why there’s stitches at the beginning and the end, to balance out the repeat so everything’s placed all nice and centered.
Remember that the chart only indicates the back (or front). Half the garment.
I just need to get rid of 5 stitches (per side, so 5 stitches from the chart above). I’d like to keep the balance of the pattern pretty much intact, so I came up with 2 good options after staring at the above long enough:
- Option 1: take the 5/5 cross cables (worked over 10 stitches) and turn them into 4/4 cross cables (worked over 8 stitches) OR
- Option 2: take one stitch out of the 7-stitch stockinette panel that’s between each cable
There’s 4 cables per side, so Option 1 would reduce each of those 4 cables by 2 stitches, eliminating 8 stitches. Close to 5, but not quite. If I liked that option best, I could always, say, stick a couple more stitches at each side. But I kind of liked the idea of keeping the cables the same size.
Now, Option 2 would eliminate 1 stitch in each of those 7-stitch stockinette panels between the cables. There are 5 of them total (4 in the repeats, then one just after the last cable), so that would eliminate 5 stitches. And that’s what my goal is! I don’t think removing 1 stitch between the cables would look much different, especially since I’m using heavier yarn than the pattern, so I like this idea a lot.
Ultimately, Option 2 is the option I chose to modify the body of my pattern.
Show me the math just to be sure
My change to the pattern is to remove one stitch out of each of the 5 panels of 7 stitches, turning them into panels of 6 stitches. That’ll get rid of 5 stitches on each side (front and back), or 10 total.
Original pattern:
Work 6 stitches at the beginning of the row, then 4 full repeats of a 21-stitch pattern, then finish with 17 stitches at the end of the row
6 + (4 x 21) + 17 = 107 stitches for each of the front and back, or 214 total
**For those of you who I scared with brackets, simply multiply 4 times 21, then add it to 6 plus 17.**
But…
What I plan to do:
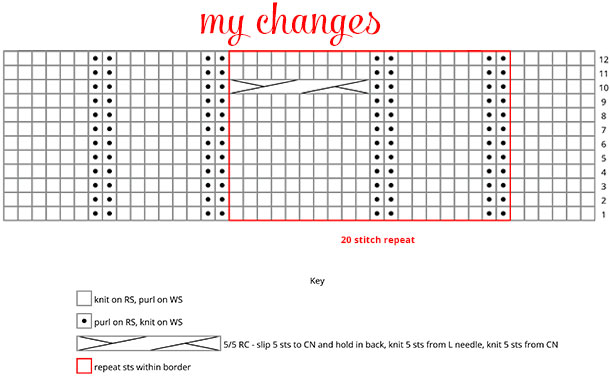
Work 6 stitches at the beginning of the row, then 4 full repeats of a 20-stitch pattern, then finish with 16 stitches at the end of the row
6 + (4 x 20) + 16 = 102 for each of the front and back, or 204 total
And my changes looks like this.
Doesn’t look a whole lot different, does it? But it’s the difference between knitting a sweater that will fit the way I want it to and one that won’t.
What if it’s a more complicated stitch pattern?
It’s not always so easy to break down a stitch pattern to its separate elements like I’ve done here. Slogging through a written-out vintage lace stitch pattern can be a bit maddening. But you’ll have a better idea what you’re working with if you try to draw it out or do a large (at least 4″ x 4″) swatch. Look for repeating elements. Decide what seems easier:
- Omitting or adding multiple repeats of the pattern
- Centering the design at Center Front / Center Back, working full repeats out from the center and ending the side seams with partial repeats
- Altering the actual stitch pattern itself
The first option would be my starting point. It can get a little dicey if it’s a pattern worked over a large number of stitches. Say, a 30-stitch pattern knit at 7 spi is already a little over 4 inches wide, so adding or omitting just one repeat of the pattern is a pretty big leap in a size change. (Which could be just what you need!)
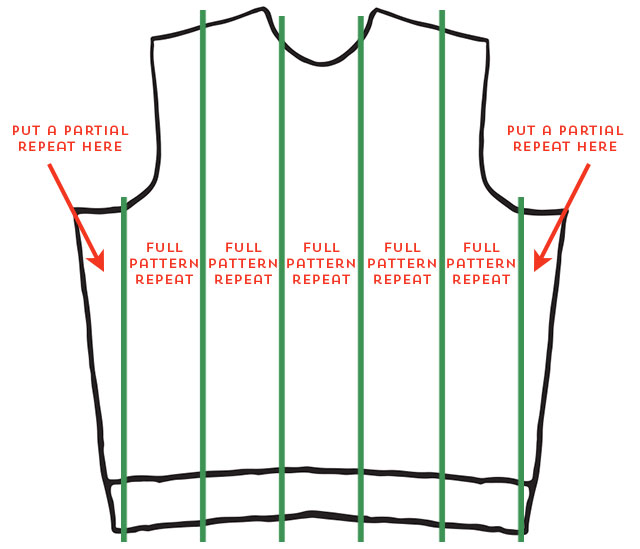
Or, you can opt to center a full repeat of the pattern at the Center Front or Center Back (whichever side you’re working on first), and then work out towards the sides with full repeats, ending with partial repeats on either seam line. (By the way, I don’t mean knitting it that way obviously, I mean plotting it out that way.) I’ve done this with colorwork and it’s bit of a pain, but it’s definitely a viable option.
If it’s hard to visualize, check this out:
In fact, doing a little mock-up of your own just like that would really help if you try this option out.
The last option is to alter the pattern itself. This can often be relatively easy to do with cables (i.e. turning a 5/5 cross into a 4/4 cross, or adding/removing stitches between cable motifs), but isn’t so easy with lace. However, make a nice-sized swatch and play around with it. Especially if there’s any vertical columns of garter stitch, ribbing or stockinette, you can probably work something out pretty easily!
A reminder for some options for resizing a pattern
Using a little math and with your desired finished size of the sweater and your gauge in hand, consider the following ideas as some starting points:
If I want to make the final sweater bigger than the original pattern calls for, I could….
- Use a heavier yarn than the original pattern calls for. This alone may get me my desired size, or I may still need to play around with stitch count some.
- Add stitches to the front and back. I could add repeats (multiples of 21 stitches, in this pattern). At the pattern gauge of 6.33 spi, if you added 2 full repeats of the cable pattern, you’d increase your final sweater size by nearly 7 inches.
- Do both. Consider doing both of these options if necessary.
If I want to make the final sweater smaller than the original pattern calls for, I could…
- Use a lighter yarn than the original pattern calls for. Again, this alone may get me my desired size, or I may still need to play around with stitch count some.
- Remove stitches from the front and back. I could remove repeats, or modify it further by narrowing cables (making a 5/5 cross cable a 4/4 cross cable, for example), narrowing the stockinette panels between cables, etc.
- Do both. Consider doing both of these options if necessary.
If I want to change the gauge that the pattern is written for, I could…
- Use a lighter or heavier yarn than the pattern calls for. This depends on if I need to scale the pattern up or down. I’d compare the pattern as written to the gauge I want to see what size the finished sweater would come out.
- Add or remove stitches from the front and back. Again, which I choose depends on if I need the sweater to be bigger or smaller.
- Do both. Consider doing both of these options if necessary.
- If it’s a multi-size pattern, consider knitting a different size. Most modern patterns are written for lots of sizes. Knowing your desired gauge, compare the math to a different size. Note: If you’re knitting a heavier yarn/looser gauge, you would need to knit a smaller size than normal. If you’re knitting a lighter yarn/tighter gauge, you would need to knit a larger size than normal.
Next time
Phew. That was a big one. Now that I know how many stitches I need for the body of the sweater and I’ve plotted out how the changes will be made, I’ve got a good part of the work behind me! Soon I’ll start to show you the pullover being knit, and I’ll talk about upper body changes: armholes, neckline and shoulders. And (assuming I can get the photos to work out) then I’ll have a special sleeve tutorial! 🙂


Thank you, I don’t like math but at least I now know how to go about it. I even think I understood most of what you said. LOL.
Ha ha! You can do it Bonnie! If you walk through it slowly it’s not so scary. 🙂
Thank you! This has been a tremendous help, I love vintage patterns and call me crazy but I like figuring this stuff out. I can’t wait to put this into practice. I know I’ll use this series as a reference often! 🙂