
I’m actually getting close to the end of my fitting and knitting a 1940s pullover series if you can believe it! Don’t worry, I know it’s going by quickly so I’ll do a roundup of all the links for future reference at the end of this series. 🙂
I last talked about resizing the body of the vintage knitting pattern I’m working on, the Cable Pullover No. 3298. knitting pattern. I talked about the lower body (Part 1 and Part 2), and now I’m going to talk about some of the upper body: armholes, armhole depth and shoulders.
But first, let’s talk about row gauge for a minute.
Row gauge and where it matters in this pattern
Row gauge is measured by the number of stitches knit over a given number of rows. Most patterns give you recommended stitch and row gauge. Sometimes when you match stitch gauge you can’t match row gauge, and generally that’s ok so long as you know where it matters.
In its most simplistic break down, row gauge matters anywhere you have to knit to a certain length. As you know, if you knit a proper gauge swatch and block it, it may change size. The same thing will happen with your garment. If your swatch grew in height when you blocked it, your sweater will, too.
Here’s an example: Pretend I knit a swatch and blocked it. Also pretend I have a pattern that tells me to knit the body to 14 inches.
Pre-blocked gauge is: 7 stitches per inch x 9 rows per inch. If I knit to 14 inches, that’s 126 rows knit. (14 inches x 9 rows per inch = 126 rows)
Post-blocked gauge is: 7 stitches per inch x 8 rows per inch. If I had knit the body to 14 inches, then blocked it, I’d find out the sweater was now 15.75 inches. (126 rows ÷ 8 rows per inch = 15.75)
I could probably write an entire post on gauge, but let’s just sum it up with this: if you’re told to knit to X number of inches (like “knit until body reaches 14 inches”), that’s post-blocking. If you had a big difference in row gauge before/after blocking, keep this in mind. Or be prepared to push and prod your sweater into submission when blocking. (And I won’t pretend that I haven’t done that because I totally have.)
Where does this matter in our pattern? This is a basic set-in sleeve pattern without a lot of extra stuff going on, so: body length, armhole depth and sleeve length. Just something to keep in mind.
Armhole shaping
If you change the size of a knitting pattern (vintage or modern), you’re going to have to think about how your changes will affect not only the lower body, but the upper body.
In the Cable Pullover pattern, it’s easy to find the section on armhole decreases.

The pattern is pretty typical, it has you BO (bind off) some stitches and then decrease one stitch every 2nd row… i.e. every other row, i.e. every RS (right-side) row, to make it easy. Then it tells you how many stitches you work on at the upper back until you get to the shoulders. (Again, thank you pattern for actually telling us this! Not all vintage patterns–nor modern– patterns do.)
Remember the pattern as written has a stitch gauge of 6.33 spi (stitches per inch). See that “work even on 87 sts” part? That’s the part that’s worked on the upper body of the sweater, across your front or back. Depending on how you’ve changed a pattern, using these numbers may make the sweater too baggy or too tight across your upper body, which you don’t want of course.
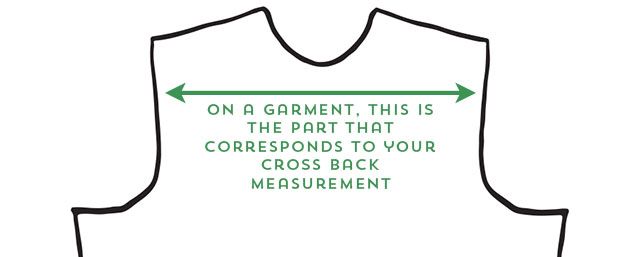
To figure out how wide I want the pullover here, I start with my cross back measurement, which on me is about 13 inches. To get this measurement, measure between the top of your armpits from shoulder to shoulder. And if you look at the silhouette of a basic sweater (with no sleeves), you’ll see why you need to know this if you’re re-working something yourself.
Now how do I figure out how many stitches this corresponds to? Watch how I think it through. (Recall: at my gauge of 6 spi, that gets me a 34 inch sweater if I use 102 sts front / back).
I multiply my gauge (6 spi) by my cross back measurement (13 inches).
6 x 13 = 78 sts
78 sts on the needles would give my sweater a cross back measurement of 13 inches. If I want to build in a tiny bit of ease, I could add a few more sts. Let’s bump the number to 82, to give me a cross back measurement just over 13.5 inches. Sounds good to me.
From the previous post, I know I have 102 sts on the needles for my body.
I want to BO about 1 inch worth of sts in the armhole BO rows. The pattern called for 5 and for some reason, I stuck with 5 sts. (Probably should have used 6, but you get the idea.)
102 (total sts for the back or front) – 10 sts (5 BO sts for each armhole) = 92 sts
92 sts on the needle is what I get after my 2 armhole BO rows. How many more sts do I need to get rid of until I reach my desired cross back number of sts (which I determined was 82)?
92 – 82 = 10 sts
I need to decease 10 sts to get to my cross back measurement. But I have two armholes (thankfully), so I divide that by 2.
10 ÷ 2 = 5 sts
If I put that all together, I get something along the lines of this:
(…blah blah beginning of pattern here…)
Work on 102 sts until desired body length is reached.
BO 5 sts at beg of next 2 rows.
Decr 1 st each side every RS row 5 times.
Work until desired armhole depth is reached.
If you have no idea what your cross back measurement, have someone measure you. Or even better, measure a sweater (doesn’t have to be hand knit) that fits you similar to how you want your sweater to fit, and make your sweater measurement match that.
Armhole depth
Armhole depth is how long you’ll knit between the armhole BO rows and the shoulder shaping. I usually knit to an armhole depth of 7 or 7.5 inches, but I’ve done as short as 6 inches for a very form-fitting sweater (like my Dragonflies Jumper). For the size 14, the pattern says to knit to a depth of 6 3/4 inches, 7 inches for size 16 (36 inch bust) and 7.5 inches for size 18 (38 inch bust). Again, this is another great place to measure a sweater that fits you well and decide what depth you’d like to use yourself. I decided to go with 7 inches for the Cable Pullover.
Hey look–first appearance of the real sweater!

Shoulder shaping
Just like every other part of the pullover, the number of stitches you work the shoulder shaping on depends on how wide you want your shoulders to be!
I like my shoulders to be around 3.5 inches wide for this type of sweater. That’s for a somewhat-fitted, 40s-style sweater with set-in sleeves on someone (me) with narrow shoulders. Again, measure a sweater you like with a similar fit to determine the width you want.
6 stitches per inch (my gauge) x 3.5 inches (my desired shoulder width) = 21 stitches
But! Here’s one thing to keep in mind, any time you’re breaking new ground in shaping a pattern, look carefully at the the pattern stitches, so you don’t accidentally decrease away an important design element that you want. See below:

See what I mean? I wanted to keep that cable intact, so I had to make sure that when I decreased at the armhole, I didn’t decrease so much that it made my cable disappear.
Shoulders tie into the rest of the upper body
How does that matter on the back piece? It means once I’ve worked the armhole shaping, and I then get up to where I want to shape the shoulders (after I’ve worked to my desired armhole depth), whatever I don’t want to be included in my shoulder shaping, I’ll include in the back of the neckline.
How does this matter on the front piece? Once I’ve worked the armhole shaping, whatever I don’t want to be included in my shoulder shaping, I’ll include in the front neckline.
So as you can see, the upper body shaping all ties in together! Armhole shaping, armhole depth, shoulder shaping and what I’ll talk about next: neckline shaping.
Next time
We’re getting so close to the end, which will come next week! In the next post, I’ll talk about the neckline shaping and give you a little preview of how I worked the sleeves!
again, these posts have been so helpful to me. I’m loving your red sweater, can’t wait to see it finished.
Thank you so much for putting the time and effort in to organizing this post series! It’s so helpful for me to see things broken down this way. Truly a great resource for those of us ready to push our own knitting skills to the next level!
I can only repeat and say thank you. You have helped me gain a little more confidence to try this because your blogs are so clearly done that I can follow what you are doing and it makes sense. You are an excellent teacher!
Thank you
Marie
Wow! Your sweater is gorgeous already :). You really need to write a book on this. Your explanations are easy to read and understand. I can’t thank you enough for making what seemed a daunting task for me actually turn out exciting and I’m excited to put this series into practice!