
Time for more in the fitting and knitting a 40s pullover series! Today, I’m starting to talk about how you can change the size of the body of the pattern. It’s lengthy enough that I’ve broken it up into two parts, so Part 2 will come tomorrow. And we’ll leave things like armhole decreases, the neckline, shoulders and sleeves for later on in the series.
What if I just changed the yarn weight & gauge?
As you know, I’m changing the weight of yarn to knit the Cabled Pullover pattern. Here’s an example of how changing the yarn weight used will affect the finished size of a garment if I made no other changes to the size.
We know the Cable Pullover pattern has a gauge of 6.33 spi (stitches per inch). And from the last post, we know that at the bustline for the size 14 / 34″, there are 107 stitches for the back and 107 for the front, bringing the total to 214 stitches at the bust.
I’m knitting with DK weight yarn as I mentioned. The pattern calls for sport weight, which is one weight lighter than DK. The recommended gauge for my yarn is 22 stitches = 4 inches, or 5.5 spi. Clearly 6.33 spi does not equal 5.5 spi, so if I knit it at that gauge I’m not going to end up with a sweater that’s the same size. Get it?
Check it out.
Pattern as written, using sport weight yarn (as recommended)
214 total stitches at the bust
gauge = 6.33 spi
214 ÷ 6.33 spi = 33.8, round up to 34 inches
Now what happens if we do this with DK yarn?
Pattern, using DK weight yarn (heavier than recommended)
214 total stitches at the bust
gauge = 5.5 spi *just using as a guideline*
214 ÷ 5.5 spi = 38.9, round up to 39 inches
That’s a 5 inch difference in size! If I knit the size 14 with DK weight yarn at a gauge of 5.5 spi, the final sweater will be 5 inches bigger than if I knit it with sport weight yarn at the pattern’s written gauge of 6.33 spi.
Changing the size just by changing the gauge is one great way to scale up (using heavier yarn) or scale down (using lighter yarn) a pattern for a larger or smaller size. That’s not the only change you’ll want to make if you use this as a way to scale up or down a pattern (you’ll have to think about how it affects things like sleeves and necklines), but I’ll talk about a couple of other points as we go along in this series.
One thing to keep in mind is any time you change the weight of yarn used in a project compared to the original, any stitch pattern motif will look a little bit different. Why? It’ll be at a different scale than the original. So for example, since I’m using DK weight and not sport weight, my cables will be a little bit bigger.
All this is just an example however, because I actually want the same size sweater but using a heavier yarn.
Change the size of the sweater by changing the number of stitches knit
I really do want the finished sweater to be about 34 inches, so since I’m using DK yarn, I’m going to have to change the pattern a little.
Now, I’ve already knit with the yarn I’m using (it’s the same as I used for my Dragonflies Jumper), so I know going in that I’d like to try to knit it at gauge of 6 spi (stitches per inch).
Before I do anything, I multiply the stitch gauge (6 stitches = 1 inch) by the finished size I want (34 inches) to see how many stitches that means I need. I may fudge things slightly from there, but it’s my starting point.
34 inches x 6 stitches per inch = 204 stitches
That’s not hugely different from the original pattern in the 34 inch size, which has 214 stitches at the bust (107 front / 107 back). So at my gauge and my desired finished size, I need approximately 204 stitches on my needles at the bust.
Just for reference so you can see how this pans out with different yarn, let’s pretend I was going to use a lighter weight yarn that gave me a tighter gauge than the pattern calls for. Let’s say fingering weight, at a gauge of 8 stitches = 1. That would look like this:
34 inches x 8 stitches per inch = 272 stitches
That would mean to get the same size sweater, I’d need 272 stitches total on my needles at the bust. Can you see how easy it is to figure this out yourself? Yep, super easy!
But just to clarify, here’s a visual
If you’re still a little unclear on how gauge changes the final size, here’s a visual for you that I hope helps. Below are two sweaters I knit, one fingering weight, one worsted weight.
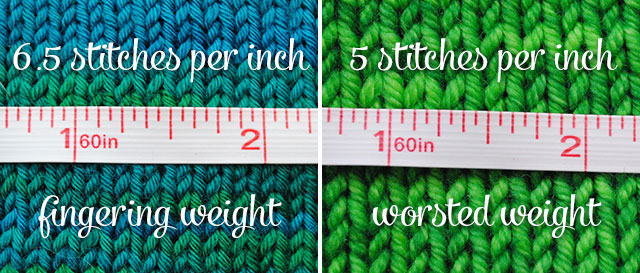
Let’s pretend I had 204 stitches on the needles at both of those gauges, 6.5 spi and 5 spi. Here’s how they garment would differ in size:
204 stitches ÷ 6.5 spi = 31.38 inches
204 stitches ÷ 5 = 40.8 inches
See what I mean? That’s a big difference. You can change your gauge to get a different finished size. Now I wouldn’t do this with a sweater that had a lot of complicated elements and doohickeys, but with a pretty basic sweater? Totally. I’ve done it a number of times. And you’ll watch me do it with this one.
Next time
That’s enough for one post! Part 2 of resizing the pattern will look at the Cable Pullover pattern and break it down to figure out exactly how to get it to the size I want using DK weight yarn. It’s a little more complicated than if I was just knitting a stockinette sweater! I’ll also give you a few pointers for if you want to do something similar with a different pattern or make bigger size or gauge leaps than I’ll be doing. Stay tuned tomorrow!
Thank you for all your info, it’s a huge help for me. Your explainations are so easy to digest. I’m learning so much!
Love these posts!
It’s good to read how a more experienced knitter is dealing with different issues like gauge/resizing ecc.
I’m really enjoying and learning from your posts. I love vintage sweaters but am a plus size so this information is very helpful to me. Thank you
This series is just brilliant 🙂