
Thanks for all the lovely comments about my Dragonflies Jumper! ♥ Today is the next installment of my fitting and knitting a 1940s pullover series. When last we met, I talked about how I look at a knitting pattern, the stitch gauge and yarn weight.
Today, we’re going to look at the knitting pattern and figure out what size the finished sweater will actually be. As you might expect, a lot of things hinge on knowing the finished size of the sweater!
Figuring out the actual body size of the sweater by the stitch gauge
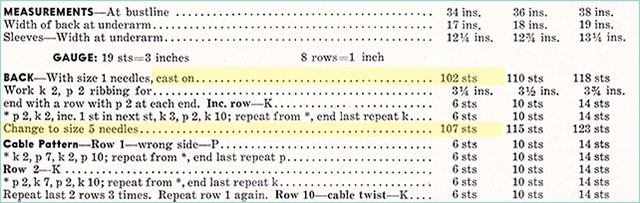
We know from last time that the stitch gauge of the Cable Pullover pattern as written is 6.33 spi (stitches per inch). The pattern is written in three sizes–vintage sizes 14, 16 and 18. The awesome thing this pattern has that many vintage patterns lack is a measurement at the bustline. Huzzah! The bustline measurements are 34″, 36″ and 38″.
(Note: most modern patterns include a schematic that tells you this number. Look for a small line drawing with lots of numbers on it, usually towards the back of the pattern.)
It’s one thing to be told a garment will fit Size X, but it’s another to be told what the actual measurement of the finished garment will be. That is what you want to know before you knit a sweater.
What if you measure 38″ at your full bust, but you want your sweater to be rather fitted, with 2″ of negative ease (meaning it’s 36″ at the bust)? Or what if you want it to fit a little looser, with 3″ of positive ease (meaning it’s 41″ at the bust)? There’s a big difference between 36″ and 41″. And what if you want the sweater to have zero ease, and be right at 38″ at the bust?
Being told the sweater will fit a 38″ bust isn’t the same as being told the sweater will measure 38″ at the bust!
So two thumbs up for this pattern for telling us the measurement at the bustline. But I still do the math myself to double-check. Modern or vintage pattern. Always.
Why? I want to make sure it’s right! Knitting a sweater invests far too many hours for me to feel comfortable assuming the pattern math is right. And it isn’t always, trust me.
How many stitches are used at the full bust in the pattern?
I first decide what size I think I should be knitting, giving the pattern. If I were knitting this as written, I’d plan to knit the size for the 34″ bust, which is the first size listed in the pattern.
If the pattern is written from the bottom up (like most–not all–40s patterns), I look at how many stitches are cast on for the back. I start with the back because if it’s a cardigan you’ll have to deal with button bands (usually–again not always–added after). So I start with the least fussy part, the back.
This pattern casts on 102 sts at the back for my size. So I make note of that. And then it has you work some ribbing for a few inches.
Then I look to see if there are any increases after the ribbing, which sometimes there are. In this case there were a few increases, so the pattern after the ribbing starts in with 107 sts. I note that too.
Then I have to do a little reading. Some patterns involve shaping between the ribbing and the armholes. Many 40s patterns are quite short, made for the top of the ribbing to hit at about the waist. Sometimes there are increases from the waist up to the bust every inch or so on both sides, but sometimes there are no increases at all.
So I read on to figure out if there are, indeed, any increases. And if you read below… no increases.
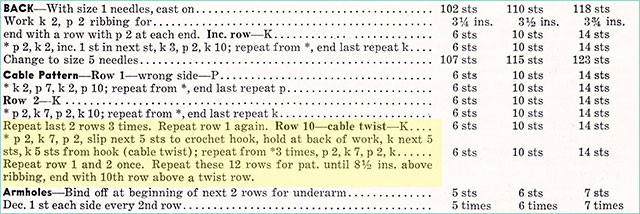
Just read between where the pattern starts and the armholes. Nothing! No mention of increases or changing stitch count. That means that 107 sts is the full number worked to the bust for the back piece.
Once I know the number for the back (107 sts), I figure it out for the front in the same way. In this case it’s easy, as the front is exactly the same from the bottom all the way up beyond the armhole bind off.

So it’s 107 stitches for the back at the bustline, and 107 stitches for the front at the bustline.
It’s worth noting that some patterns are much longer (modern and vintage alike), so you might have to read through a few columns (or even pages) of pattern to get to how many stitches are at the bust. Fortunately many modern patterns will actually tell you the number of stitches in a given row when stitch counts change (such as with increases or decreases), but sometimes you’ll find that vintage patterns do this, too. (Yay!)
Figuring out the finished size at the bust using the stitch count & gauge
Once I know how many stitches are on the needles at the bustline (107 for the front and 107 for the back in this case), and I know the pattern gauge (6.33 spi), I can figure out how big the sweater will actually be at the bust after blocking.
Here’s how I do it. It’s super easy and one of the most important pieces of knitting math I ever do!
Add up the number of stitches at the bustline for the front and back.
107 + 107 = 214 stitches total at the bustline
So we have 214 stitches at the bust. Divide that by the stitch gauge.
214 ÷ 6.33 = 33.8
And voila.That’s the number of inches the finished sweater will be at the bust. 33.8 inches.
The pattern told us that the size 14 would be 34″ at the bust. 33.8″ is practically right on the nose, so the pattern was correct! Okay, technically you’ll lose 4 stitches from seaming up the sides (one stitch for the front and one for the back at each side seam), but you get the idea. It’s pretty damn close.
What does that mean for you? If you were planning to knit this sweater, you’d then have the confidence going in to know what size the finished sweater will be (assuming you get gauge). Want a 34 inch sweater? Knitting it at the same gauge as the pattern? Then knit the size 14.
Why is it important to figure that all out?
This calculation can mean a big difference in your final project! I do it whether or not my pattern tells me what size I should expect the finished sweater to be. I can’t drive it home enough: I want to know what actual size my sweater is expected to be.
Besides, if I’m planning to make any changes (and you know I am, because that’s why we’re here!), I’ll have to know the stitch count at the bustline anyway!
Caveat emptor
I’m not going to pretend that this is all a perfect way to know with 100% certainty what the finished size of a garment will be if you get gauge. Because it isn’t!
Yes, it’s important to do this calculation to get a really good idea of what the expected finished size of a garment will be. But some stitch patterns are super stretchy, and some aren’t. Sometimes a particular yarn will behave a little different in the final garment than it does in a swatch. And gauge can vary a little, even within a project. (Knitting during a scary movie? Or did you put the project down for 6 months? Maybe part of the project is knit flat and part in the round? You get the idea.)
There’s no way to be absolute certain that even if you get gauge when you swatch, that your finished garment will be exactly the same size as what you expected it to be when you did the math. But you can at least be a lot more confident in your results if you know what you’re expecting.
Next time
Next time, I’ll start to get into the math of the pattern. I’ll show you how I figure out how to change the pattern for the weight of yarn I’m using, and I’ll give you a few ideas in case you do want to make bigger alterations. Not a 34-38″ bust? Want to use a lighter or heavier weight yarn? You’ll see how I would get started with changes like that.
I’m so excited you’re doing this series as I’m choosing my first sweater to knit. You articulate the math of pattern play really well, I’m confident this will be a resource for many for years to come!
Thanks Laura, I appreciate it! 🙂
The next post is the one I’m really waiting for…. curious how you alter the design/sweater when there’s stitch pattern involved.
I’m splitting it into two parts, so of what I know of your knitting skills, it’s probably the 2nd post you’ll be interested in. 😉
This series is so cool. I’m thinking you should publish this info. You make it very easy to follow even for a beginner like me. 😉
I am DRINKING in this series! Thanks so much for taking the time to explain everything so thoroughly!
This is so useful – thank you! Now I was wondering if you may know a trick of figuring out the gauge for a pattern that doesn’t tell you what the intended gauge is supposed to be? I have a few vintage patterns in my stash that I’d like to try but finding a suitable yarn for it when you’ve no idea of tension is like knitting on the dark..
Well, that’s a good question, and there’s really no way of knowing what the intended gauge was unless it’s stated (which is terrible of them not to do, lol!). What you could do is work backwards, however–figure out how many stitches are at the fullest part of the bust like I discussed in this post, and then compare it to the final dimensions given. Of course, if they say the pattern “fits a 34″ bust” that doesn’t actually mean it’s meant to be exactly 34″, so there might be some level of ease you don’t know about there, but you can hopefully get an idea from the fit on the model (if it’s baggy, or fitted, etc). Not perfect, but it’s at least it’s somewhat of a starting point. 🙂
Thanks for getting back to me Tasha, I thought that might be the only way. It should be illegal not to mention gauge in knitting patterns 😉
Dear Tasha, Thanks for your amazing pullover cable pattern. I however has problem to knit 38 size. When i come to cabling i end having 5 cables and not four. Where do i go wrong?