
Hello! I’m back from a relaxing vacation in the Southwest, where it was so relaxing, in fact, that we spent more time enjoying ourselves than bothering to take photos! But I may be able to cobble together a post from phone photos, so possibly stay tuned for that in the future.
Now I’m continuing my basement makeover posts! When last I left things, you got to see the planning and build-out phases. And today *drumroll please* I’m showing off my cutting table. Yep, it’s getting a whole post of its very own!
In my plan for my sewing and craft area, the biggest goal was a massive cutting table with a cutting mat over the entire surface, so I could cut large pattern pieces without having to move around two little small cutting mats on the floor and make myself nuts. Which is how I’d been doing things previously. Definitely bonkers-making, and because I thankfully had the space to improve that in a big way (and a lot of time to think about how), I did!
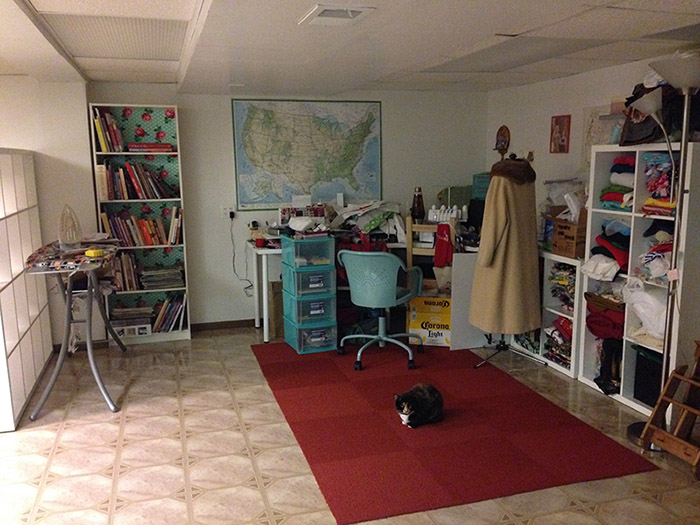
As a reminder (while this space was still in transition), here’s where the table was going below. Freestanding, right in the middle of my part of the basement, so I could walk around it on all sides.
 Hi, Dinah!
I wanted my cutting table to have storage underneath, a very large work surface, and to be a good height to stand at. For reference I’m about 5’2″, so counter height (typically 36″) is too tall for me, whereas I’d been using table height (typically about 30″, although mine was 29″), which was a bit too much to bend over for any length of time. Somewhere in the middle would be ideal, if possible. And I wanted as much work surface as I could fit. I fortunately had a large open space, and my goal was to be able to fit a typical mid-weight cotton (about 45″) without it hanging off the sides. Most surface tops aren’t that wide, so I had to get creative.
I saw lots of examples of DIY cutting tables on blogs and Pinterest (feel free to ooh and ahhh at many of them on my Pinterest board), which helped me realize what I liked and what I wanted to do a bit different. Many featured storage cubes or short bookcases underneath in various configurations, with a large table top, butcher block, or hollow core door as the work surface. That’s essentially what I decided I wanted to do: big table top, and storage cubes to house my fabric. And I came up with a different configuration of cubes underneath than I’d seen, which I felt maximized storage as well as providing two comfortable places to stand, one on either long side.
While I planned all the little details of the table, I had to still decide between different orientations, so I left that until the end when we were assembling the base. I had to work around a structural pole, and just basically decide what I liked best! So of course, this being an area where I’m anal-retentive, I moved everything around during my lunch break about 4 times until I was satisfied with the configuration!
The orientation below didn’t win, but I’m including it so you can see the base of the table and how I shaped it as two Ls going in opposite directions. There’s a big place to stand on both sides, and you can see there are open cubes below. The half of each L is an IKEA Kallax four-cube unit, so four cubes each, totaling 16 cubes. More than I figured I’d need for fabric (I was right), but I liked the room to grow.
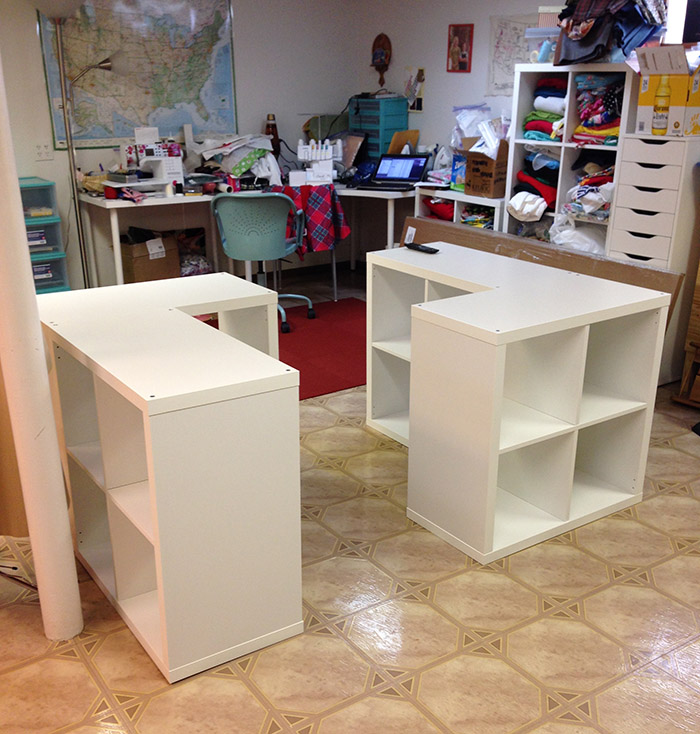
Below is what that non-winning orientation looked like standing in my sewing area, and with the table tops sitting on top. It was nice, but I didn’t like the placement of the structural pole. This also put the table further away from my ironing board and sewing machines, and I liked the idea of it being a bit closer. Plus you can’t tell, but the left side in the photo below was awfully close to the table on the wall to the left (that you can’t see).
 More Poirot 😉
This next configuration below was the rough location I decided I liked, but I wanted the cubes oriented in the opposite way. I know, I’m picky, right! But hey, this is important!
The reason I didn’t like it is that the cubes in the far right corner of the photo were where I wanted to put my rolling cart (that corner is close to the end of my ironing board, so great for easy access from both locations). So I flipped it all around so that it was a back side of a cube there instead of an open one. Meaning the rolling cart wouldn’t sit in front of cubes of fabric, but against a blank spot.
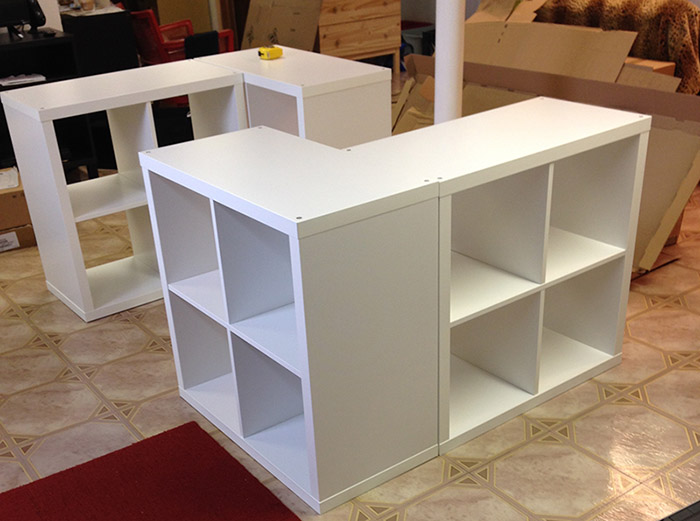
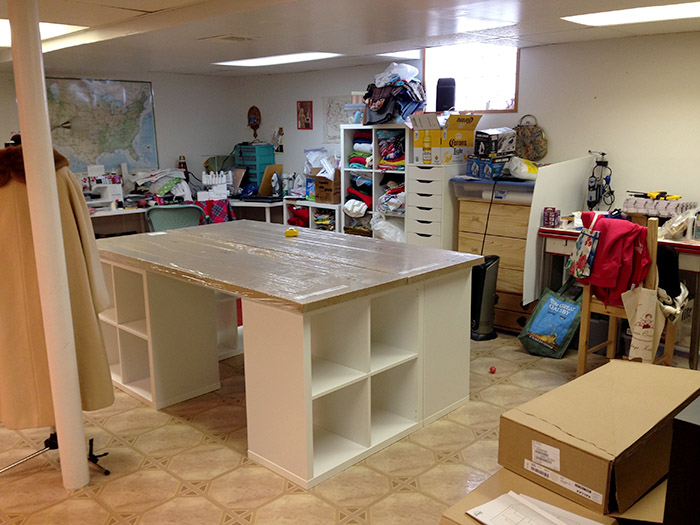
So the configuration below was the winner! And the whole thing was moved away from the structural pole, so it also gave me a place to put my dress form (wearing a vintage coat currently), right by the pole, still with a little room to stand in front of it at the table if I wanted to! And of course, easy enough to move the dress form if need be.
Below you can see it with more of my space—and mess to organize—behind it. The vintage dinette table at the far right of the photo (piled with crap on it and on the chair obscuring it) (what isn’t piled with crap in this photo actually) is the table for my messy projects like resin jewelry making. It’s the table that was too close to the edge of the cutting table in the first configuration I tried. And the naked wood dresser directly to the left of it was the one in which I formerly stored my craft supplies, and now will house some of my sewing patterns. I plan to paint it at some point this summer or fall to spruce it up, probably red.
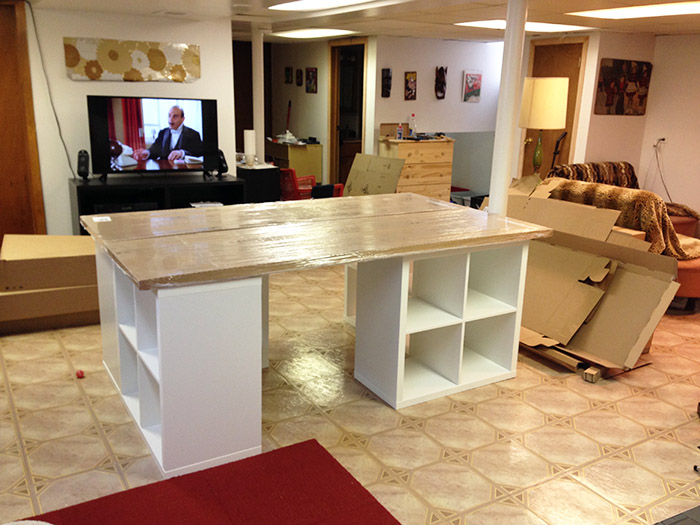
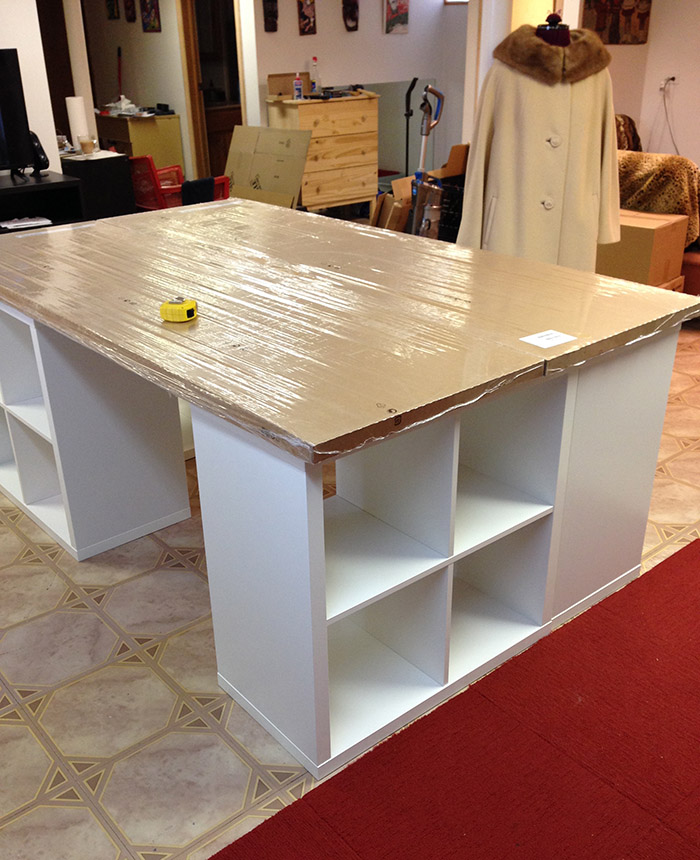
But, back to the cutting table! Wee hee, look at this big beast!
The surface of the table is two white IKEA Linnmon table tops attached together (still with their wrappers on in the above photos). The four Kallax cubes under it are 30 3/8″ tall, and the table tops are about 1 1/2″ deep, so that puts the surface of the table at just under 32″, which is a perfect height to stand at for me. (If you were taller, you’d probably want to raise the units somehow.) It’s between table height and counter height, and a very comfortable height to stand at (again, for me). This is one of the reasons I went with the Kallax units under it, because I knew they’d make a perfect height table!
The total work surface is 78.75″ x 47.25″… or roughly a bit over 2 yards long by a bit over 1.25 yards wide. (Goal to fit 45″ cotton without hanging down the sides achieved!) The cube units aren’t attached to each other; they’re plenty sturdy and not going anywhere. The table tops are screwed to each other underneath with mending plates. (The tops are mostly hollow, so moving the tops into place was a total bitch and I should have just screwed them together while sitting under the table, but whatever, it’s done and works.) Eventually I need to do the final touches and attach the top to the cubes, but keep forgetting!
I would have gotten about 6″ more work surface on the short side and 2″ on the long side if I’d used two unbored hollow core doors (meaning no door knob hole pre-drilled) from a store like Home Depot, but our car isn’t big enough to fit them, and we were already paying for an IKEA delivery, so it made the most sense to just go with the IKEA tops even though they were a little pricier. If actually getting them home wasn’t a concern, hollow core doors would be the way to go, especially if you wanted to paint or stain the surface.
I could also have opted to use only two units underneath (one parallel to each short end) to give myself a much wider lip on all sides (making it a bit easier to stand at any given spot), but decided I’d prefer to maximize the storage space. It’s not too difficult to stand at the edges where the lip is short, and if I really need to lean far over the table (which now I caaaaan!), I stand where it’s open on either side. Eventually I probably plan to hang a couple of rails on the flat sides of the cubes units for things like scissors and rulers, but want to live with this awhile to see what I decide.
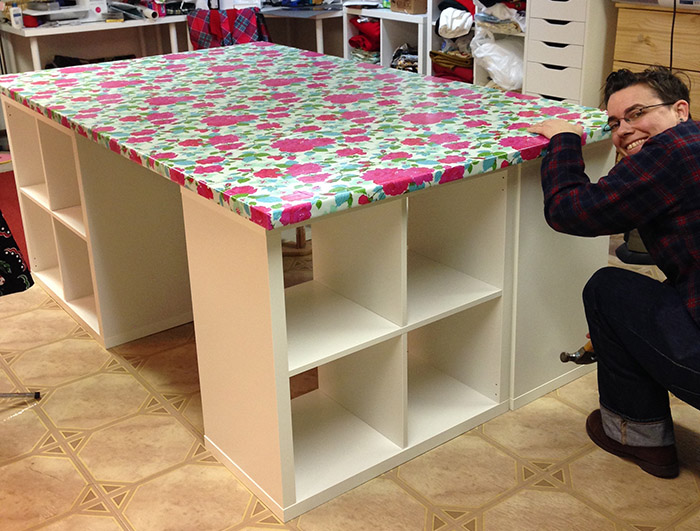
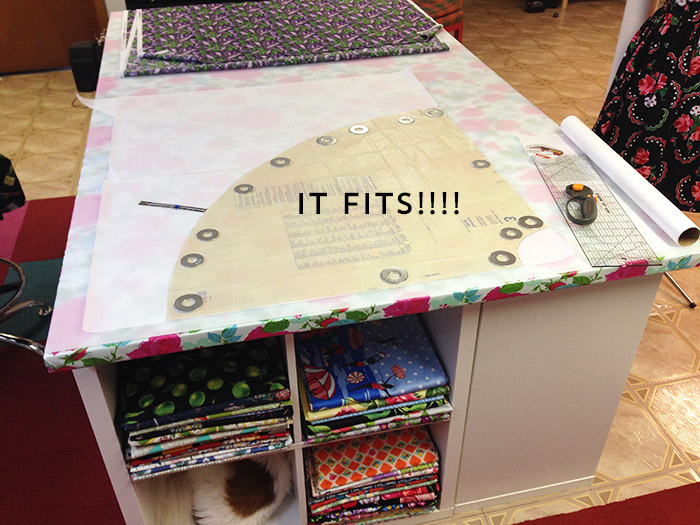
Then to kick the table up a notch, we covered the surface with a brightly colored laminated cotton fabric by Jennifer Paganelli (just stretching it over the top and stapling it underneath), because the final step was to cover it all with a self-healing cutting mat that was mostly opaque, but just translucent enough to show some of the pattern. This is what it looked like with just the fabric on top:
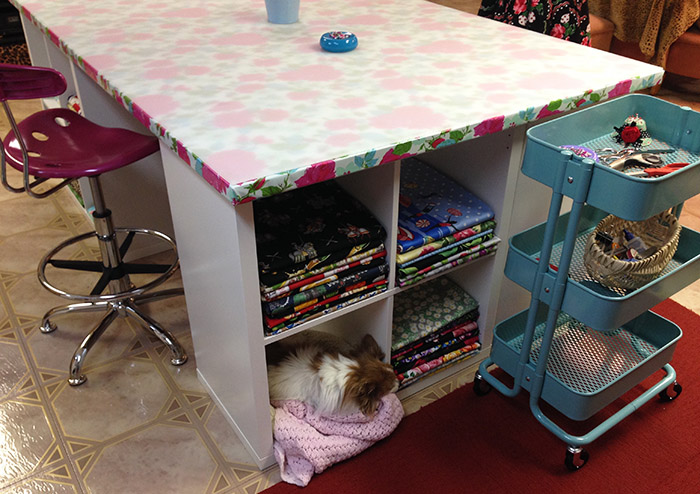
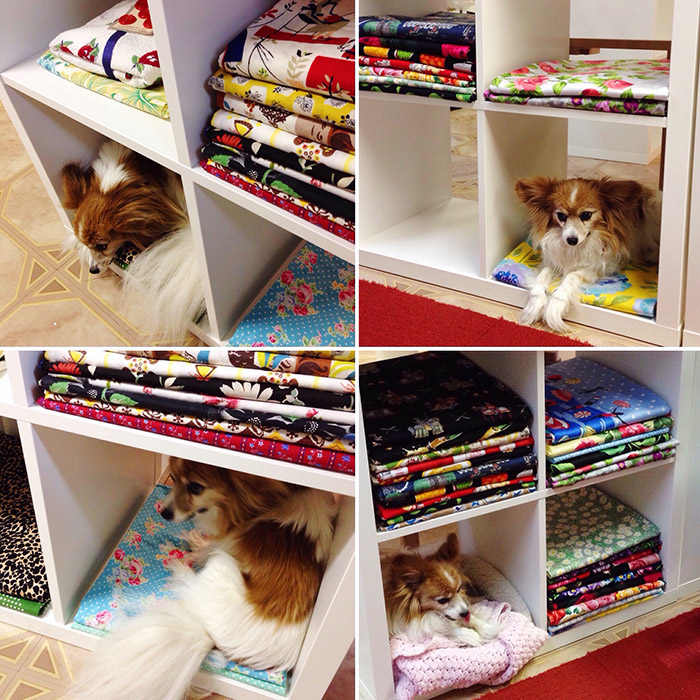
Here’s what it looks like with the cutting mat on top! And Pia in the little “apartment” I made her underneath. 😉 And you can see that the cubes under my cutting table are where I’m now storing my fabric! And the IKEA aqua Raskog rolling cart (I’ve wanted one since I first saw it a few years ago!!). It’s in the perfect place to roll around out of the way, or to grab quick supplies from either my ironing board or the table. (That’s $30 of the cutest and most useful storage ever.)
I have to be 100% honest here—this is a Rhino brand cutting mat, and it’s advertised as self-healing (you can buy them from several sites online, I got mine from Speedpress as they do free custom cuts right to the size of your table which is awesome). I do not think it’s nearly as good as the two old beat up Fiskars mats I was using before. It’s mostly self-healing, but I’ve already cut some veeery shallow lines into it using a rotary cutter (just a few where I must have been pressing hard to get through thick layers), and I find the surface less forgiving (interfacing, which is already annoying to cut, likes to cling to the cut lines and not cut as cleanly as I’d like). So it’ll probably also mean I need to change my rotary cutter blades more often. That’s all been a bit of a disappointment, especially as including shipping the mat was just under $150, so it wasn’t cheap. (I’m assuming it’s better for cutting paper and not fabric, which is presumably its real purpose. Also if you cut fabric with shears and not a rotary cutter, this would be a total non-issue for you!)
While I’m really happy to have it and absolutely thrilled it’s not big and ugly and instead shows my lovely fabric underneath, and it’s mostly performed well, I wouldn’t say it’s perfect. But its good points outweigh the bad point, for sure! Plus, it’s technically a reversible surface so if years down the road I felt I needed to, I could flip it over (that side is shiny and apparently people typically prefer the matte side, but both are the same material and can be cut on). It’s also just laid on top of the table and tacked in the corners with clear museum wax, so if I ever had to change it down the road I certainly could do so easily.
That aside, obviously, I’m pretty deliriously happy with this table and the aesthetic of the entire thing is just what I wanted. When I was able to lay out a circle skirt pattern piece on it to trace, with the full yardage I was planning to use on the opposite end, I nearly wept big alligator tears of happiness. And I will not pretend like I haven’t laid my head and arms down on this table several times to give it a hug!
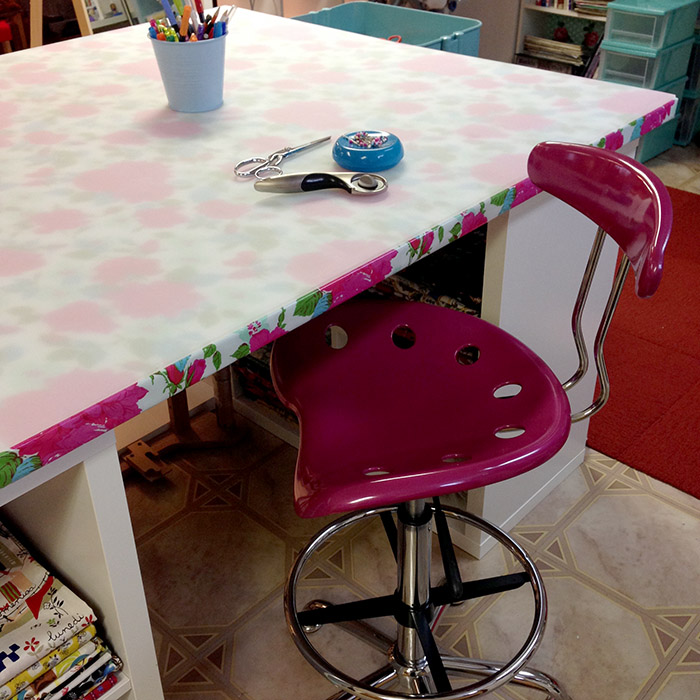
I even got it a stool to match! This is a drafting chair from Wayfair and there was a mix up with the color they sent me, which was supposed to be a lighter pink. But I actually decided to keep this one, as the more magenta shade matched the flowers in the table better, anyway. I’m so happy we wrapped the table with the fabric instead of cutting it to the size of the surface (which was my first idea), so you can see the pretty pattern along the edges and it just ties it all together.
So I guess I was slightly wrong in my last post saying my space didn’t have any personal touches from the get go, as I definitely built some into the plan from the start. But I can’t wait to decorate this space and really make it mine!
I’ll leave you with some hilarious photos of Pia, who has basically tested out every bottom cube that I’ve put fabric in under the table, including on a stack of jersey just after she’d had a bath (no joke!). But she typically now sits in the cube where I put a bed just for her, after seeing her love of these little hidey holes!
Oh, and you can also see my tidy fabric. I made a piece of cardboard 1″ narrower and shorter than each cube, and I use it to carefully fold all my fabric now. A far cry from the heaps of it before. Even dressmaking amounts of fabric fold up quite small, which is fantastic and makes me feel like I don’t have much of a stash at all, hee hee.
Well there you have the story of my new pride and joy! Soon I’ll share some “soft reveal” photos of how everything looks now in our spaces… but have to get on the stick and take some photos first!
Well done! I was lucky enough to find a free giveaway 1960s desk that has ample space for cutting. That rolling cart is going on my wish list!
Sounds lovely! Yes, I am so happy about that little cart. I have to figure out how I want to organize things in it, but I’m already loving it!
Oooh *swoon*. Your table is lovely – I love your idea of laminating the table tops. It really give it a “Tasha touch” to the space. 😀
Btw, Pia is so cute.
Thanks, Liz! I’m sooo glad I thought of covering the table with fabric, it really was a pretty inexpensive way to give it a lot of pizzazz! 😀
There is an Olfa mat that is about 37 by 72 ish that comes in 3 parts..
Yeah that mat basically fit none of the requirements I wanted. 🙂
What a great post! Your table looks amazing. I’m also 5’2, and was daydreaming about how to get a counter/work surface to be the right height. Knowing I can get it out of Ikea stuff is super duper inspiring!
Thanks! It’s really hard to figure out a good working height! I knew counter height would be too tall, but until I worked at a table height for 4 years I didn’t realize that would seem a bit low. So those Kallax units really are great for a shortie like me! 🙂
Wow! I was so curious as to how you had made it, and this is just fabulous! I love the fact that you wrapped the top with fabric to make it a bit prettier too. 🙂 This is giving me all sorts of ideas for my craft room now. . .
The Artyologist
Yay and thank you, happy to spread the inspiration!
Your cutting table looks great, and Pia looks looks very pleased with her little cubby. 😀
Thanks, Michelle! Yeah she is pretty pleased that she’s more special than having another stack of fabric there, ha ha! 😉
I have the opposite problem as you. I’m 5’11” and I have severe arthritis in my spine. I sadly put my sewing machine away because I can no longer cut fabric because my table is too low and I can’t bend over it to cut. But now I can! I have a very handy son who can fashion me something similar to what you have in your sewing area. Thanks for giving me hope.
Definitely sounds like a great reason to have something custom made to make things easier for you so you can still sew, good luck!
oh I dream of having the space to do something like this! Love the chair you have at your sewing desk. I have an ikea one and it gets threads stuck in the wheels! I got an imitation raskog from Aldi this year and it’s so handy ;o)
Thanks! And my chair at my sewing table is now a rolling one (also from IKEA), and I’ve had that issue since there’s usually more thread over there than by my cutting table. I *try* to remember to vacuum and pick up loose threads as much as possible!
Love love your cutting table, and all the creativity employed to get just exactly what you wanted! Kinda polishes off that wonderful space. Planning does pay off!
Thanks, Cherie! You’re right, planning does pay off. While I deliberated solidly for a couple of weeks about the whole space, I’d kind of envisioned my cutting table long before, so it was a wonderful feeling seeing it come to fruition. 🙂
In my own Makey-Space Improvement Project, I’ve invested heavily in Ikea myself. I see you’ve also got the aqua Raskog rolling chair, which is on my next Ikea list (we are having to do our project very piecemeal, according to the influx of paychecks). I loved the aqua Raskog cart so dearly I went back the next day and got a second one. One is full of sewing things by the cutting table, the other is full of desk-type things near the Hemnes secretary. I probably need a third, for bathroom things. My sister uses hers as a bar cart! And just yesterday I realized that I have an excuse to get two more, as bedside “tables”…
I saw so many creative uses of that adorable little Raskog cart! Mel got one too, a gray one, and is using it to store a ton of paints, pens and markers. I haven’t quite figured out how I want to organize things in mine or what exactly needs to live in it yet, but I love it!
ORGANIZE ALL THE THINGS
When you began telling us your heigh I immediately thought about Ikea! I’m 4’11 and my table is adjustable from that marvelous store! I also have the cart, is fantastic! I love your table, well planned!
Thank you! And I love that some of their table legs are adjustable! So smart, us humans aren’t the same, after all!
I have serious sewing room envy! This is so lush and perfect!
And Pia’s apartment is the piece de resistance 🙂
Thank you so much for sharing all of your makeover project, I especially appreciate the “in between” photos. I’m also going through a bit of a re-organize, and having your experience and advice is more helpful than you know! Love all the changes you’re making. Especially love Poirot on the telly – I’d have have something similar on too!
Your project is absolutely inspirational! Thanks for sharing the juicy details!
Where did the cat go? No cubby for him too?
Great table, and all the accessories too. It’s wonderful that you could really plan out all your measurements.
Ha ha! She doesn’t like the cubbies for some reason, although we have her a bed of her own in the similar IKEA unit we’re using to store records. 😉
Thank you soooooo much for sharing this build! You two are wonderful! I shared you all over the makeitwithme.ca blog. Here’s the link http://makeitwithme-kell.blogspot.ca/2016/08/a-sewing-room.html Thanks again. and keep being awesome! We love you! <3
I’m so happy to have helped inspire your space, it looks awesome!! 🙂
Awesome project! Does the line in the middle where the 2 table-tops are connected give you any trouble…?
Thanks! Nope it doesn’t at all, in part due to the fabric I stretched over it, but mainly due to the cutting mat. You can’t even tell that it’s two tops together! The mat is a good 1/4″ thick and heavy, so it’s all flat as a pancake.
Awesome – thank you! I’m going to try making one of these for my wife. If it turns out half as nice as yours I’ll be happy…
I love Poirot in the back! 😀
hi there,
just wondering if you have ever had problem using 2 table tops next to each other? it is just so hard finding a singular table top with a good width! thanks in advance!
Nope! Because of the way I covered it with oilcloth and then a cutting mat, you can’t even tell it’s two table tops. I’ve used it for a year with no issues.
How is the cutting mat holding up?
Same impressions as I described in this post… it’s fine and in no danger of needing to be replaced and it gets used very often, but I really wish it were more ACTUALLY self-healing.
Tasha
I have been going back and forth trying to figure out the correct table for me. I am a man that sews and I am 6’2 and most table to not accommodate my height. What would you suggest for a man of my height to build a table
I would recommend that you go to Lowe’s or somewhere they sell second hand bottom cabinets and paint then if you need. Put a wood top on iy then you can put some clear cot on top. You can buy some nice cabinets at a warehouse.
Have you thought of painting peg board and adding to the outer flat sides (non-cube storage) for hanging rulers, scissors…etc….
Can this be used as a sewing table as well? I only have space for one piece for sewing and cutting.
I love your blog posts and refer to often! My hubby & I are planning a new shed out in the yard to store trailers & vehicles below & a sewing room above for me yoo hoo! Back to your blog again for inspirations – table post just the job, all the space, storage, seating just everything! Many thanks for the time & energy it took to put all this info out there on the web. It is very much appreciated.
Wow nice. Mind me asking how much it cost in total?
Checking in nearly 8 years later, how has this held up for you? Is there anything you would do differently?
I’m about it build my own cutting table and would love to know!
Thanks!
It’s been great! I don’t really think I’d change a thing even if I started all over again. It’s held up well and in fact you can see it in use in the majority of my YouTube videos now. 🙂 https://www.youtube.com/@tashacouldmakethat
I love it! My husband is getting ready to make me one. I too am only 5ft 2 so I really like your post. Been looking at different ones for some times.
Thank you for this tutorial. Just made my own with 2 LAGKAPTAN table tops and the KALLAX units as you used. I found some 3″ risers that make it a total of 35″, which is perfect standing height for me. This was a great inspiration and I’m thrilled with my table!
Hi, thanks so much for sharing this — it’s been super helpful!
I’m considering the Rhino Self-Healing Mat you mentioned for rotary cutting and garment making. How’s it holding up? Would you recommend it over mats like Olfa or Martelli, and is the quality comparable?
I’m mainly drawn to the larger size (over 60″), but I’ve seen mixed reviews on whether it’s truly self-healing. It sounds like it wasn’t quite what you expected either — would you say it’s more like the Sullivan mats from Joann’s?
Also, just wanted to say — your garments are some of the best-fitting and most well-crafted I’ve seen on YouTube. Really inspiring work!
Thanks again!