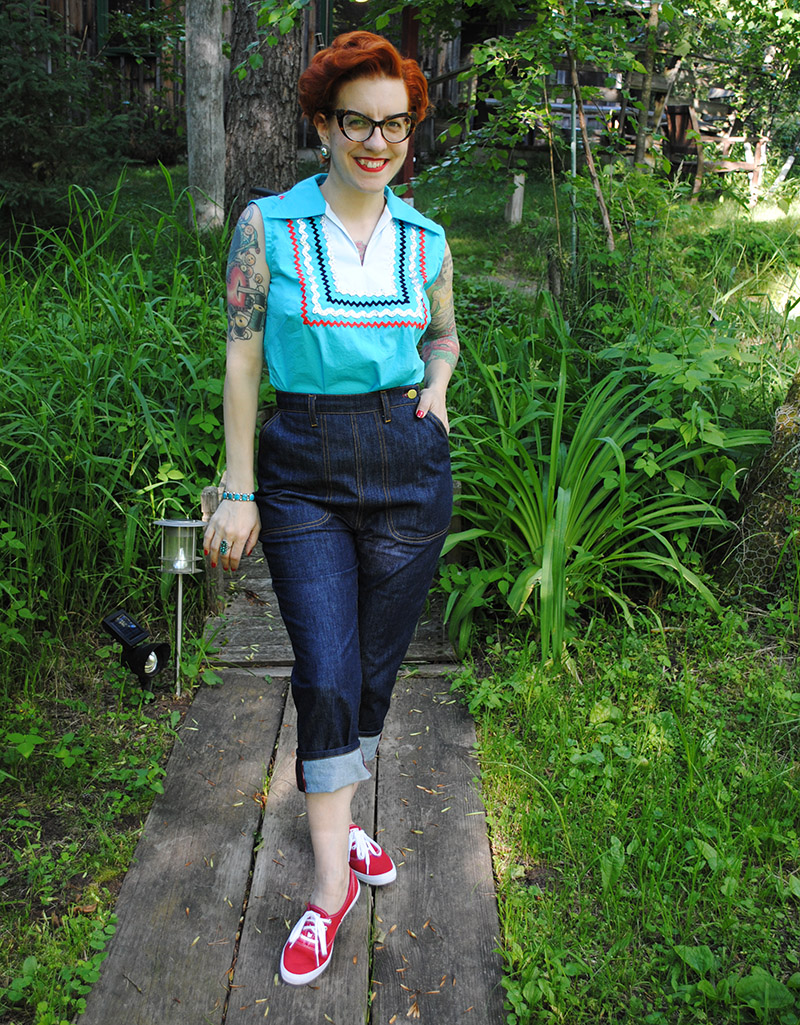
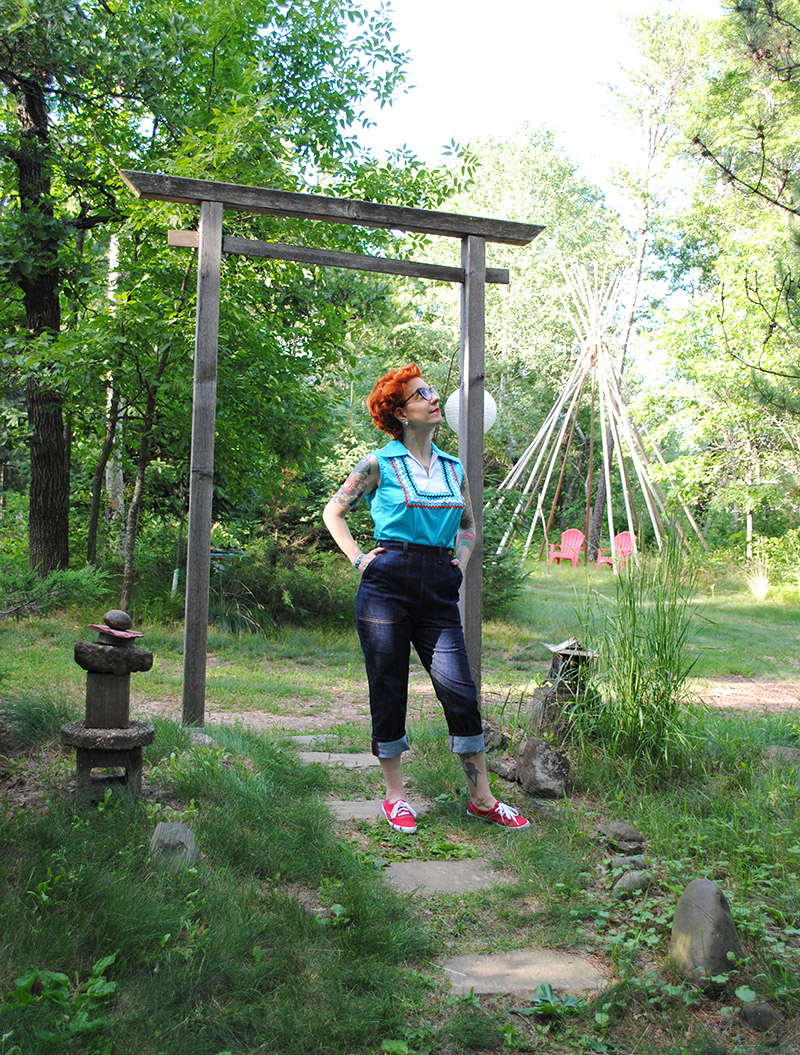
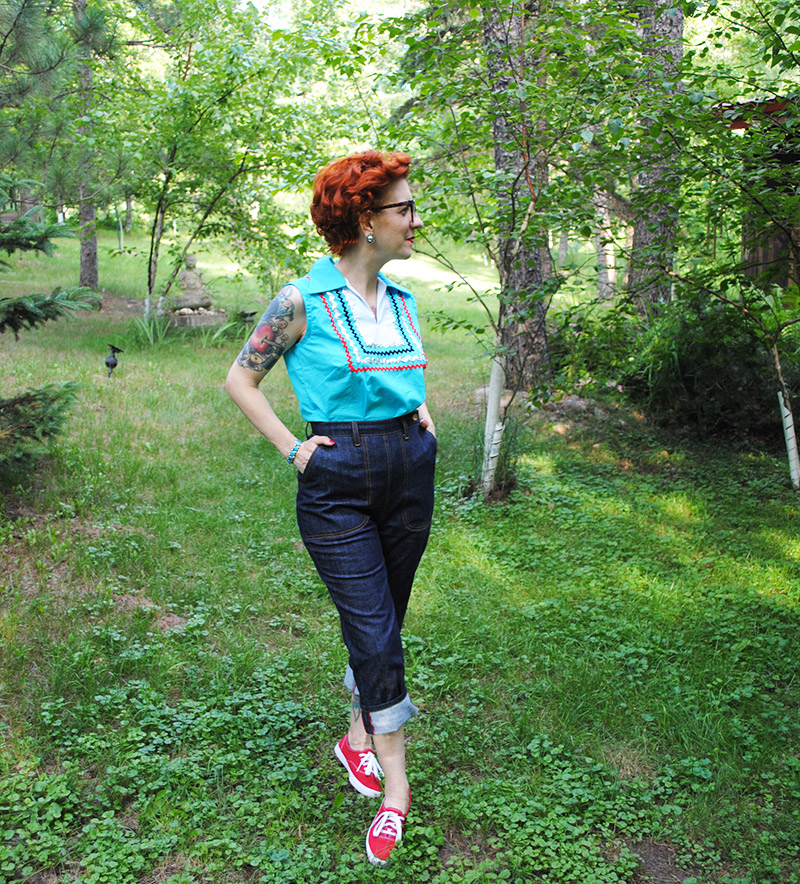
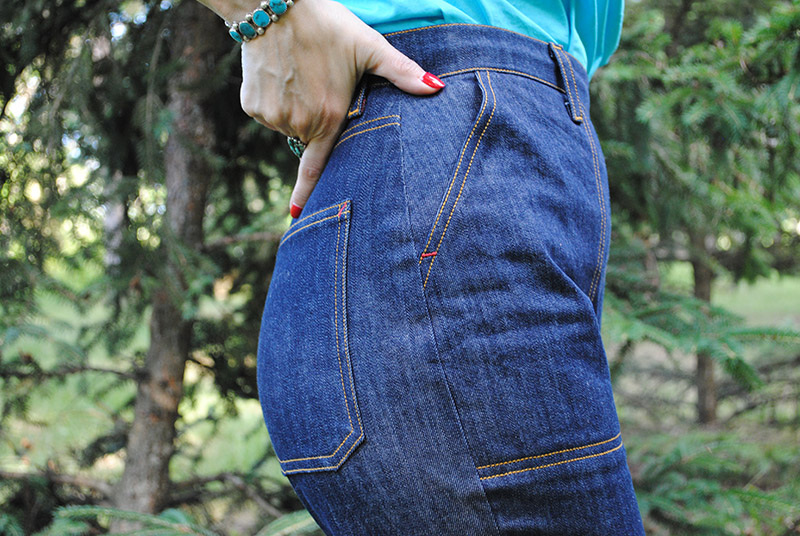
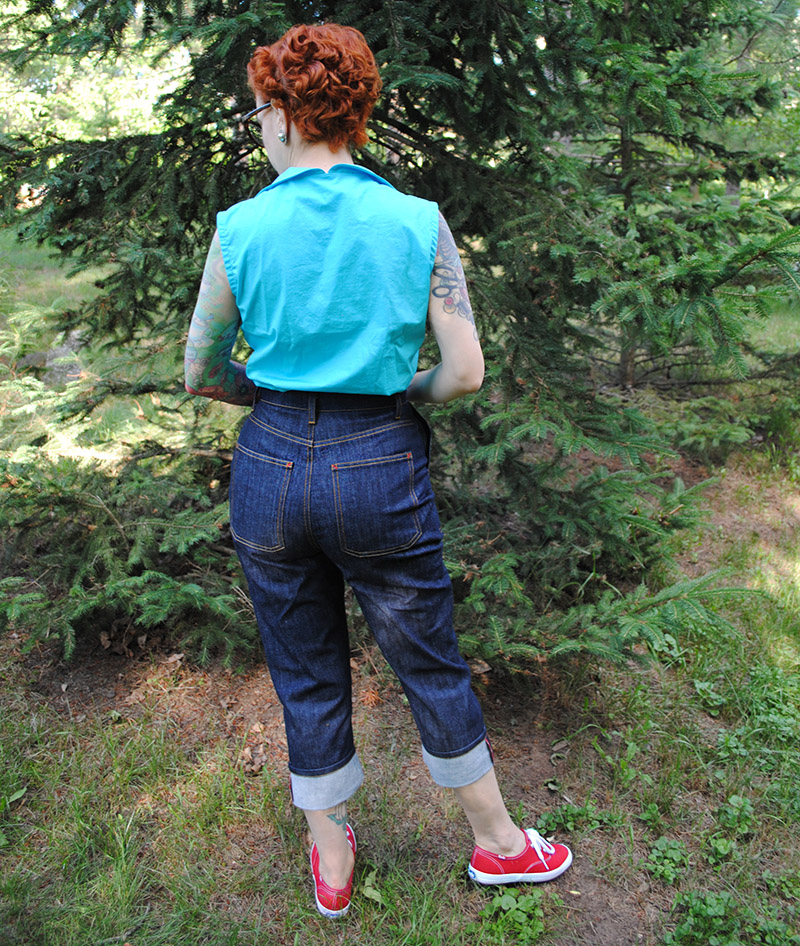
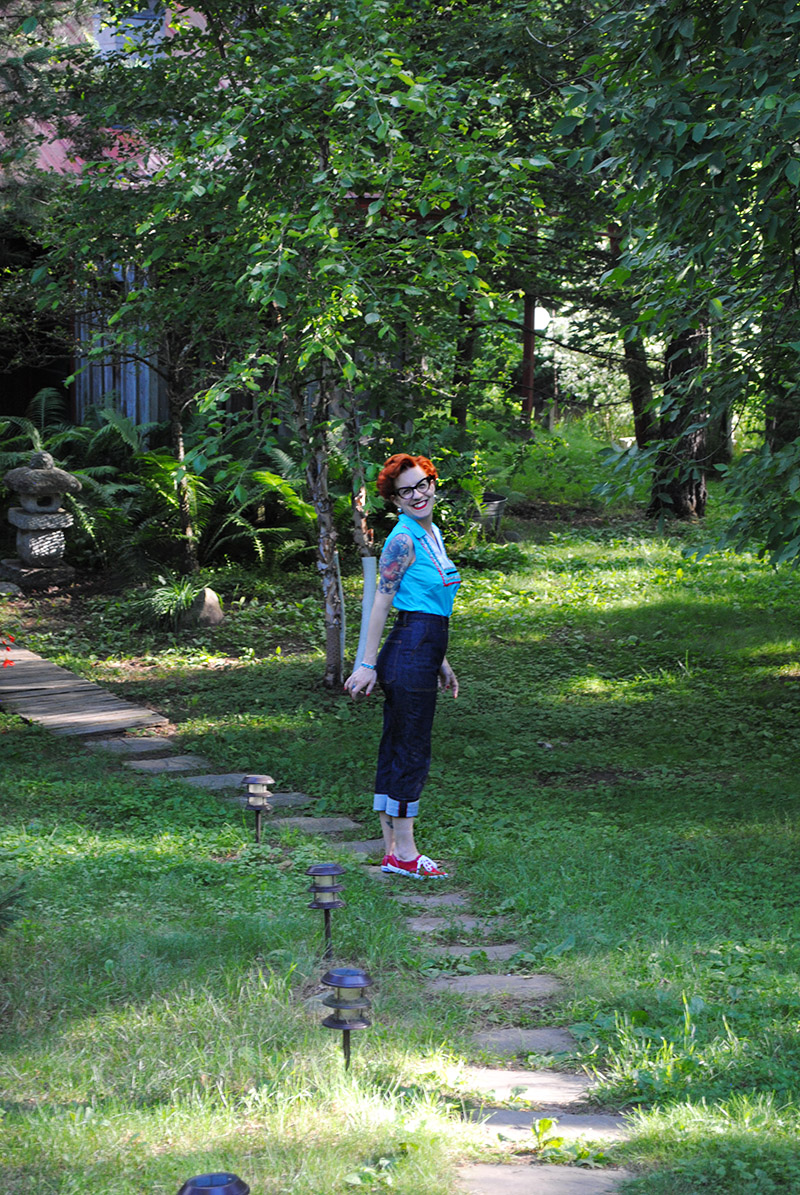
Ooh friends, I’ve made something I’m soooo happy with. 1950s-inspired jeans, in a pedal pushers length for summer!
We took photos of them at an Air BNB cabin we stayed in up north in Wisconsin earlier in the month, near the Minnesota border. Pretty there, right??
I’ll hopefully put together photos from our mini vacation soon. I kind of have a lot of things to blog about suddenly and not enough time. (The blouse I’m wearing is another thing to blog about soon too!)
Anyway, these jeans are something that’s been on my sewing to-do list for like, ever. Eeeever. Over the last couple of years I’ve sewn lots of jeans. But they’ve all been a vintage take on modern skinny jeans. Fly front, very fitted leg, the whole shebang. Of course, I’ve done multiple takes on it (favorites are still my Western-inspired Ginger jeans).
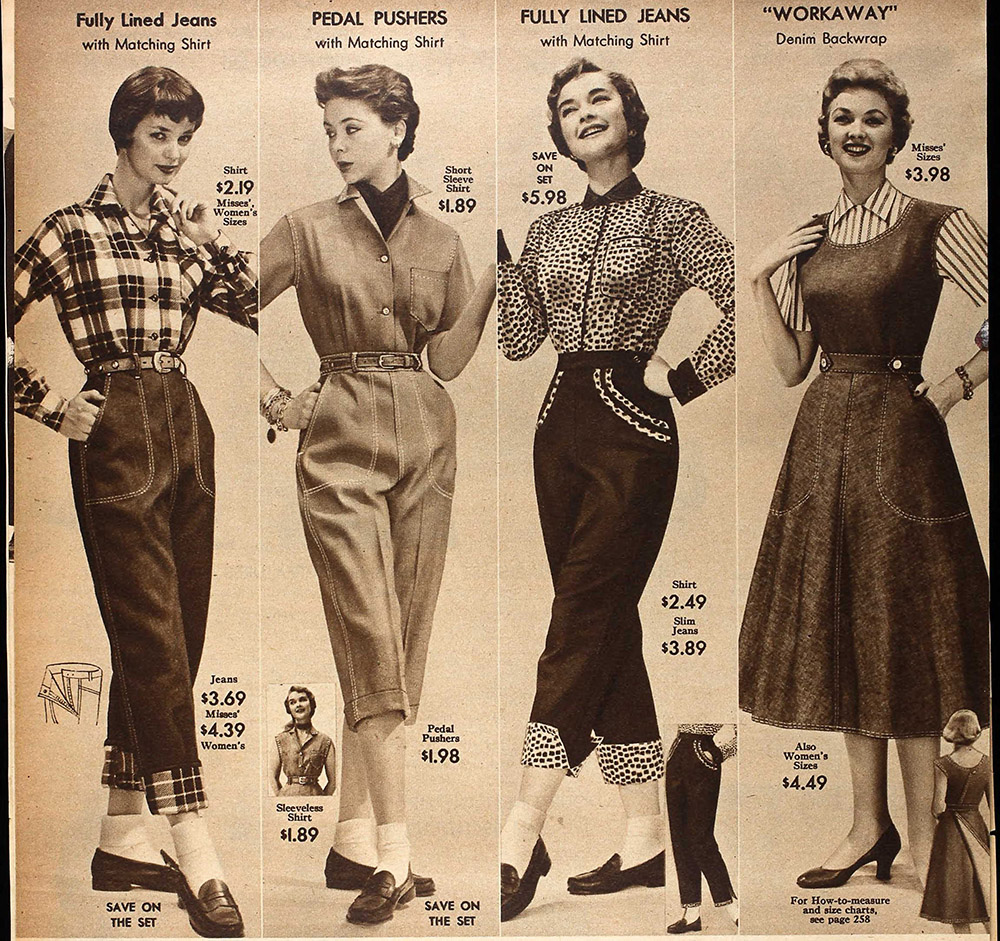
But in the 1940s and 1950s, there were a lot of women’s jeans (and casual sportswear trousers) that had a different but recognizable style. Large slash front pockets with topstitching often outlining them, button closure at the left side, sometimes a back yoke, and back pockets of various shapes. The closure was usually a hidden zipper or button placket in the left front pocket, or a lapped zipper on the left side that went right through the bottom of the pocket edge.
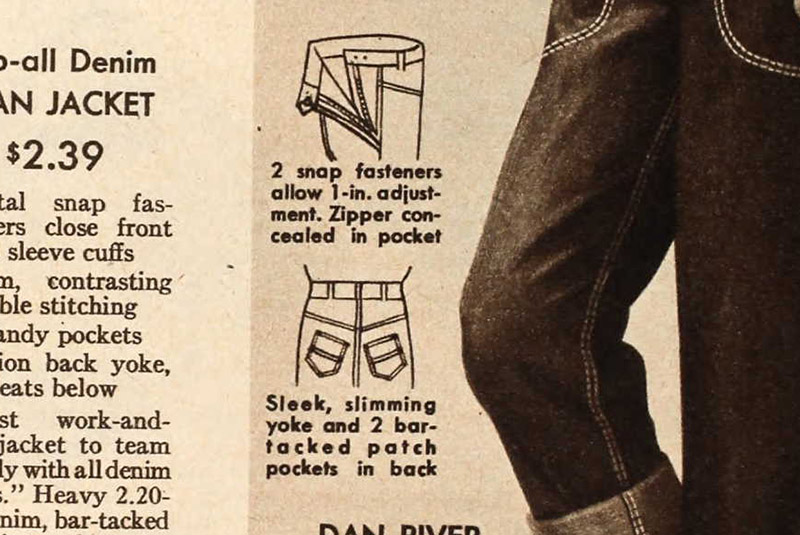
Take a look at a couple of pages from the 1954 Sears catalog, and you’ll see examples of what I mean. (Also, can I please have everything on these pages?! Thanks.)
 Source: Ancestry.com
 Source: Ancestry.com
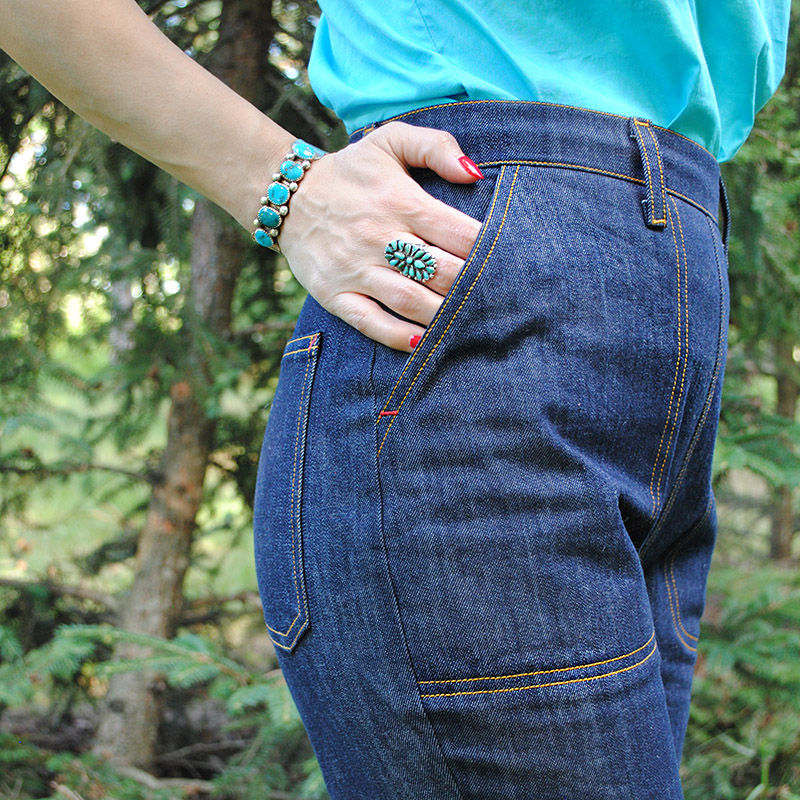
In fact… have a closer inspection of that first page. You’ll see drawings of exactly what I was trying to accomplish! Hidden zipper in the front slash pocket (though I went with only 1 button closure, not 2), a back yoke and pockets attached with bar tacks.
Compare that drawing above to my own pedal pusher jeans… makes me so giddy. I nailed that zipper!
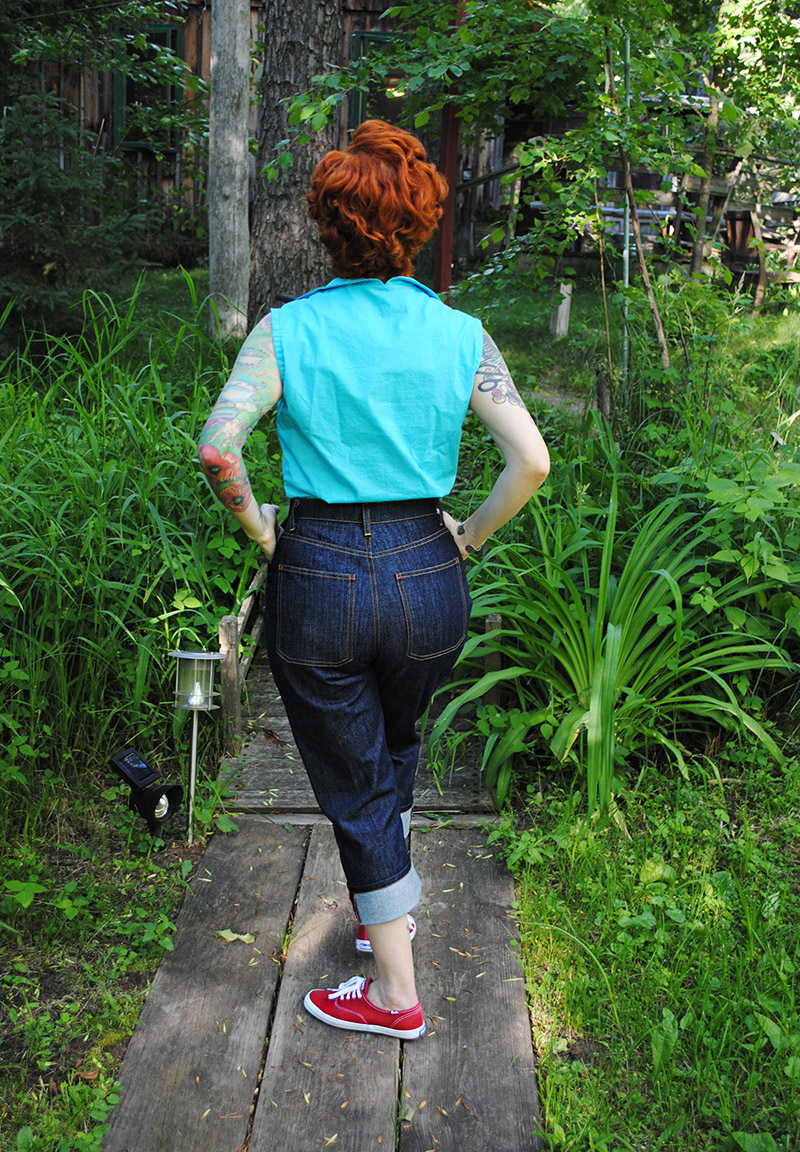
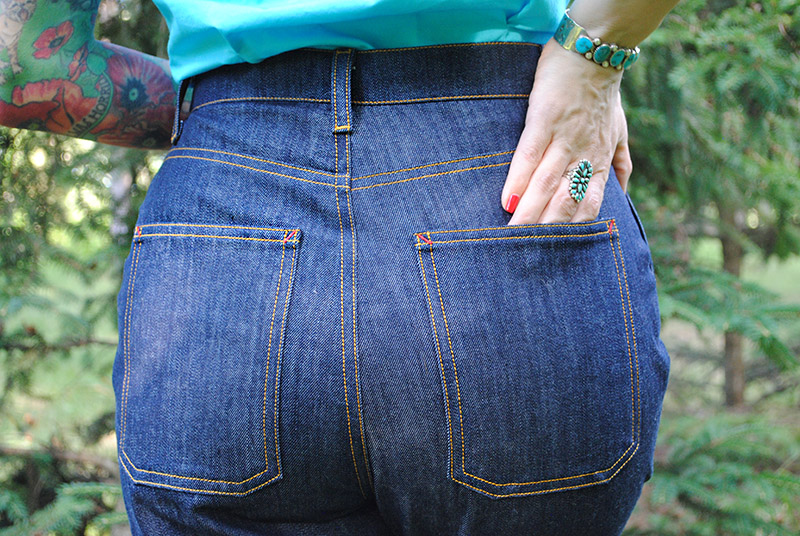
And here are my my big ol’ back pockets. I actually made sure my iPhone would fit inside without peeking out, ha ha! I’d used this pocket shape on a pair of shorts last summer (I think I got the idea from a pair of my Freddies of Pinewoods), and wanted something different than a traditional jeans pocket, which I’ve done so much over the last couple of years. I couldn’t decide on embroidery, so I left them plain.
Speaking of which, if you’re familiar with the repro brand Freddies of Pinewoods, you’ll know they’ve been making 40s and 50s women’s jeans in this general style for years (some pairs even have a straight across back pocket embroidery, like the Sears catalog drawing). Finding that brand many years ago (long before I sewed) was one of the turning points in my style, when I was able to truly still feel retro while I was just bumming around in a t-shirt and jeans, because other high-waisted jeans were just non-existent then. A few other repro brands make similar style jeans, but typically have a zipper up the center back, where Freddies have that truly vintage hidden zipper and are the most authentic reproductions I’ve encountered. Of course like any RTW, they don’t work for some shapes and sizes, so not everyone can wear them!
In general, I’ve always wanted more options for vintage jeans and daydreamed about making my own. And as I’ve gotten to the point where I sew so much of my wardrobe, being able to tweak fit and style is really important to me. I wanted 50s styled jeans but more than I could just buy: any leg width or length, any topstitching or bar tack color, twill or denim in any color, different shapes for the front pockets, fitting tweaks to customize them just for me… you get the idea. What can I say, I like options!
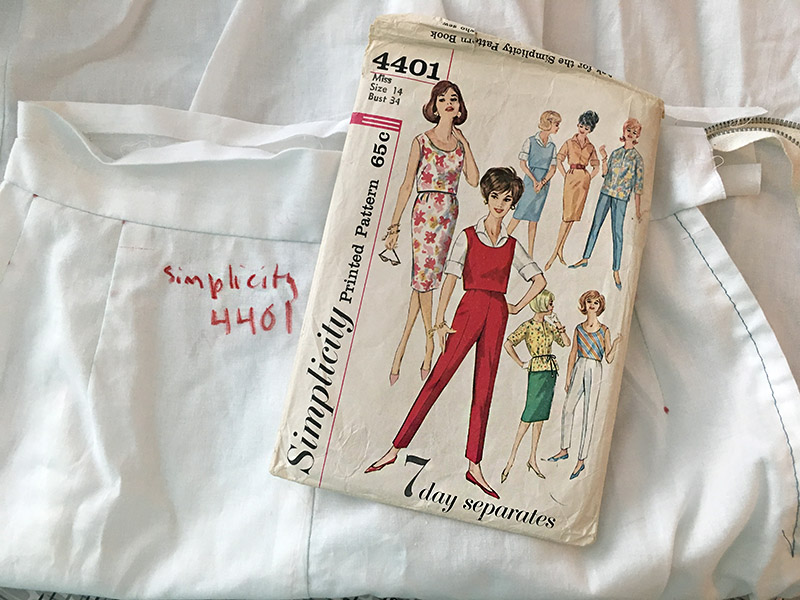
What I started with was a vintage pattern that had about the fit I was looking for, Simplicity 4401 from 1967 (making this another Vintage Pledge item!) Yes, same exact pattern used in my tropical capris. It features a basic, relatively slim trouser. Doesn’t look much like jeans, does it?
Obviously, I made a lot of tweaks to get the overall style I was looking for! But under it all, it’s really still Simplicity 4401.
Roughly, I used the original pattern as a base, changed the front pockets, added a hidden side zipper, added a back yoke, and added back pockets. I also had to draft out the 8 (count ’em, 8) waist darts and add back width at the hips as a result, and lowered the crotch curve a bit to make it more comfortable for denim and bulky seams in that region. It took 3 muslins to get everything worked out right.
Good thing I always baste together jeans even though I never want to, as I needed to take them in more than the muslin led me to believe! And for once I’m just not stressing out about wrinkles at the back of my legs. I’m just not, even a little bit. There’s too much other awesome stuff to focus on with these babies anyway.
The rest of the tweaks to get this pattern into jeans status were mainly jeans stuff: non-stretch denim fabric, contrast topstitching, bar tacks, belt loops, a metal zipper and jeans button, etc.
The denim I used is 10 ounce non-stretch Cone Mills denim from Threadbare Fabrics. Except for the 12.5 ounce rigid denim I used for Mel’s Morgan jeans, I’d only used stretch denim for my jeans, so this was a new experience for me! I have to say I’m delighted with the weight of this fabric. It’s nice and sturdy, yet a light enough weight to work for summer. But I think for full length it would be fine for winter, too. (I always wear long underwear in winter anyway.)
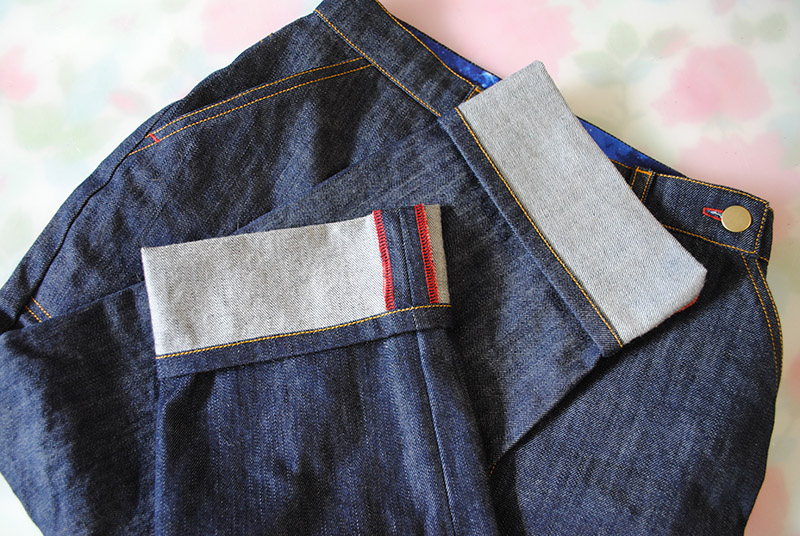
I did a couple of things I’ve really enjoyed doing in the past, using red serger thread on the inside (with the outer side seam pressed open to kind of mimic selvage jeans) and red bar tacks. Because I specifically planned to wear these cuffed, I also flipped the topstitching of the cuff—since topstitching thread doesn’t really like to work in a bobbin, I just sewed the hem of the cuff with the inside on top. No one will ever see that the blue bobbin thread is on the right side! (I did this first on Mel’s Morgan jeans.)
It’s amazing how just a (relative) few things can totally transform a pattern into something else. And that got me to thinking.
I shared a video on Instagram after I finished these, and people were really excited about them. And I know I’m sure over the moon about them, because I now have a TNT pattern for making all the 1950s jeans and variations I could ever hope to wear. Yes yes yes!
In fact, I want to share more with you! I thought of this idea as I was hashing out all my Frankensewing details on these, because you just simply can’t find a tutorial for a hidden pocket zipper (different style but same idea as on my recent tropical capris). So I was initially going to do a tutorial for just that, but then realized with a bit more work (umm probably a lot more work if I’m honest), I could do an entire explanation on how to take a trouser pattern you like and turn it into 1950s or 1940s styled jeans like I did. Because I know I can’t be the only person who was longing to do that!
I’m planning to do either a tutorial series or kind of a loose sew-along later this summer or early fall. I’ll break down all the steps I took to start with a high-waisted trouser pattern and turn it into a vintage women’s jeans pattern. Sound good?
If you want to get a head start, start thinking about what trouser pattern you’d like to use. Pick one meant for a non-stretch fabric—it can’t be too form fitting or you’ll never get that pocket zip over your rear end. Maybe even do a muslin to get an idea of the initial fit. I’ll try to give you some advance warning before I’m ready to start, so you can get supplies and such.
In the meantime I’m going to be making up a red cotton twill pair of these (haven’t decided on full length or some cropped length yet!) with white topstitching, for a special project that I’ll tell you more about soon. Plus I really want to start figuring out how I’ll break down the tutorials for you.
Let’s meet back here in a month or two on this topic, deal? 😉





Can’t wait ??
I like the zip in the pocket very chic
Darling pants, and that seems like such a great place. As an aside without getting into politics (well, -ish), those photos come from ancestry dot com…? That means those photos have been ‘converted’ in more ways than one!
These are super cute i love my freddies but these are even better
Tutorials on how you made the changes and the side zipper would be fantastic!
Thank you
Marie
These are beyond fantastic! Your attention to detail is second to none. You are so brave and fearless. What is the difference between pedal pushers and clam diggers? (Did those Sears models have seriously teensy waist? Did the patterns back them have smaller waists in proportion to hips as these days?
When I was a kid clam diggers had a rope belt for a nautical beachy effect. Maybe the fabric was more beachy too.
You know that’s one of those things I never really know… clam diggers, pedal pushers, capris… I tend to use pedal pushers and capris pretty interchangeably. I think if they’re a little longer I think of them as pedal pushers, and a little shorter as capris. But that’s just me!
The proportions aren’t terribly different to modern patterns now, and it could vary by brand. But of course not much different from today, no matter the size, the envelope showed a pretty small model! I do love vintage pattern envelope artwork though, they’re such lovely drawings.
Every time I see a new post from you it’s like a mini Christmas gift!
That’s so sweet of you to say! I wish I could make it happen more often. LOL
LOVE those jeans! Very excited that you’re willing to put in the hours to help the rest of us. Thank you!
I’m reading, I’m oooohing and aaaahing. I get to the part about back wrinkles and have to scroll back up because I never even noticed them until you said something. The whole time I’m thinking – how can we readers band together to talk you into a sew along tutorial?! Needless to say, very excited that you’re going to share your progress so we can also have fabulous tailor made retro jeans. I’m one of the types who can’t wear the Freddies. I look totally flat in the rear, and I normally have the opposite problem!
Amazing!! You are my heroine. I have this pattern for a couple of years but I never thought about doing jeans. I don’t know if my sewing machine can with denim seams. Yours are perfect!! Brava!
You might be surprised! If you aren’t already aware (and you might be!) the best trick to get over bulky seam intersections with denim doesn’t have anything to do with your machine, but you put something under the back of the presser foot (sometimes called a “hump jumper” but anything will work… folded up fabric scrap, folded paper, etc) as it’s approaching the part where it has to go over the bump, to raise it to the same level. It works so well for thick seam intersections!
Those are wonderful! I love how you were able to completely personalize and add in details that are just not possible with RTW and ended up with this lovely pair of custom jeans!
That’s my favorite part about sewing jeans, that you can customize little details and make them all your own!! 🙂
Most definitely YES! Let’s sew them together—woooooo!!!! These are fantastic and it would be fun to see other makes. Congrats on a job well done!
Yes, please for the tutorial! I have been trying to figure out how that is done for a tweed skirt. I remember my grandma had tweed skirts with the overlapping section with a zipper under and a button closure. Thank you for being so willing to share!
What you might prefer then is the type of zipper that’s inserted into a full side seam pocket, like I did in my previous post on my tropical capris. But I’m planning to do a basic tutorial for that as well! 🙂
Wow, these look AMAZING! And that’s so generous of you to take the time and effort to offer that tutorial series!
Your jeans look fab! I was anxiously awaiting this blog post to see the hidden pocket zipper in action and it’s even more clever than I thought. I’m really excited about this. A tutorial or sew along about how to turn trousers into jeans would be wonderful. I already have a pattern in mind. Thank you!
Yay! Just sit tight on it for awhile, I’m thinking end of August or possibly September, I need to work my way through some projects on my plate before I can devote the time to it. But I promise it will happen! 🙂
As soon as I saw “pedal pushers” I had to hop over to see what you were up to! When I was 6 years old (1960) my mother bought me a gorgeous pair of pedal pushers that I loved (I have the photo she took of me then showing them off). They weren’t denim however – a heavier weight aqua print cotton. You’ve nailed it perfectly with this pair! They just make me drool 🙂 WOW! What an amazing make – all the adjustments you made to create this pair too is so awe inspiring!
Wow! These are really great and look fabulous on you. I’m super interested to see your tutorials on all you’ve described above. You could do a sew along…
This project is truly amazing, I’m blown away with all the changes you’ve done. Why not get into pattern making? lol just a thought
These look amazing! And ahhhhhh I’m so excited about the tutorial you propose – waiting with bated breath!
I’m in for the sew-a-long tutorial, andI might have a shorts pattern that could work, maybe…
Tasha, I am sure you that i am an avid read of your blog posts, you are absolutely an innovative women. Pedal pushers are looking so chic on you that it is making me Jealous that why i have never thought of it before. But thanks for giving me one more idea in my project list to try.
WOW!!!!! These are amazing and right on the mark!!
xoxo
-Janey
Really, I sm in awe! Wonderful! You look amazing.
Deal!
I found you again after all these years! And how timely! I really really want to make jeans, Freddies don’t work for me, and I sew so why not but I haven’t made as much effort as you to try. You’ve inspired me to try again. Although i’ve found some great coloured denim, it has a little stretch to it, I usually prefer mine without stretch but who wouldn’t want red or turquoise jeans?! nice to see you again. I’ll read up on old blog posts later.
Fiona!!! I’ve missed you! Mel and I were just talking about you the other day. I’m going to start a sewalong for vintage jeans probably sometime in October, by the way. I was SO happy to see your name in my inbox this morning! 😀 xx
Aw I often think about our afternoon in a pub in the posh part of London in that little upstairs room that was like something out Sherlock Holmes !
Fab I look forward to the sew along, I really want to make some. When I’m finished work, this evening I’m going to have a look through your blog and see how your house is coming along. You had not long been in when I last saw your blog!
Oh that was such a wonderful afternoon! We often think of it too. And you know, we’ve been to London twice since! Last was for my 40th birthday in April. I hope you are Paul are well! (Also if there’s any chance you’re on Instagram you had better let me know! <3)