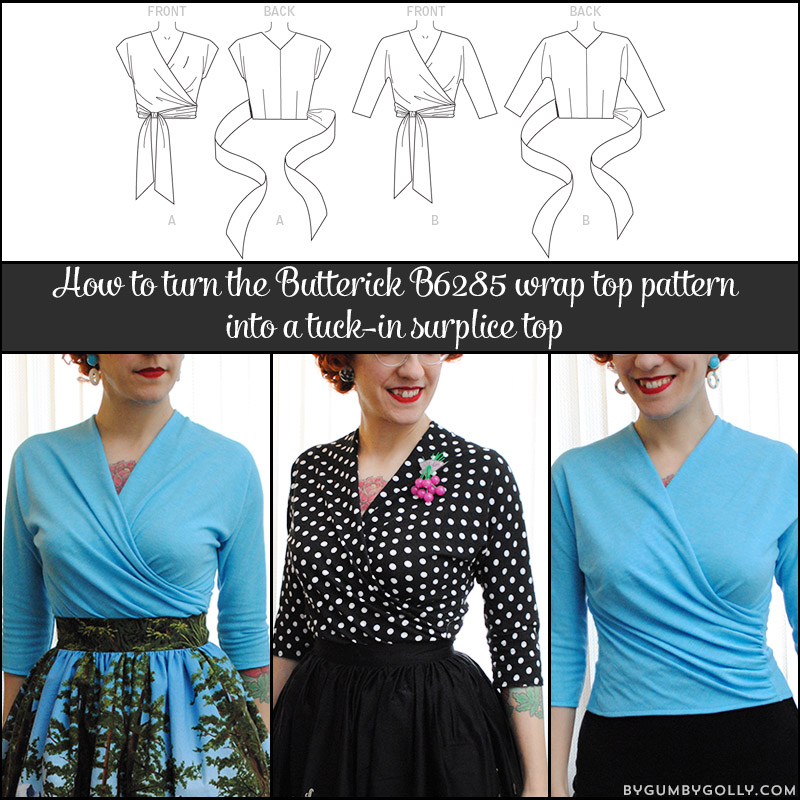
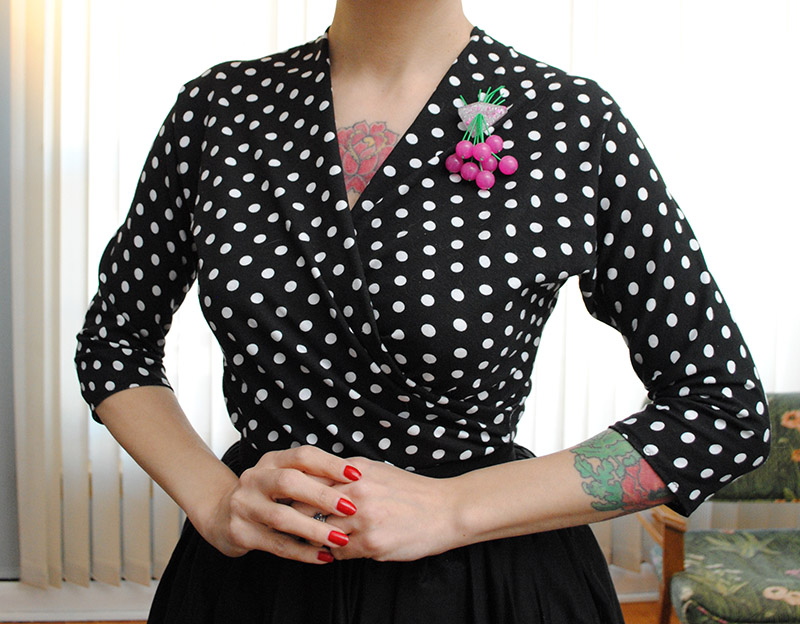
As I mentioned in my wrap/surplice top series introduction, I have two pattern hacks I’ve worked up for Gertie’s Butterick B6285 pattern. Yesterday I showed you how to lengthen the wrap top bodice. But today’s modification is my favorite: how I turned this wrap top pattern into a surplice top. Basically, it looks the same, there’s just no wrap ties, and it’s long enough to tuck it in!
I adore the general fit and shape of Butterick B6285. I’m really falling for tops that overlap in the front lately, and this one was a great starting point. Having made the pattern as written once before I started down this path, I knew I really wanted a version that tucked in, and didn’t actually tie.
In essence, a surplice top. Something to throw on with pants or a skirt and look chic but be effortless at the same time. New Look 6151 has a similar look but with set-in sleeves and much longer torso (way too long for me), but I already had the Butterick pattern and was happy with the shape, so I wanted to try and work something out with it. However if this is all daunting and you still like the idea of this kind of top, I bet that pattern would be a good place to start! And you could always modify the New Look pattern to have cut-on sleeves, if you liked that from of the Butterick pattern (which I do, you know I’m a sucker for them).
There are really only a few hacks that need to be made to the pattern to get a surplice top instead of a wrap top… the rest is just all in how you sew it. So you need to:
- lengthen front/back (so you can tuck it in)
- widen the surplice/gathered part (since you’re lengthening the top considerably)
- construct it a little bit differently
This tutorial builds on yesterday’s tutorial on how to lengthen the bodice, because it uses the exact same concept of removing the back dart, and lengthening the bodice (but lengthening it about twice as much). Mostly what’s different is the sewing construction. So you will need to refer to that post, too.
My usual caveats applies… I’m not a pattern maker, and this is just how I personally figured out how to modify a pattern into something else I liked, etc, etc. If you follow this tutorial, I’d highly recommend trying it out first with a knit fabric you’re not in love with. You could also add huge seam allowances along the side seams, and baste it together a few times until you get it right. It may take a bit of doing to get it perfect for your own body. But it’ll be worth it! 🙂
Remove the back dart
I’m not going to reinvent the wheel here: we’re going to do exactly what I described in Wednesday’s tutorial on removing the back dart and lengthening the bodice. So please go remove your back dart with that post, then meet back here. (You can read the lengthening bodice section too for good measure, although because we want it longer, I’m covering that below.)
Lengthen the bodice
The difference in what we’ll do here vs. yesterday is how much longer we’ll make the bodice, since we want this to tuck into a waistband. To get the wrap top a little lower, I lengthened the bodice 2″. To get it to tuck in as a shirt, however, I lengthened it 4″. (That’s 4″ more than the original—not 2″ and an additional 4″, to be clear.) Keep in mind I have a short torso so 4″ may not cut it for you, especially if the original waistline of the pattern is above your own.
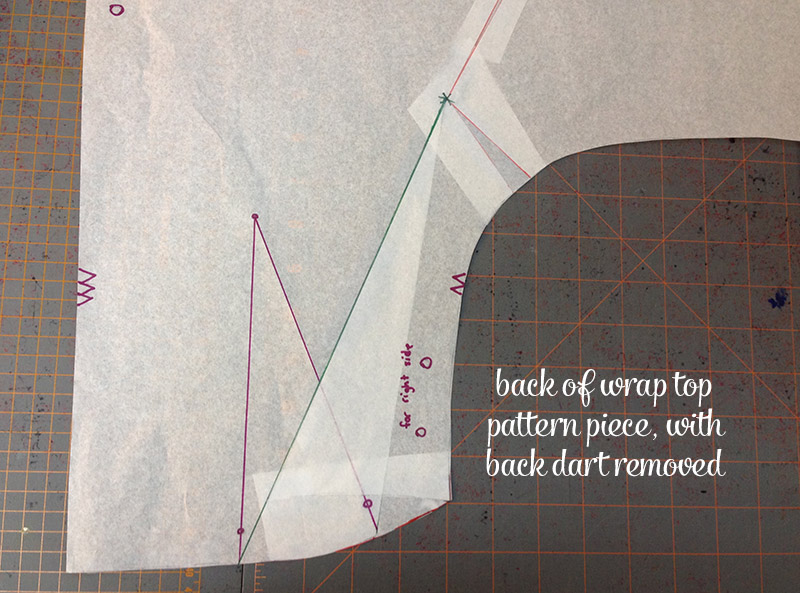
Once you’ve removed the dart and cleaned up the bottom edge of the back of the pattern piece, you’ll be left with the piece looking about like so:
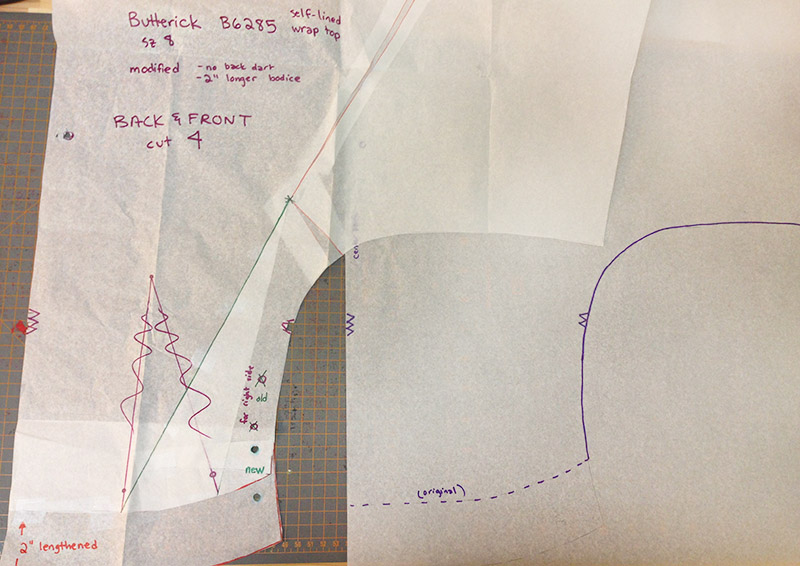
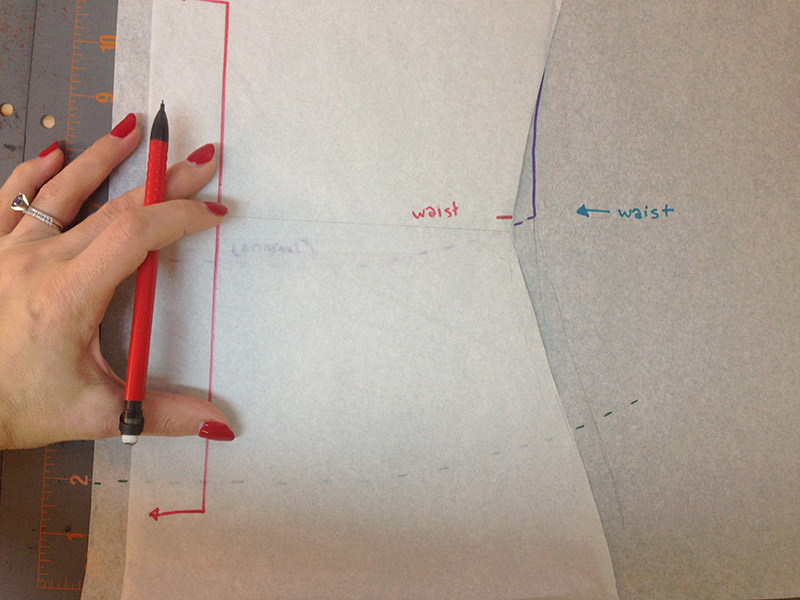
You’ll lengthen it in the same way as that post, just longer, and adding more to the side seam to accommodate your high hip. I traced off a new piece from my modified original with the back dart removed. That’s the one on the left, with my new one on the right. To make it easier to see, I indicated the original length of the pattern piece with a dashed purple line. (You can ignore the faint pencil line which was how long I added to the bodice of the wrap top, that was just for my own reference.)
Just to be extra sure you follow me: that piece on the right is just the wrap top pattern piece with the back dart removed, and a dashed line just to show you the original pattern hem, which we’re now going to lengthen to a suitable tuck-in length (in my case, 4″).
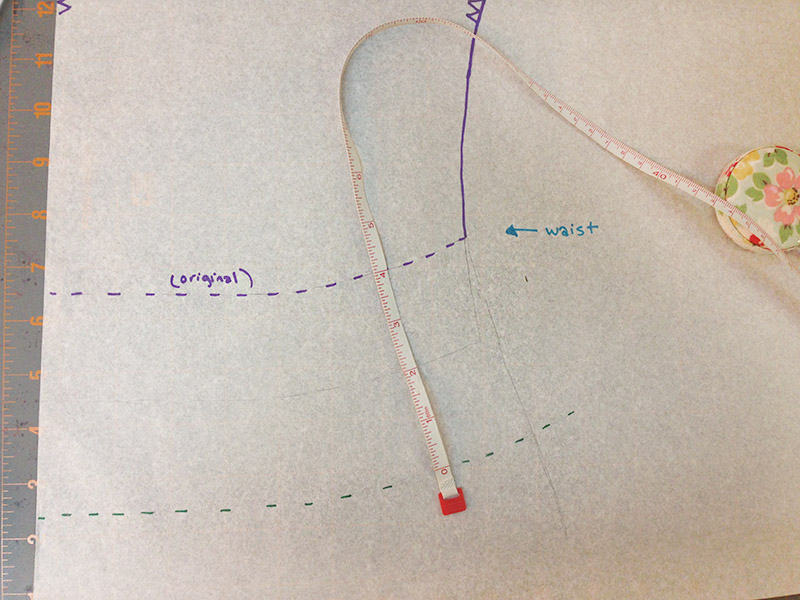
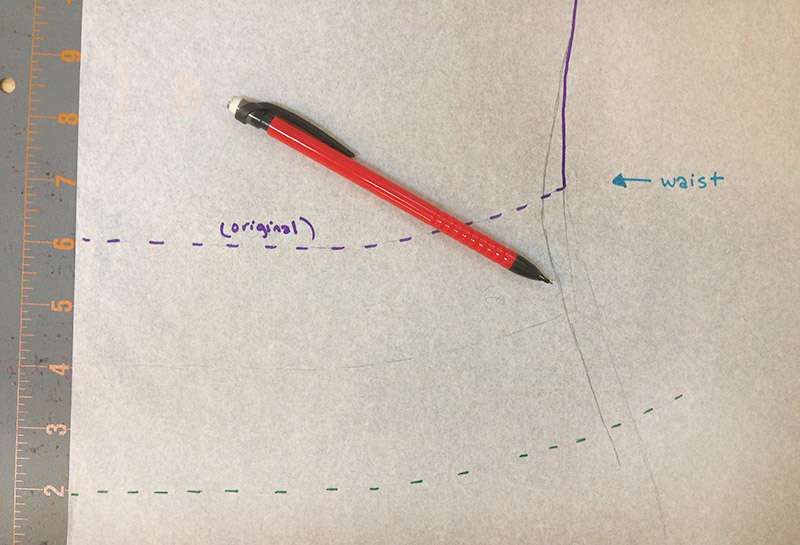
Still looking at the back part of the piece, and I’ve used green dashes below, I marked down 4″ from the original line of the pattern, kind of continuing my line a bit beyond the pattern side seam. Faintly in pencil, you can see I’d already been playing with the side seam a little bit, and I marked that the original pattern hem is the waist, just as a reminder this is the point where things need to start flaring back out for the high hip. If your torso is longer than the pattern, you may need to extend your line down more straight for a bit, then flare out for the hip.
(Sorry the lighting got kind of bad for this section and a few photos are a bit blurry!)
Now you have to extend that side seam for your hips. If you have a fitted t-shirt pattern you like, you could use that as a guide, too, like below. Or you could carefully fold an actual t-shirt in half and use that as a guide, but keep seam allowances in mind. (It’s also a good idea to use a shirt you like to decide how long to make it. 4″ worked for me but you may find you need more or less.)
I drew in my new hip line in pencil first (where the pencil is pointing to below):
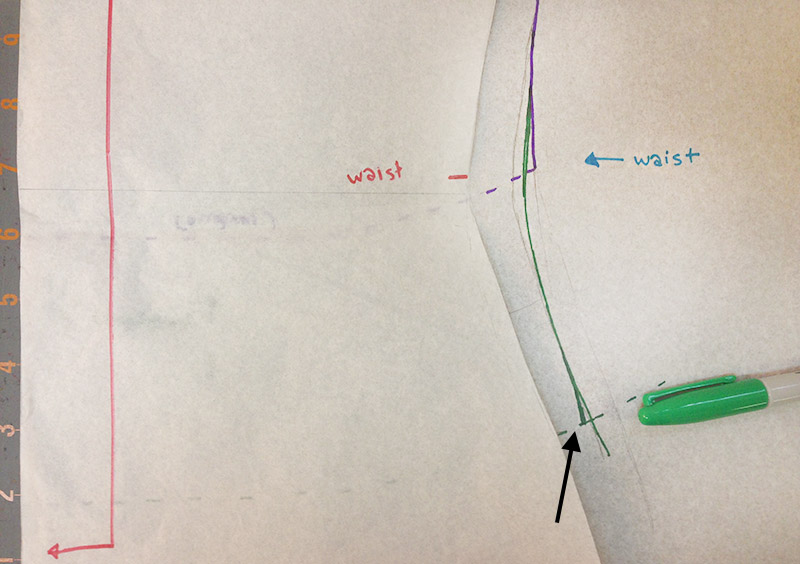
Then I drew it in with green, which you can see below. I compared it again to the t-shirt I was using and realized I made the end of my line kind of harsh and it should probably curve back towards my body slightly there, so I tweaked that a bit (shown with a black arrow below). You can also see I drew in green a bit outside my original pencil line near the waist as I was concerned I was shaving off a bit too much. You can always take away but you can’t add back!
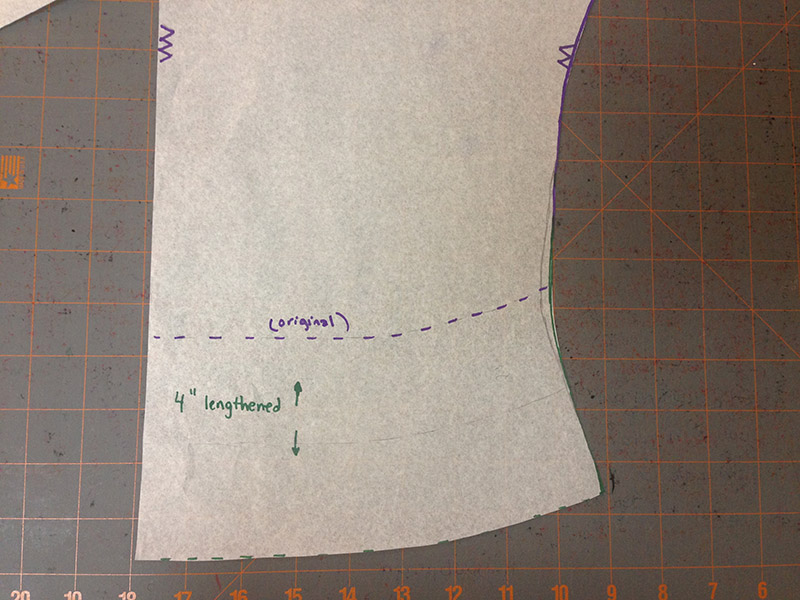
That’s it for the front! Just cut along the new side seam and hem lines you made (all my green lines), and the back of the pattern piece is done. There’s no dart, and it’s now long enough to tuck in, and flares out for your hip.
Lengthen and widen the front
I did this wrong on my first version. Oh I lengthened it just fine, but I forgot to add more width at the side that’s gathered, which gets seamed into the side seam, so I caused the side seams to pull in towards the front on my first (blue) one, as I mentioned in Tuesday’s post. Whoops! It’s better on my second polka dot version, and I decided to add another smidge still for next next version, which is what I photographed today.
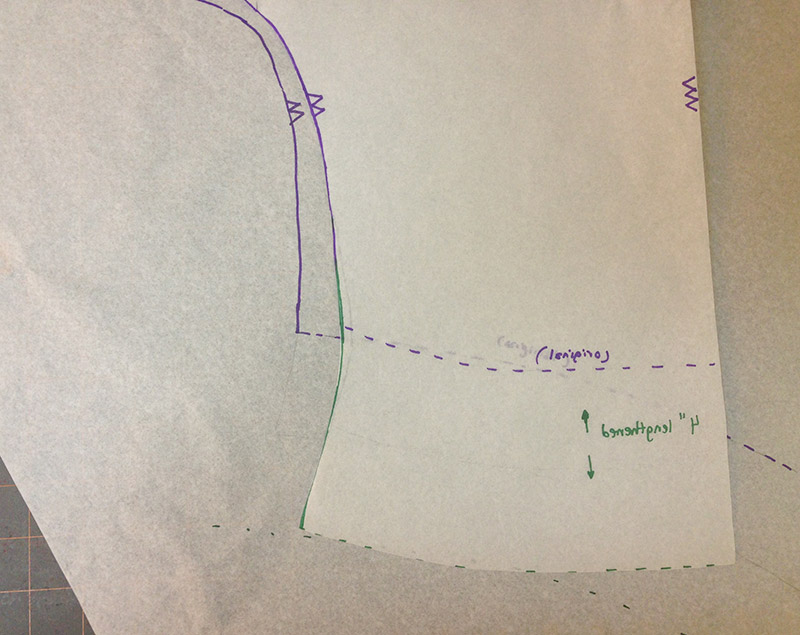
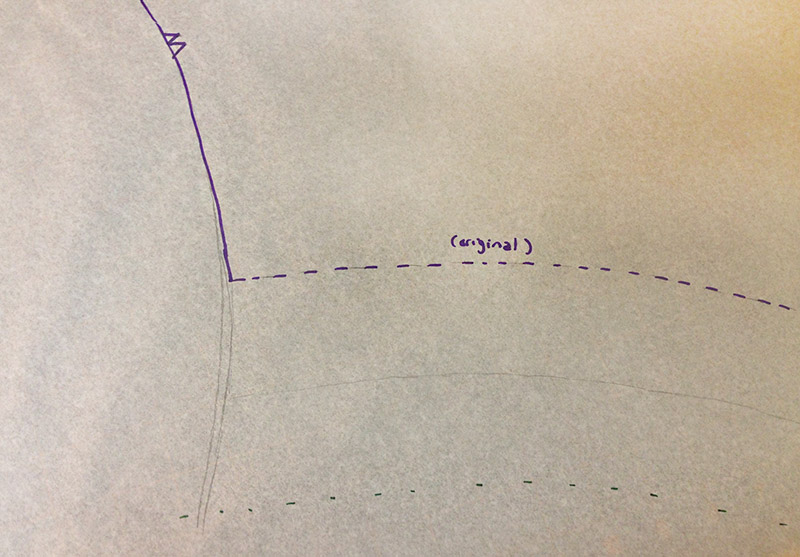
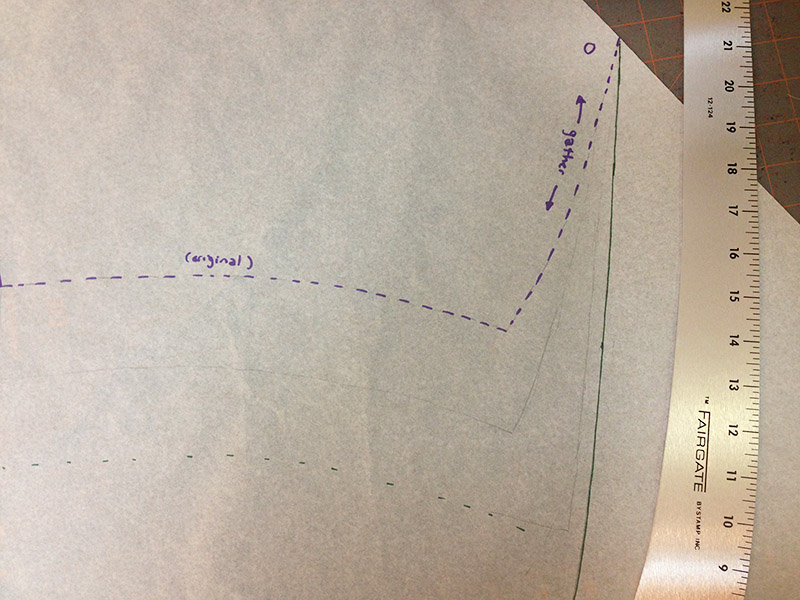
Now look at the front of the pattern piece. Like I did for the back, I drew in a dashed green line to indicate 4″ down from the original hem (which is again shown in purple below). (Again, you can ignore the faint pencil line which was how much I added to the bodice of the wrap top, that was just for my own reference.)
Then it’s time to address the non-gathered side seam, which above, is on the left, below the two notches. Like I did in Wednesday’s tutorial on lengthening the wrap top bodice, I folded over the back to the front, and matching up the notches, used that as a guide for drawing in my lengthened side seam:
I drew that in with pencil and again fussed around with it a bit, extending it out slightly:
With the non-gathered side seam marked (just pencil in my case), move onto the gathered side.
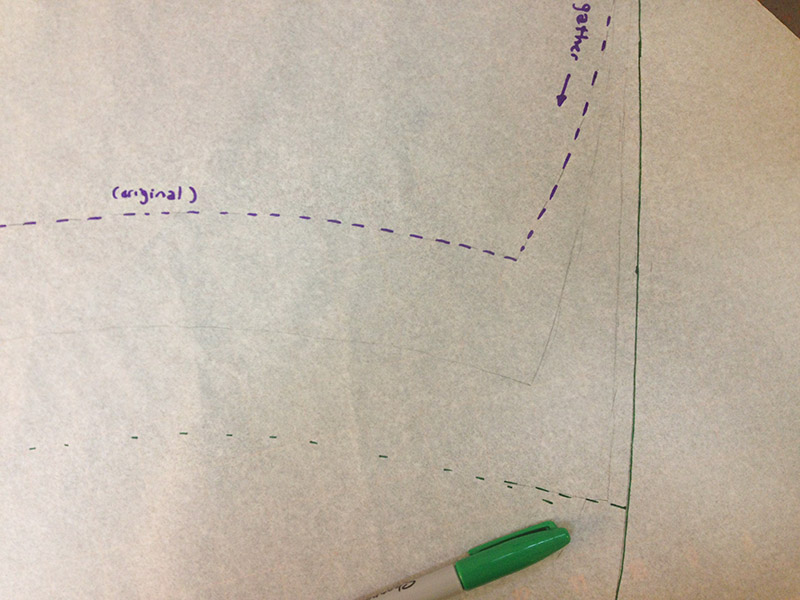
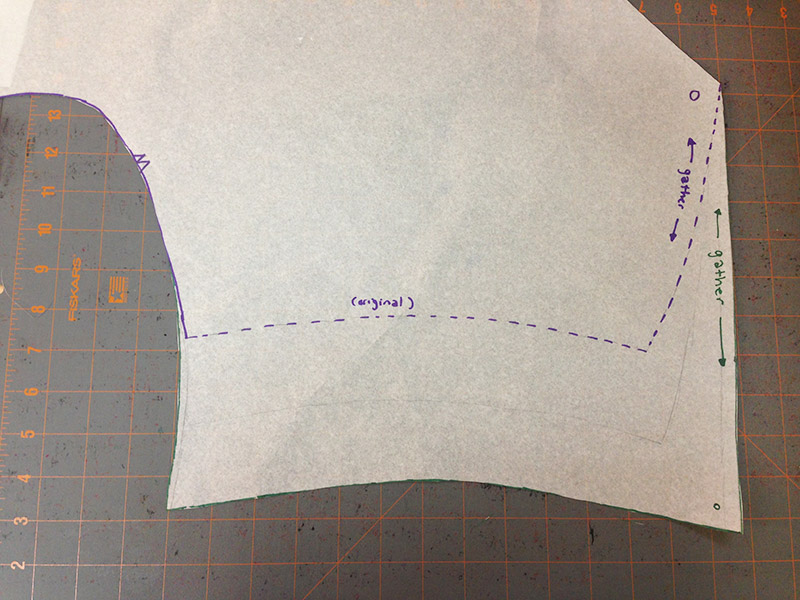
This side is going to need some more width added, too, because you’re adding length below your waist, which is a wider point on your body. If you don’t, the gathered parts going across your torso will pull the side seams towards the front. Overall, I found a little over 2″ wider at the bottom edge of the original hem was about right for me, but this is honestly the area where I’m the least able to be precise with you and you’re going to need to perfect this to suit your body shape.
You could be smarter than I was initially and give this side a BIG seam allowance (1″ or even more), baste it together and then trim it down as needed, and transfer that to your pattern piece. Or you can be lazier like I have been and add a wee bit more each time you sew it up until you feel you have it right. 😉
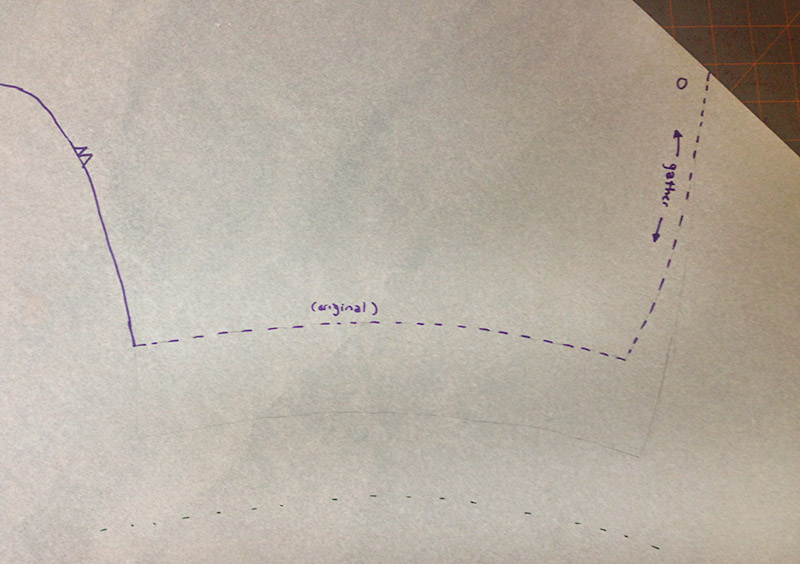
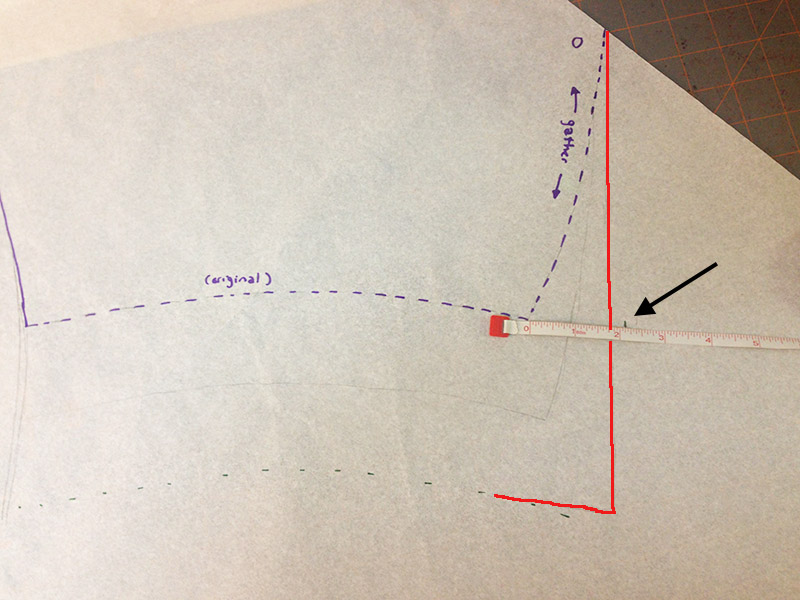
From the bottom edge of the original hem (dashed in purple), I drew a mark about 2 1/8″ out to the side, indicated with the black arrow below. The red lines indicates how I changed the side seam on my polka dot version but as I said, I wanted to gain just a smidge more width in the front, so I moved that line out about 1/4″:
Now you have to make a nice slightly curved line from the top of the gathered edge down to where you marked your new hem (the green dotted line for me). You can do this with a hip curve or just eyeball it. Depending on how much width you added, your line may need to start nearly towards the top of the pattern piece, up by the large dot, which mine did. (If you need to go further, then you could widen the pattern at this point.)
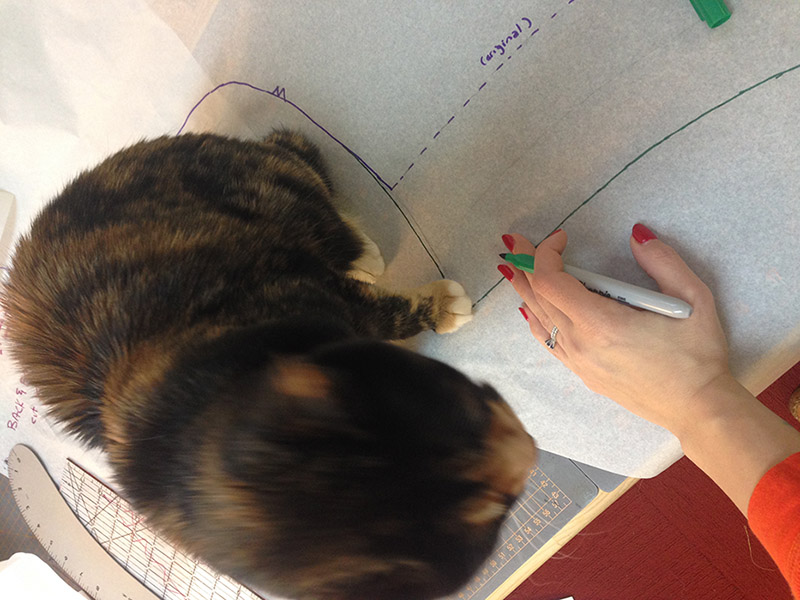
You can see my line drawn in with green. I did extend it down lower than my dashed line (that indicates 4″ down from my waist, my lengthened bodice), so that I could clean that edge up:
I didn’t want that lower edge to have quite such a dramatic curve down, so I soften that up a bit, although this area is all gathered so frankly, it probably doesn’t make much of a difference either way:
And then I just had to contend with my little “helper” as I drew the new lines in solid to show you… 😉
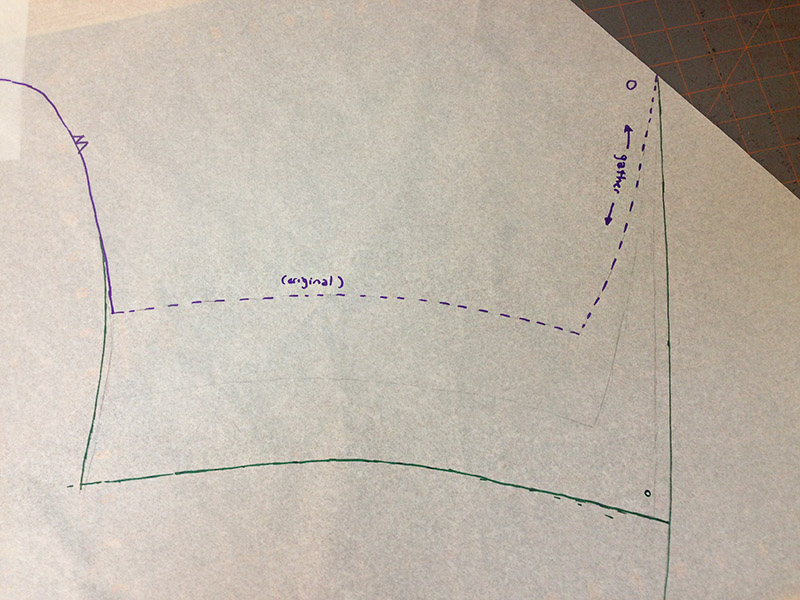
Ta da, new lines in green below, compared to the original in purple. I think the front is the more difficult side of the two so I wanted to try to give you as clear of a visual as possible to see what I did. Again, I may still tweak this more down the road, and feel free to give that right-hand side seam edge a gigantic seam allowance if you’d prefer to baste and fit as you go.
And then just cut it all out along your new lines:
Cut out the fabric
Don’t quite follow the instructions for cutting out the pattern, because this version won’t be lined, and there won’t be ties!
You only need to cut 2 of your main pattern piece (mirror images of each other, so you can cut on folded fabric or flip the piece over if cutting on one layer). And obviously you don’t need to cut out the ties, either. Which means I could fit this on a lot less fabric. Woo hoo! Not under 1 yard, alas, but at least a yard less than the original wrap top.
Transfer the marking
Unlike for lengthening the bodice for the wrap top, where we had several markings to transfer, we’re only transferring one here. We don’t need the markings for where to pull the ties through as we aren’t sewing them. All we need is the lower marking indicating where we gather the side edge. I’d forgotten to mark it on my original as I was doing this tutorial, but you can see the small green circle on the photo above. That’s the only one you need to worry about!
Sew the surplice top
To sew, you can’t follow all of the pattern instructions because you aren’t lining it and there aren’t ties, and you’re sewing the gathered parts into the side seams.
Sew the center back seam to the large dot, as indicated in the pattern instructions. You might want to sew with a zig zag (or a straight stitch and stretch as you go, as the pattern indicates) and if you have a serger, then serge/trim the seam allowance below the dot… I say this because I was lax on my polka dot version and serged/trimmed first and ended up with a doofy area at the top that I had to fix by adding in a few extra stitches.
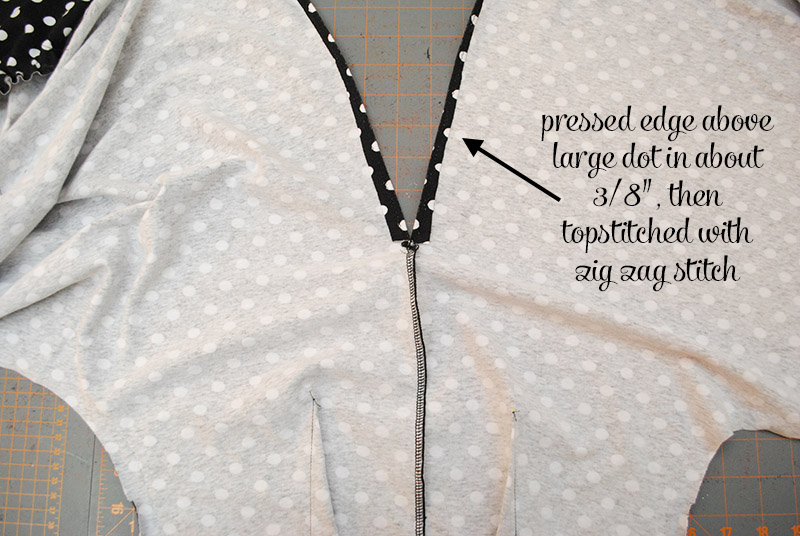
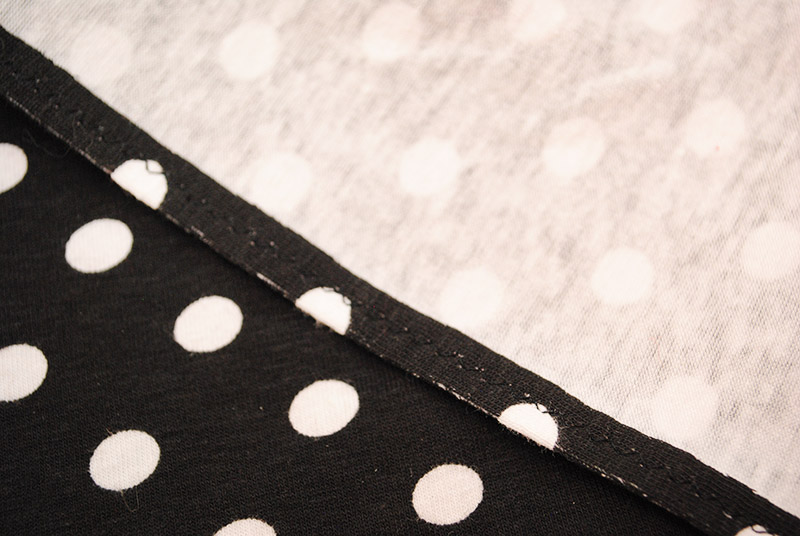
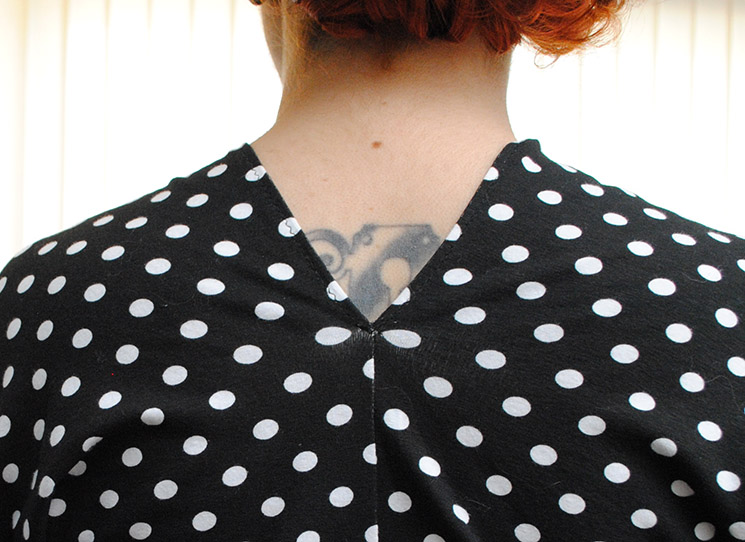
For the rest of the seam (above the large center back dot in the pattern), that’s going to wrap up and over your front, crossing all the way to the side seam. You need to finish this edge in some way. The majority of this edge isn’t seen, as it falls towards your body the way we’ll sew it, but you do see the last few inches as it meets up at the center back, so go for discrete and not bulky. For the first version, I serged the raw edge and left it, and that was fine, but you should press it in maybe 3/8″ or so, and possibly topstitch or slip stitch it. For the polka dot version, I folded the raw edge in 3/8″ and zig zagged it, and I liked that. When you wear it, you see the seam treatment at the center back and up to your shoulder until the edge folds in on itself, so make sure you don’t mind the way it looks. You only see a few inches so I decided a twin needle was overkill. Decide what you like best.
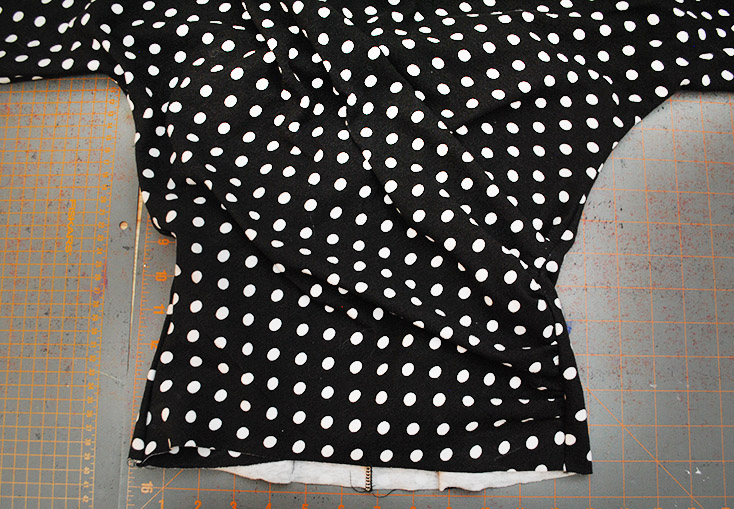
(Ignore the back darts in the photo below… I didn’t work out how to remove the back dart until I’d already sewn my first two surplice tops, and one of them is the one I photographed in this tutorial.)
Then like in the pattern, gather the front edge between the dots.
An interruption about the hem: Let me interject about the hem a second because if you do something different than I did, you’ll need to think about it now. This pattern will essentially have a doubled front, so you can either choose to hem the layers together like I’ll do here, or separate. Hemming them together is mildly annoying and wouldn’t work nicely with thicker knits, so if you’d prefer, you might think about an alternate way to do this. You could hem all sections (front inner/outer, and back) separately, and then do the side seams. (Kind of unusual, but especially if you serge or trim the side seam allowances close, I don’t see why you couldn’t try it.) You may have to play this part by ear and determine what you like best!
Back to gathering—once you’ve run your gathering stitches, you’re ready to assemble! When I first tried this I was completely perplexed at how this all went together and made it waaay more complicated than necessary. Once I figured it out, it was the easiest way conceivable! Nothing confusing at all.
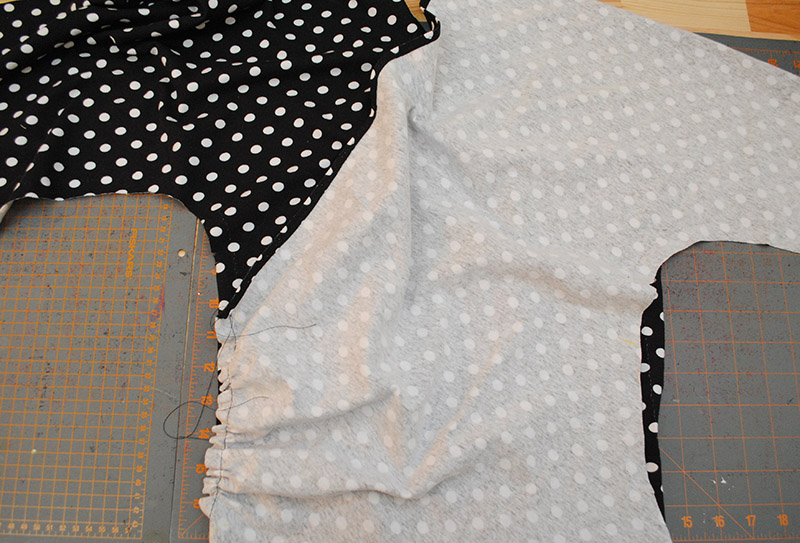
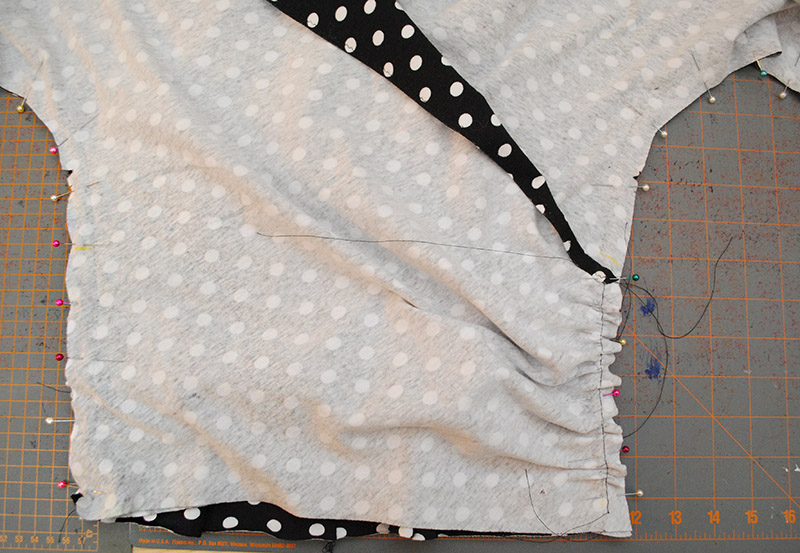
With the right sides together, you’re going to start making sandwiches on the left and right side seams… only they won’t look the same, because one side wraps over the other! When looking down at the fabric from above, on one side, the gathered “surplice” bit will be between the other front and the back, and on the opposite side, it’ll be on top of both of them. Why? If you think about it, one of the fronts is on the outside, and one is on the inside, so they don’t get constructed in the same way.
Looking at the fabric with the right sides together and the wrong side of the back of the bodice on the table, take the gathered part from the right side, and place it along the left side seam (again, using right and left here as you’re looking at it, not on the body).
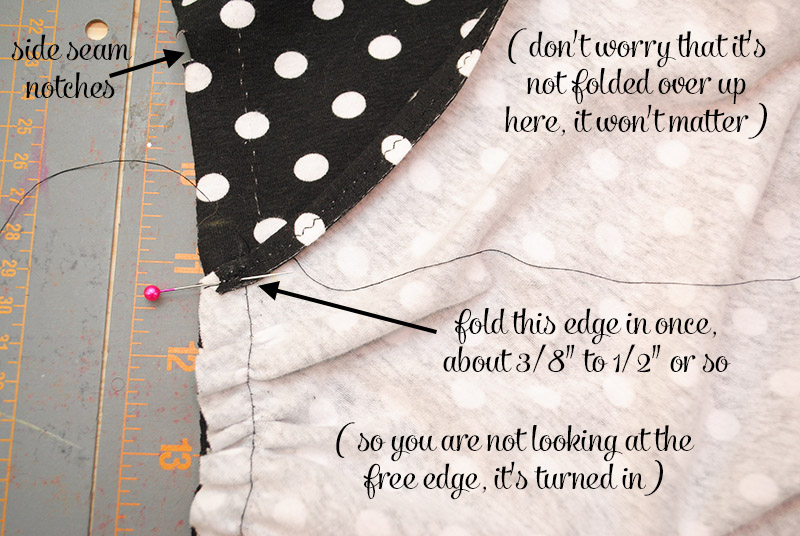
Important!! Fold the very top edge (that you finished already!) in once about 3/8″ to 1/2″ or so. This help the seam turn towards the inside. Do not forget this step, it’s integral to making the surplice front lay very nicely and roll towards your body! You can see how it looks below, near the pin. As a reminder I pressed this edge in and zig zagged earlier, and now I’ve folded that in 3/8″ or so, just at the side seam where it gets sewn:
I found that if I started the gathering about 2″ down from the side seam notches, and ending about 1″ above the hem, I was pleased with the result. But I highly recommend taking the time to baste the side seams and try it on to see what you like! I just used the largest length of a zig zag stitch as I could to baste, and that worked fine. It really doesn’t take much time (only two seams, promise!) and it’s a very helpful step.
Once you’re happy with the gathers, lay the left side down over the right side seam. Don’t forget to fold the top (finished) edge in once exactly like you did for the opposite side, and gather to match how you did it on the opposite side, too. Pin both sides to get ready to sew things shut. You can see below what I meant earlier about the sides not “matching”—on the right, the gathered part is on the outside, on the left, it’s sandwiched between:
Then, sew the side seams, turn it right side out and suddenly you’ll almost have a finished surplice top!
All that’s left is hemming the body and the sleeves, and you can do that however you’d prefer. I serged the raw edges, folded them up and zigzagged to topstitch. A twin needle here also works. I didn’t feel like setting mine up and so I didn’t. 😛
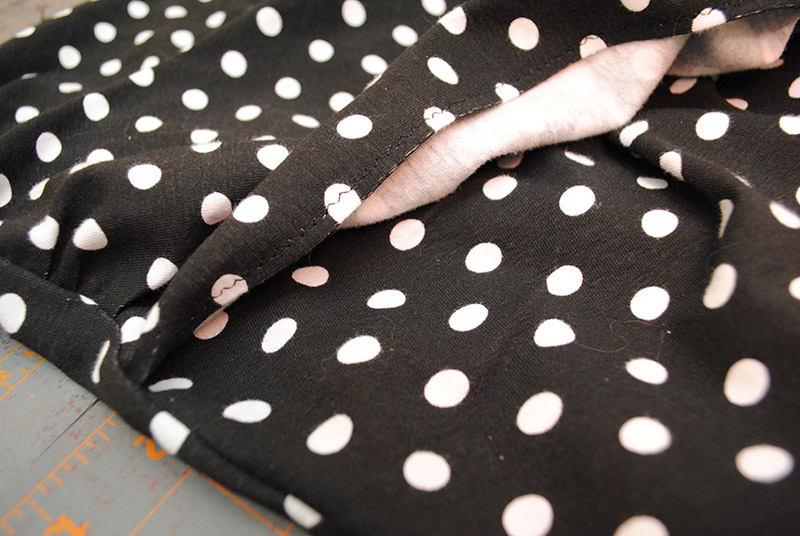
And you’re done! When you put the top on, just take a bit of care to get the surplice fronts into place how you like them. The seams above the gathering should naturally want to roll towards the body so you don’t see them (except at about the top of your shoulders to the center back), since you folded those over when sewing the side seams, if you recall:
When you wear it, they should roll towards the inside nicely, as you can see below. It gives such a soft and beautiful neckline!
And like I said, you only see that edge as it pops over your shoulder towards the center back. (My fabric looks weirdly white at the V because it’s kind of crappy—like you can see white through the black when you stretch it—but it made for a good second test run of this pattern.)
If you dislike the way it looks, you could always fold the raw edge over twice and slip stitch invisibly. More work, but if you made this up in a fancier fabric, it would be a lovely way to finish it off. Oooh imagine a metallic knit for a party outfit… like this minty shimmery rayon jersey from Emma One Sock. Wow I totally want that fabric now. Delightful! 😀 Anyway, feel free to play around with this, I know I plan to in future versions.
So there you have it: how to turn this wrap top pattern into a surplice top. If you make up a version, please tag or ping me on social media, as I’d love to see it!
And that’s our wrap/surplice top week of love wrapped up (I know… I couldn’t resist)! I was hoping to have another surplice top to show you tomorrow but it didn’t pan out this week. But you can bet your bottom dollar I’ll be making more. Lots more!
Hope you’ve enjoyed this miniseries. Here’s all the posts for future reference:
- Introduction to the miniseries
- My two wrap tops (good and better)
- Surplice tops for every day of the week
- How to lengthen the bodice of Butterick B6285
- How to turn Butterick B6285 wrap top into a tuck-in surplice top (this post)
Have a fantastic weekend!

Absolutely excellent tutorial, clearly presented and many great pictures to show the detail. Thank you for detailing this the way you did!
Marie
I inherited a top just like that from my mum. I wore it when I was in highschool and she wore it when she was in her 20’s. It was black and a really soft thin sweater knit. Your tutorials are tempting me to make one up even though I don’t wear high waisted skirts anymore.
This is a great tutorial. I made threadcount 1502 which is a similar style top
Great tutorial! Thank you.
Just love the blouses!! Thanks for sharing your tutorial
Hi, love the pattern (sewed some tops already).
Now*drum roll* I will knit it in the pattern shape and then sew it together. Maybe I will add some little bobbles on my “knitted fabric” to make it more interesting. Hope it will work ^^
What a fantastic, excellent, expert tutorial. I followed it closely and ended up with a beautiful top!
Amazing. You’re able to do all this and I can’t even get the pattern cut for the skirt. 😭