We’ve hit mid-week in my wrap/surplice top miniseries! Aaaand I’m supposed to sew up another surplice top for Friday but it hasn’t happened yet, so we’ll see about that. 😉 But today’s post is the first of two pattern modifications that I’ve worked out for the Butterick B6285 wrap top pattern.
Pretty much everyone I’ve chatted with on Instagram or in comments on my blog who has also sewn up this top has had the same result: the bodice is really short. And it’s obviously meant to be short, as there’s no provision to lengthen/shorten, and the waistline is marked basically right at the hem. I’m short-waisted to begin with, and the final hem hits right at my natural waist. Fantastic over dresses, but not so great otherwise. I just needed a litttttle more coverage, so that it would cover a skirt (or pants) waistband. If you have a longer torso, you might need a bit more.
You can see the difference below (from Monday’s post): on the left is the one sewn straight from the pattern, on the right is the one I lengthened:
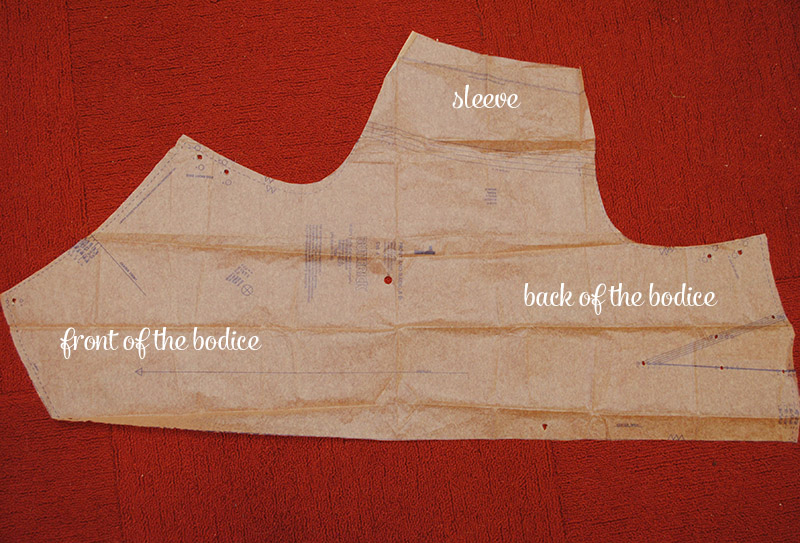
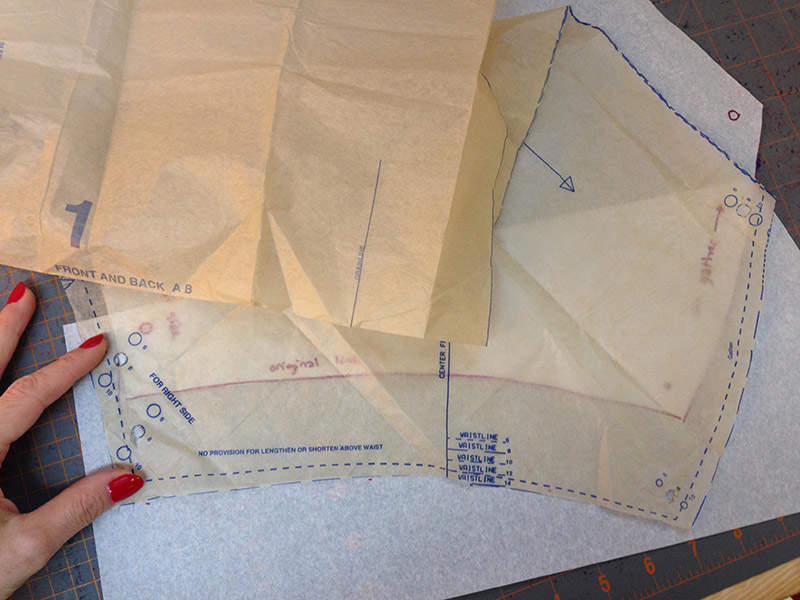
Normally, a pattern has a “lengthen/shorten” line on the bodice—this doesn’t. It actually says “no provision for lengthening/shortening the bodice” right on the pattern. Which is why I’m sharing how I did this, because the pattern piece is wacky shaped and it’s not necessarily immediately obvious what to do…. see?
Very cleverly drafted, but makes for hacking it up (er, modifying it) a little more difficult. In fact I fussed around with a few versions before I finally hit on the way I want to stick with.
The back of the bodice is shaped with a waist dart (you can see that on the right, above), which ends at the bottom of the pattern piece, which is the waistline. This is the main thing that complicates lengthening the pattern, and the only reason why I’m actually writing this up as a tutorial, because it was a bit perplexing, and I know people were interested to see how to do it!
I want to point this out before starting: I’m not saying this way is the right way or the only way to do this! It’s just how I worked it out and I am happy with the results. As they say, your mileage may vary. 🙂
When I first set out, I saw two mains ways to lengthen the bodice:
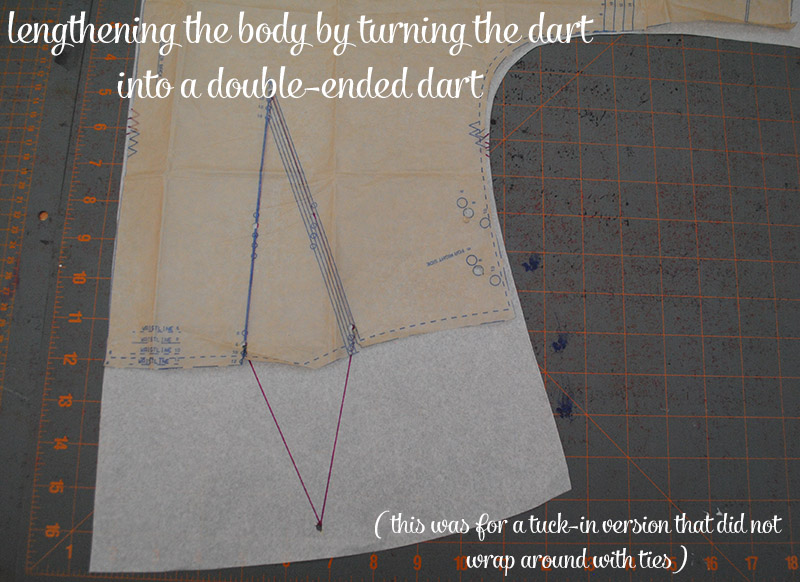
- Turn the back waist dart into a double-ended dart, and shape some at the side seam. This is actually how I did it on my first two surplice top hacks of this pattern, but not on the wrap top (because I did that after). It’s like how a tuck-in blouse is sometimes shaped, where the widest part of the dart falls at your waist, and gradually tapers above and below to shape the back. This is slightly odd in a knit fabric since the dart kind of flaps around, but since the original pattern had a dart anyway, it’s what I tried first. And it worked fine, but I felt like there could be a better way. Which was #2… OR
- Remove the back waist dart, and shape at the side seam. With some tweaking you can actually remove the dart completely, and then just shape the body at the side seam. Knits are forgiving, and I found this quite easy to do and I liked it even better and found it more accurate.
I’ll be showing you how to lengthen the bodice and remove the back dart.
BUT! In case you’re curious or would prefer to do with a double-ended dart for some reason (hey, if you sized up this would be great in a woven!), here’s how that looked. In the photo below, ignore the fact that my (white) pattern piece is so much longer (4 inches)—that’s because this piece was initially how I lengthened it for my surplice tops until I hit on the dart removal method.
But let’s move on to my now-preferred method: lengthening the bodice and removing the back dart. I would highly recommend doing this with a traced version of your pattern piece, as you’ll need to refer to the original a few times.
And also, if you haven’t sewn this pattern up yet, I’d suggest (as Gretchen does in her sew-along) you pick a size down from what’s recommended by your measurements on the pattern envelope, otherwise it may come up too big. I always go down one size with Butterick patterns compared to what my measurements tell me I should be sewing.
Let’s get started!
Remove the back dart
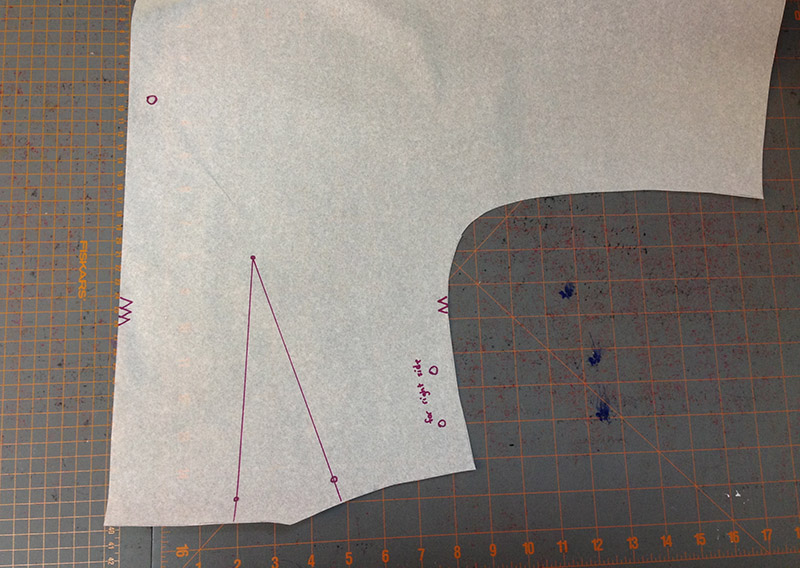
The first step to lengthening the bodice on Butterick B6285 is to remove that back dart. Here’s the back waist dart, drawn in below on my tracing of the original pattern:
We want that to go away. But you can’t simply fold the paper in, because it’s a flat pattern piece and then you get lumpy bits. And yeah you could kind of cheat and smush that all flat but it’s kind of a lot to smush.
So you have to “release” that fullness somewhere else. I found a fantastic tutorial on how to remove darts from patterns, and used that as a guide. The main difference with the Butterick pattern is there aren’t armholes to use as a hinging point, because of the cut-on sleeves! So I had to get creative. Here’s what I cooked up. Possibly slightly overkill for a stretch knit but it worked really nicely and was still easy to do.
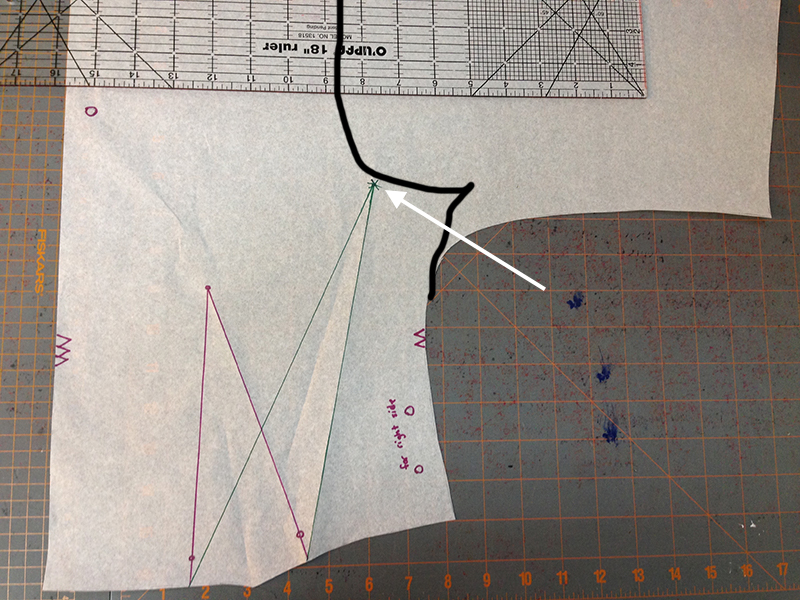
Draw a point (the green asterisk in the below photo) that’s vertically about halfway between the large dot for the center back stitching, and the top of the dart, and horizontally an inch or so in from the side seam, if it continued up vertically (instead of swinging out for the sleeve). It’s sort of approximately where the lower part of the armhole/armscye would be, if there weren’t cut-on sleeves. I tried to indicate that with the black line I drew onto the below photo, mimicking where an armhole would be. Doesn’t really have to be exact, don’t worry, and it’s difficult to explain, so hopefully my photo will help.
From that point, draw a line to each end of the original dart. The original dart is in purple, and my new lines are in green. So original dart in purple, one that I’m going to release towards the sleeve (longer and sideways), in green:
(Note: in Laura’s tutorial she has you move one of the legs into the dart 6mm to account for ease, but we’re working with a pattern for stretch knits, which are forgiving enough that I didn’t do this.)
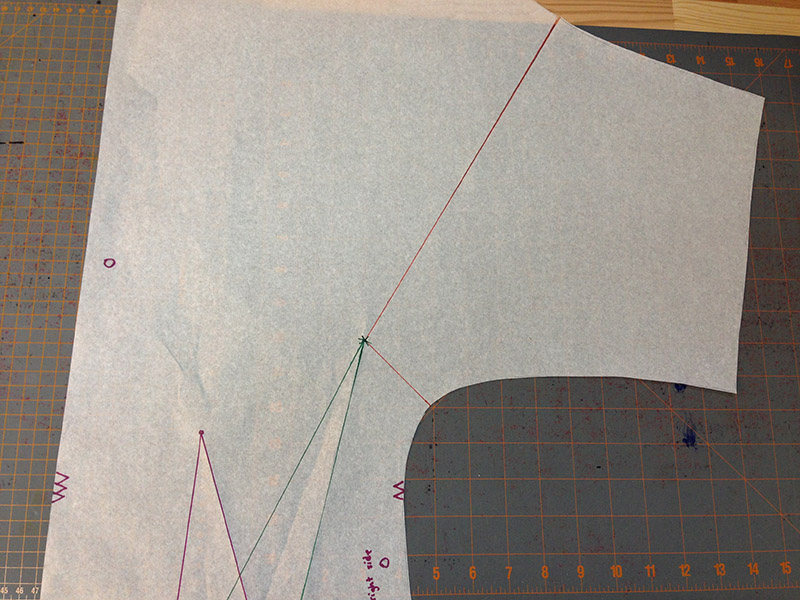
Now, keeping in mind that the sleeve is folded over when sewn, so what you’re looking at on the pattern piece is an entire sleeve, draw two more lines: one goes to about an inch or so into each side of the sleeve. Those lines are in orange, below. You can see one is a very long line, one is very short:
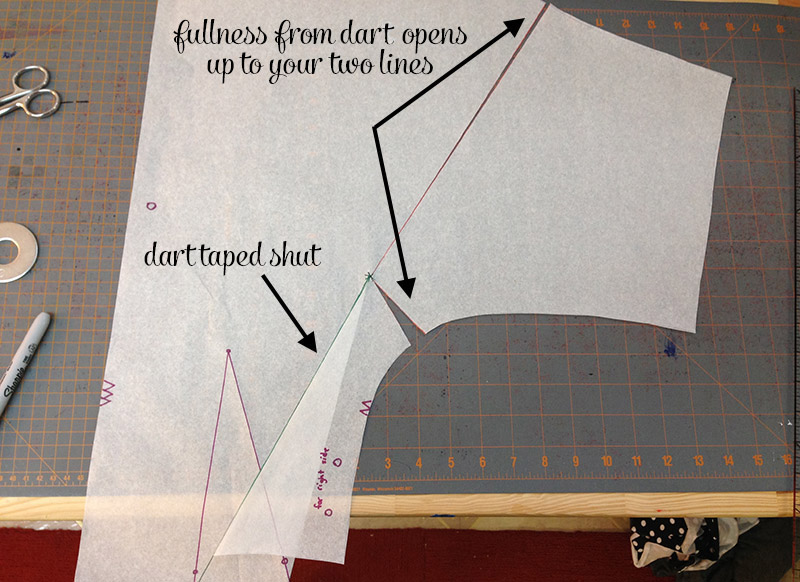
We’re going to cut now! Cut along the right-hand new dart leg (mine is green), nearly to the asterisk, but not quite there. Then do the same for each new line towards your sleeve (mine are orange). All three cut lines meet at the asterisk and need to hinge at that point, so cut as close as you can without cutting through all the way! (If you do, put a piece of tape down and try again.)
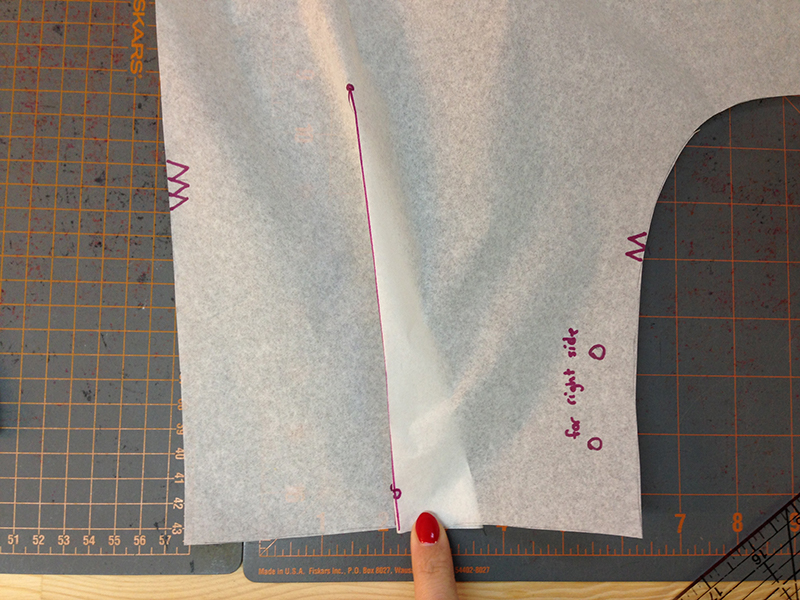
Carefully slide your dart closed, and tape in place. This will “release” that dart fullness towards the two sleeve lines you cut. Why did we cut two? Because there’s too much fullness for just one point (try cutting only one line and you’ll see what I mean). Releasing on both sides of the sleeve at approximately the same point makes it a lot more even. You can slide the paper around until it’s about the same on each side. It adds a minimal amount of extra ease to the sleeve—maybe 1/4″ in my case.
(Below I obviously don’t have the lines even, the gap is bigger on the bottom side, but you get the point.)
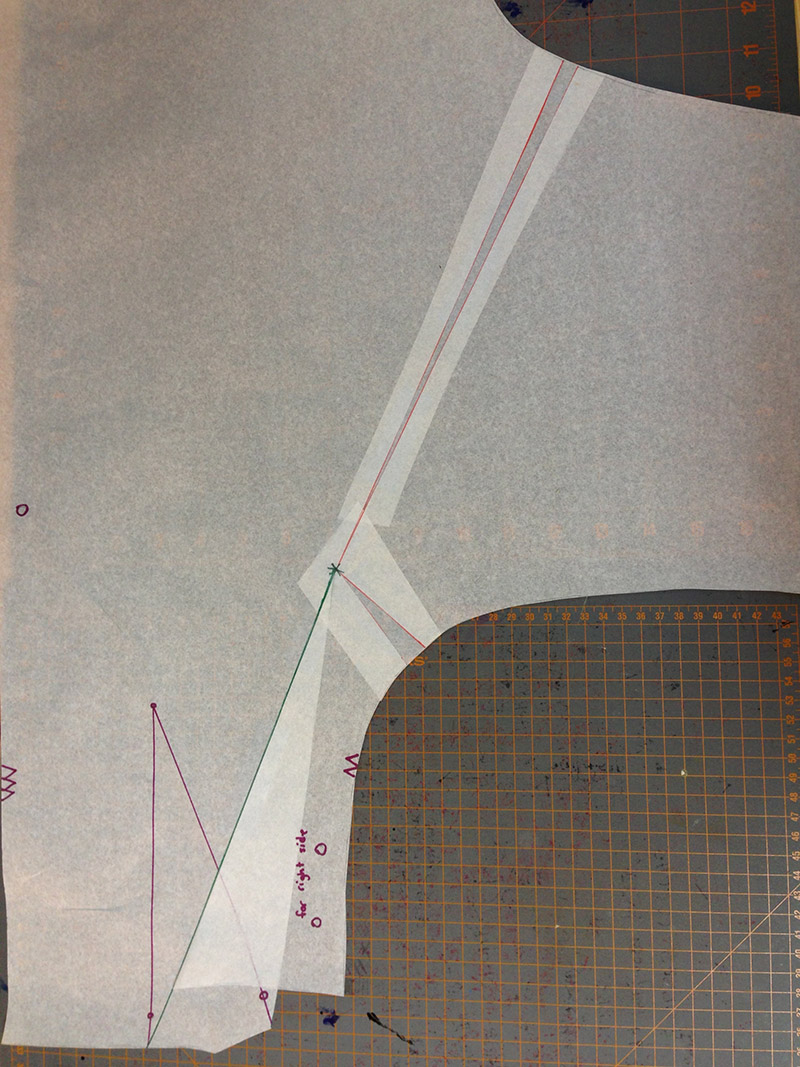
Carefully slide a little bit of extra paper under those two slashed lines (which are now gaps) you’ve just created, and tape them down to the pattern piece, trimming to keep the same shape of the piece at the edges. Here’s what it looks like with everything taped down:
The side seam at the hem is obviously funky from moving that dart, so we need to clean that up. Don’t be tempted to lengthen the side seam to match the rest of the bodice hem, because that adds length to the back side seam and it won’t match the front. (Ask me how I know…)
Instead, with a piece of paper underneath, gradually taper that line towards the center back seam, shown below in orange:
Trim off the extra paper and voila, dart is removed! Time to make the back longer.
Lengthen the bodice back
Now we can do the easier stuff! With the paper trimmed, lay another piece underneath. You’ll have to decide how much extra length you want on the bodice, which should probably involve a muslin or a first version, so you’re not just going by my judgment! I personally added 2″. If you have a long torso, you may need to add more, but it might take a couple of test runs to get this perfect, just like any time you modify a pattern.
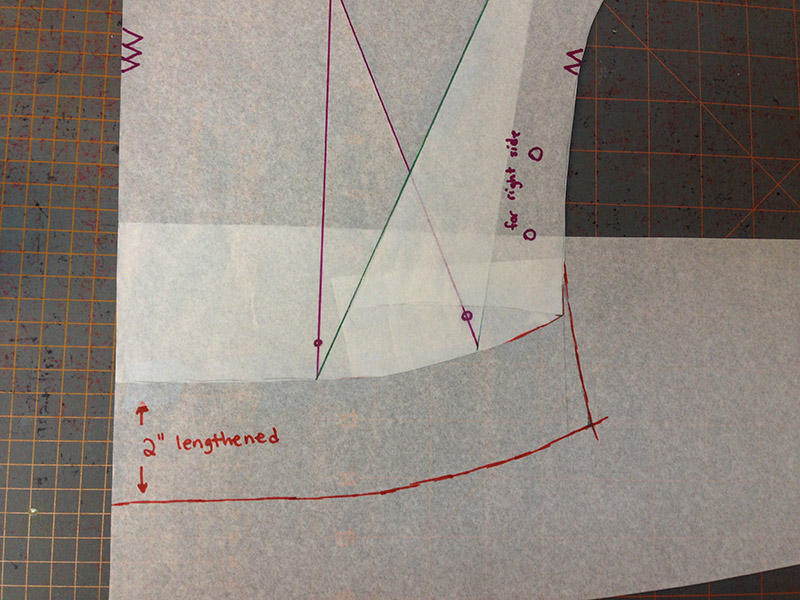
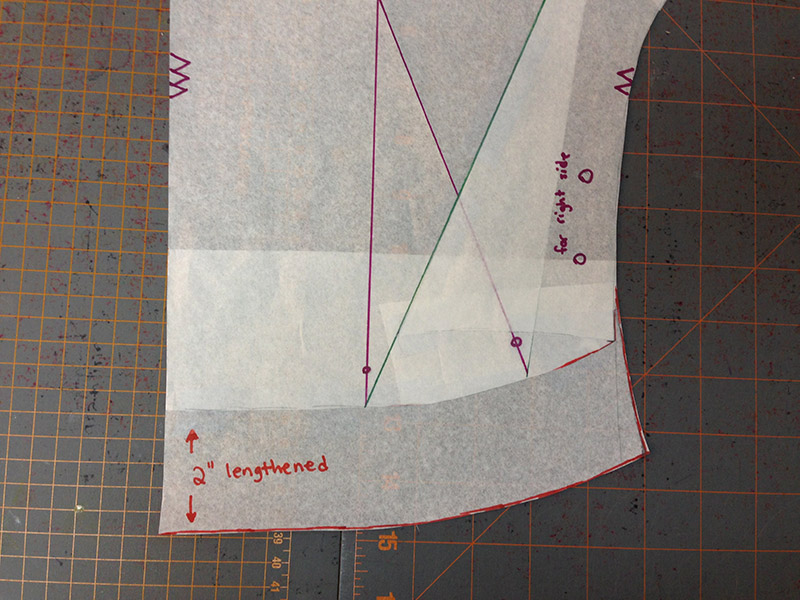
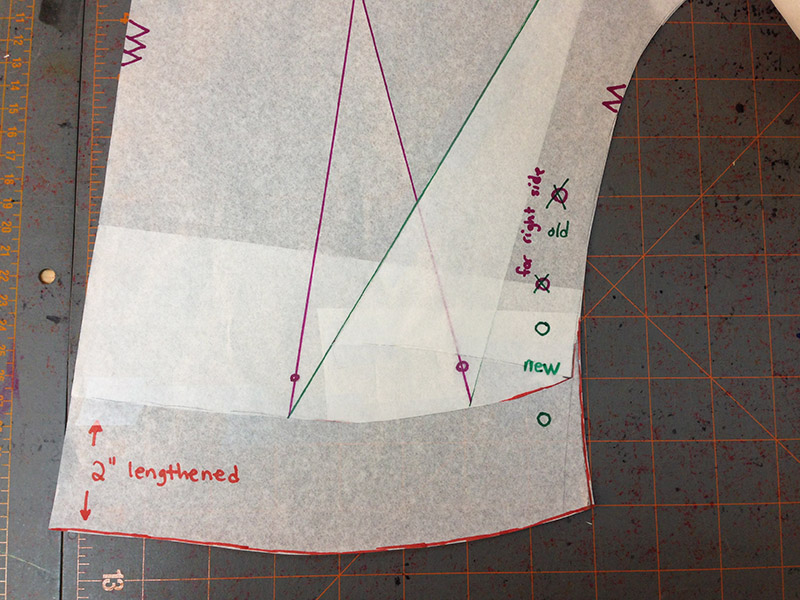
I drew 2″ down along the entire bottom edge of the back of the bodice, following the contour of the pattern piece. Because I knew the previous hem was at my natural waist, I also gradually flared the side seam out a bit for my high hip (barely qualifying as your hip, like high high hip). Don’t forget this part. If you’ve already sewn this top and found it hit way above your waist (say 1″ above), you’ll want to keep extending the line straight down to where your waist would be (1″ longer), and then flare out. And if you don’t have a narrower waist and just need to lengthen the bodice, then of course, don’t make that line flare out. (Basically, you’re contouring this for your body shape.)
I didn’t go very far out in my contouring since it’s for stretch knits and the fact that it wraps around is pretty forgiving by nature. So just a bit of flare:
Then trim away the excess paper and you’re done with the back!
Lengthen the front bodice
We’re going to add the same length to the front as we did to the back (in my case, 2″). But we also want to make sure that the side seam flares out at about the same rate as we did for the back.
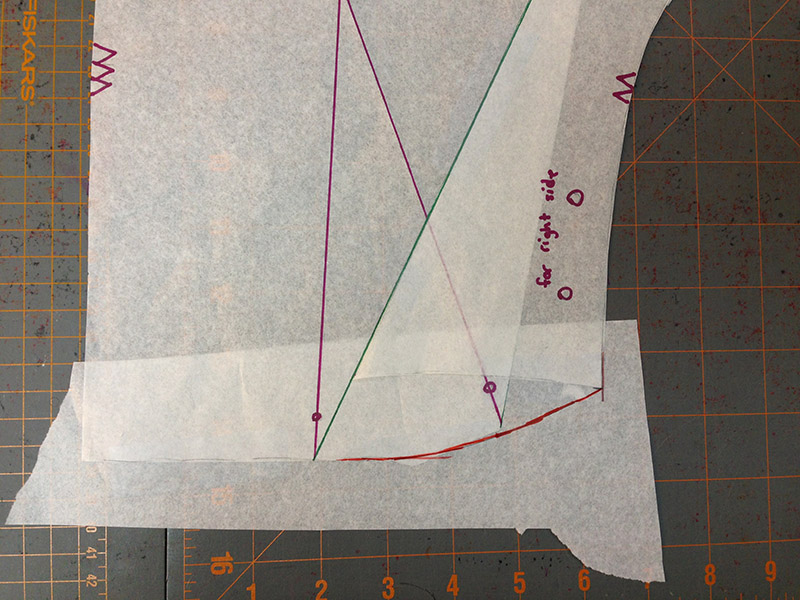
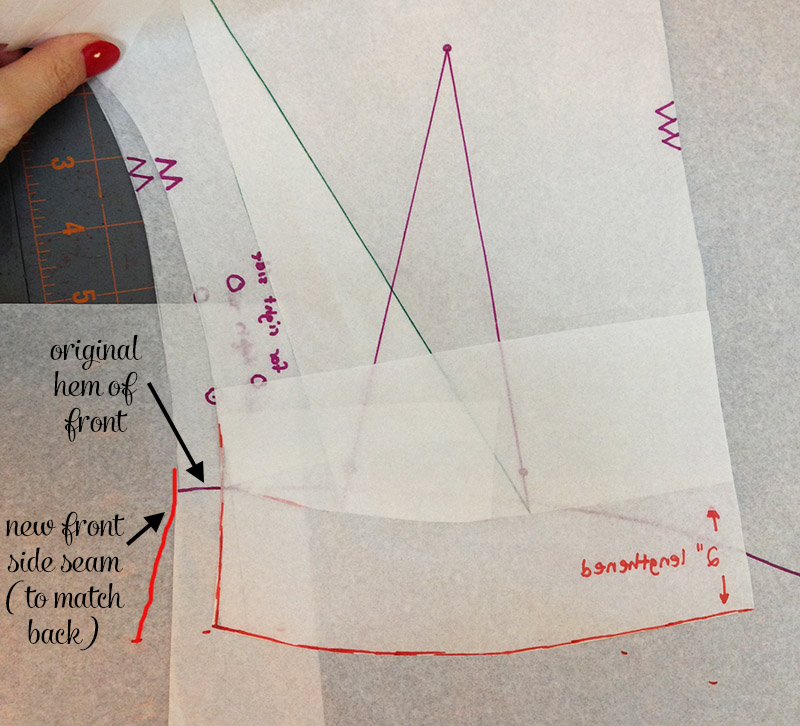
What I did was just to fold the pattern piece over so the back is on top of the front, match up the two notches (in purple below), and match the front side seam to the back, drawing in a new line for the front. I have the notches lined up below and the back slid slightly over to the right, just so you can see the pieces are layered. I hadn’t drawn in the side seam yet, so I drew it onto the photo in red:
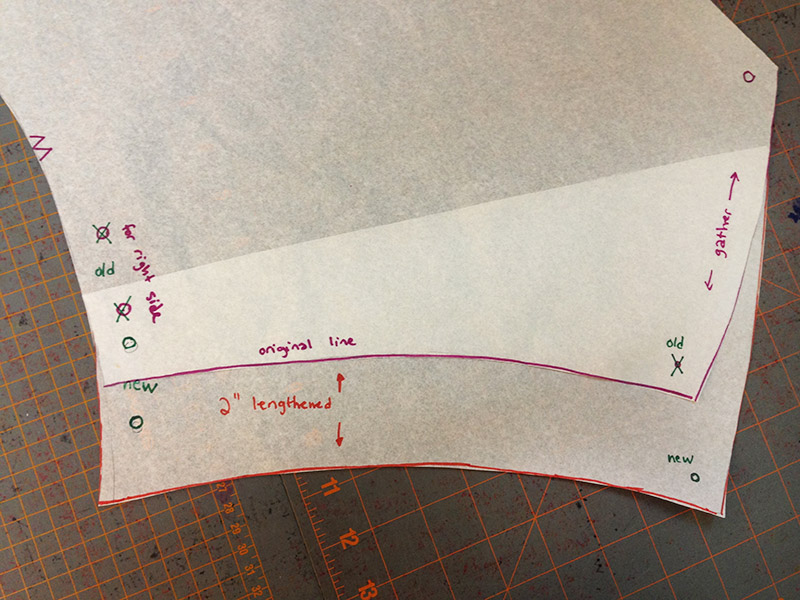
Then I lengthened the front hem the same length as the back. However a word of caution: don’t just eyeball this exactly. I admit, I am a total eyeballer when it comes to lines, but twice I found myself accidentally giving myself less fabric than I needed because the gathered edge is curved, and I narrowed it instead of widening it!
So use the original pattern piece as a guide for the lower edge of the front. I lined it up at my 2″ line… you can’t see my line below as I’d only just dotted it in with marker to start, then used the bottom edge of the pattern to trace the entire width:
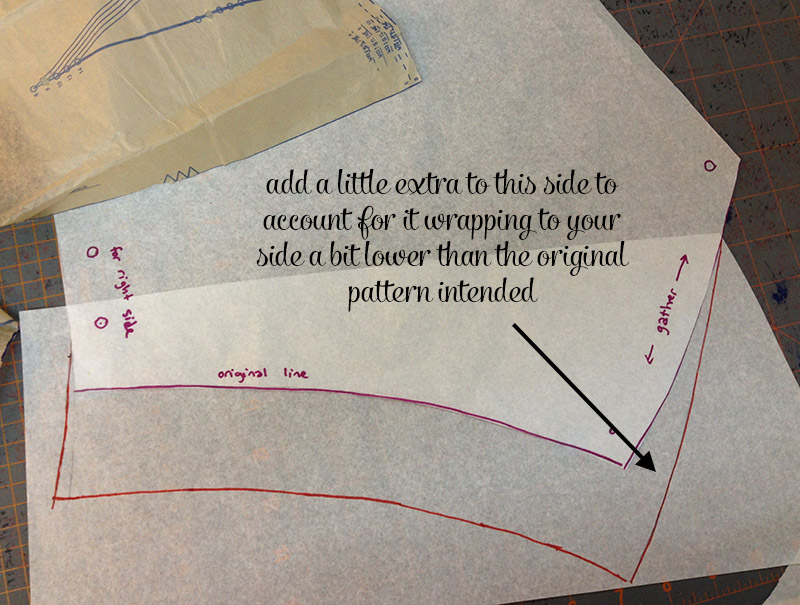
And then because you’re now lengthening this a bit, you need a little bit of extra fabric on the side, too, so the wrap goes far enough to the side seam. It’ll no longer hit at your natural waist, but a bit below. I didn’t add much, maybe an extra 1/2″ or so, since again, it’s for stretch knits:
Cut this out, and you’re done lengthening your front bodice!
Move the markings
Last step is easy but don’t forget it! Since you lengthened the piece, any small or large dots on the original pattern piece at the lower edges are now too high (in my case, 2″ too high). Overlay your original pattern piece, and transfer them to your lengthened piece.
You can see below I just crossed out the old markings, and drew the new ones in another color:
Here’s a suggestion that I didn’t do, but probably will next time: those two large dots at the side indicate where you pull the tie through the top, at your waist. Because lengthening the bodice means adding a bit more bulk to the gathered side, you might want to increase the spread between these two dots, just raising the upper one a little bit. Even 1/2″ would help. I didn’t do that and on my yellow top I find that are a teensy bit bulky with all the double layers of fabric. Just an idea you may want to try.
And now that I’ve stared at these photos a million times it looks like I raised the holes for the wrap maybe 1/4″ or so compared to the original, although I don’t recall making note that I did this. Ha ha!
Sew with the pattern
Then sew it up as the pattern instructs, skipping the dart because you’ve omitted it, and just gathering the sides a tad more when you sew them into the ties. I’d highly recommend following Gretchen’s post #7 from her sew-along for this top, as she shows you a way to close the sleeve hem by machine instead of slip stitching… if you’ve ever bagged a lining, it’s basically the same concept. Great trick!
In the end, with just a bit of tinkering with the pattern, you’ll have a slightly longer bodice for your wrap top. Huzzah!
Tomorrow I’ll be sharing how to turn this pattern into a pattern for a tuck-in surplice top (featured in yesterday’s post), with no ties, which is my favorite way I’ve made up this pattern so far!


Hey, thanks! <3
I already ordered the pattern and will do my first jersey project because of Your hack.
Yay, happy to hear it! I haven’t sewn with knits in awhile but this pattern has definitely rekindled that enjoyment!
Thank you so much for writing this tutorial and for going into such detail on the dart removal; I don’t think I would have figured all of it out on my own (at least not without a heck of a lot of trial and error and wasted fabric!). Looking forward to the next installment…
You’re welcome! I was so happy to figure out a nice way to do it I had to share. 😀
Thanks for sharing this… I’ll have to reread it with my pattern in hand ?
How much extra fabric did it take to make the longer version?
Actually because I shortened the ties, I was able to (with a LOT of sitting on the floor with pieces and staring and test pinning) get it all on 2 yards, so I used even less! If you weren’t shortening the ties you couldn’t do that though, so in that case I really think the extra yardage was mostly negligible if you’re only adding a couple of inches of length to the bodice!
Brilliant! I’ll be using this to make my first top 🙂
Awesome, glad it will help!
Just ordered the pattern! I couldn’t wait any longer after seeing all your great makes of this top. I love all the styling of it, and you made it super perfect with the lengthening hack. Thank you so much for sharing. I am so excited to try it out!! ❤
xox,
bonita of Lavender & Twill
Awesome, I hope you enjoy it! I’m sure it’ll look fab on you!
A HUGE thank you for this tutorial! Just what I need! Your instructions and photos make it look so easy. I made the original last month and love it, but find that it’s a bit too short for my tastes (I’ve been safety-pinning the back to my waistband just to keep it down!). I have two new lengths of fabric and will be trying this this week.
As a side note, I also made your Nisse hat pattern last year. I’ve gotten so many compliments on the design (I work as a guide at a presidential home), so I make sure to let them know they can find your pattern on Ravelry.
I’m so glad it’s helpful, Miranda! And that’s so wonderful to hear about Nisse. YAY! 😀
Maybe it’s my lack of experience but I am curious why didn’t you simply add the length to the bottom like you did on the front? I am getting ready to make my second top and was considering how to lengthen also.
You can technically do that, especially if the top falls well above your natural waist. However, if it falls at your natural waist or close to it and you’re lengthening it, the trouble with just adding length at the bottom is the dart: if you extend the legs of the dart going it keeps getting wider (meaning taking in more fabric), which means it’s then getting smaller at a part of your body that’s bigger (i.e. upper hips, vs. waist). Make sense? So no, you don’t have to remove the dart if you don’t want to, but it’s a nice option!
Thanks for clarifying. I forgot it will be going over a larger part of my body.
Reading your helpful tutorial has brought great relief to me. The pattern was a bit challenging and didn’t seem to make a lot of sense to me. I completed the top, but it does not fit at all. It is too short and the 3/4 sleeve is way too tight. I definitely wasted a pretty piece of fabric. I thought I had done something wrong, but after reading this I feel so much better. This shirt pattern needs to be done over before selling. Thank you again for your helpful tutorial
Thank you so much for your tutorial. I just finished mocking up my pattern. If I wanted to make long sleeves..so I just simply make the sleeve area longer? I didn’t know if I needed to modify anything else. Thank you.