
Hi, my friends!
I haven’t blogged in nearly two months and it’s almost entirely due to current world events that have been all too stupefying and depressing. I just haven’t wanted to sit around taking oodles of photos and having mundane chatter about this and that I’ve just made. It doesn’t mean I haven’t been sewing or knitting because I have! They help keep me sane. In fact I’ve finished up some projects I’m really proud of (and some boring ones, too). But inspiration has been slim. And while the political climate has not changed, at least I can tell spring is coming (huzzah!), and I have a big birthday trip planned in the next several weeks, and so I’m feeling like some of my fog is lifting and I’m ready to blab on again about things I enjoy. And so here we are. 🙂
Last fall, I blogged about how I was going to take the plunge into bra making, which was a difficult place to get to since I wear retro style bras to match my overall style and fashion preferences. Since then, I finished up Beverly Johnson’s first bra making class on Craftsy, and have watched parts of her other two more advanced classes, too. Seriously, these classes are some of the best money I’ve ever spent on something craft-related! (Looks like they’re all on sale now but periodically they have even better sales.)
Back in October, I completed my first fully-finished bra. I say fully-finished because there were two not-completed projects first. The very first was one that I started from one of the vintage patterns I bought, Sew-n-Stretch 217 fro 1969, only to discover the 32C was comically small once I had the cups in the frame, so I bailed on it right away. Even if I’d found the pattern in a D cup, I still think it would overall have been way too small.
Not to be deterred, I started on Kwik Sew 3594, which is basically the modern equivalent. I went with a 32D in that, and inserted channeling and wires unlike the pattern (which doesn’t require any pattern modification, just needed to add those steps). The frame was very comfortable, but the cups were a hair small. Plus, I personally like my bras to have a lot of lift but I went with their suggestion for where the greatest degree of stretch (DOGS) should run, which was essentially parallel to the floor, and that meant that the cups were kind of saggy, even being self-lined (two layers of nylon tricot). So even though it should theoretically have given more of a vintage kind of oval uplifted look, it just looked like a normal round bra to me. Fail.
That was the blue one below, mostly finished but never to be worn. It was made from a nylon tricot kit from Bravo Bella. But a really good learning experience and helped get my feet wet for really understanding the pieces, stretch, and overall architecture for a basic bra.
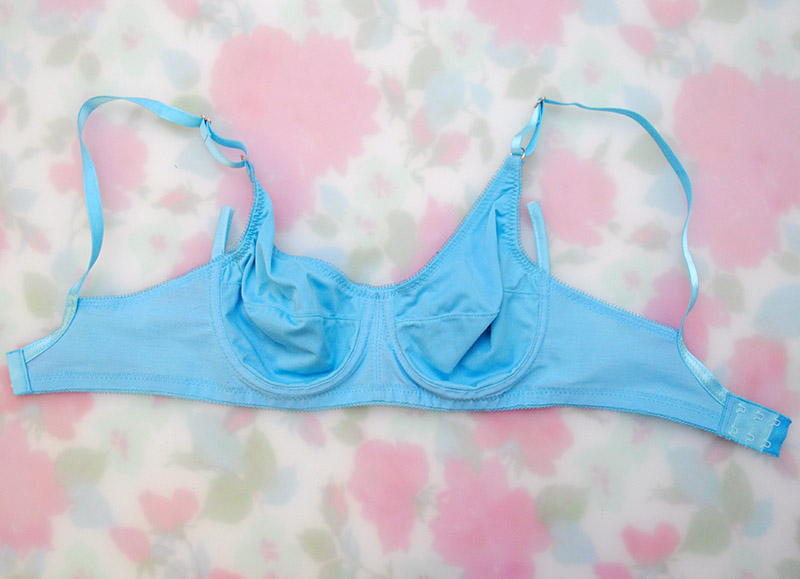
At that point, I was determined to get a bra the way I wanted it. And I was closer! But not there. The Kwik Sew pattern didn’t come in a DD cup for the 32 band, and I could have figured out a way to use the 34D and made the band smaller (so the sister size to a 32DD), but I also wasn’t sure if the cups would fit me better if I changed the direction of the stretch, and I suspected the DD might be too big.
But then I had a brainstorm. I’m after a really specific look, amd I get that really specific look out of one of my favorite bras that’s also pretty inexpensive: Bali Flower. What if I just bought a new bra (so that it wasn’t stretched out already from wearing it), and disassembled it? Kind of crazy, but for $20, it was the price of many indie bra patterns, to get more-or-less exactly what I wanted. So that’s what I did! I couldn’t quite decide on a C or D since I’d been waffling between those two sizes in my bra drawer anyway, so I went with the D figuring I could remove some excess in the future if I needed to.
It was actually kind of fun and since I never planned to put the bra back together again, I made it easier on myself by drawing on it as I went. Here’s what the cups looked like once I unpicked half the bra. You can also see the important direction of the stretch, which is vertical, not horizontal. These are seriously stable cups (the white fabric is fused to the sheer fabric) and I now know to make mine the same way.
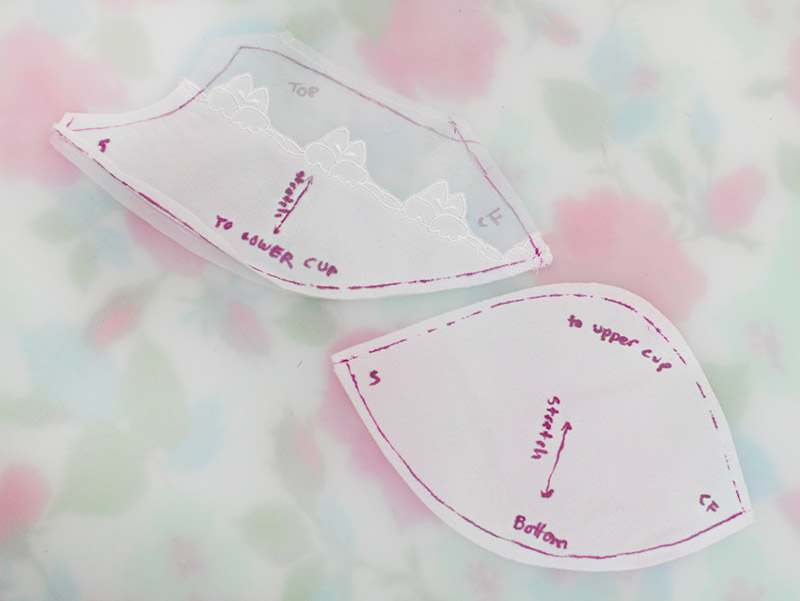
Initially, I planned to trace off the Bali Flower band but once I started looking at it, I realized you know… I don’t love the band! I love the cups, but the band is wider than I really need (4 hooks for the D cup and the bra has so much lift on its own, it’s overkill), and I prefer the U-back style. So I did Crazy Thing #2, which was slap the Bali Flower cups onto the Kwik Sew band. Well, and technically I changed the upper cup not to be straight across like the Bali Flower, but with tapered self-straps that fold over a ring like the Kwik Sew pattern, to keep things simple in the beginning.
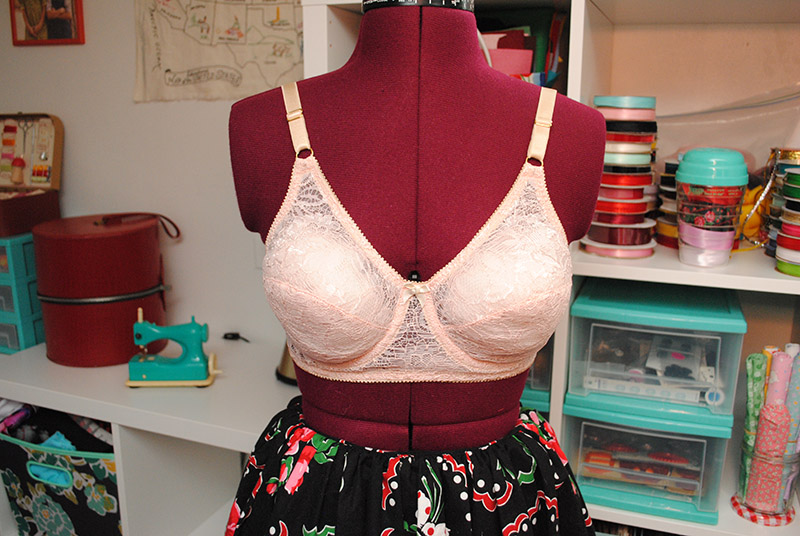
And it worked! It all went together well and the fit was pretty much just what I wanted (a bit to tweak over time still). My first finished bra was this orange and black one, which I made right in time for Halloween… a good while ago by now, obviously. 😉 The orange power net and Duoplex for the cups and frame also came from Bravo Bella.
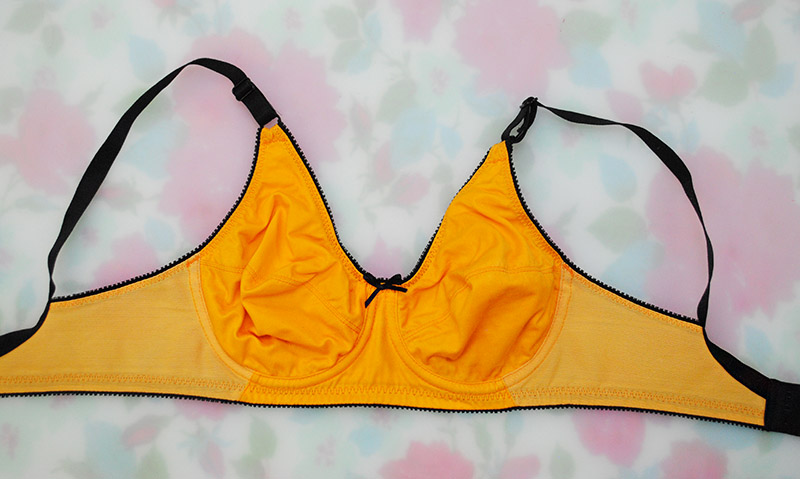
I made a couple of alterations to the frame, making sure it would fit with the new cups, and removing the center front frame seam. I also put a seam in the frame because the Kwik Sew pattern has the entire frame/band as one piece of power net, whereas most bra patterns I’ve learned have the frame in a more stable fabric, so I made a little angled seam under the cup. (Now that I think about it, I wonder if a stretchy frame could also have somehow affected the fit of the cups in my blue tester Kwik Sew bra.)
I actually got the idea for the seam placement from the Bali Flower RTW bra.

And I have worn the hell out of that bra! Right after making it, I got all excited about making others and bought a bunch of supplies, but somehow just never got around to it. That is, until I had a cold last week and wanted a small and fussy little project to take my mind off things, once I started to feel good enough to work on something.
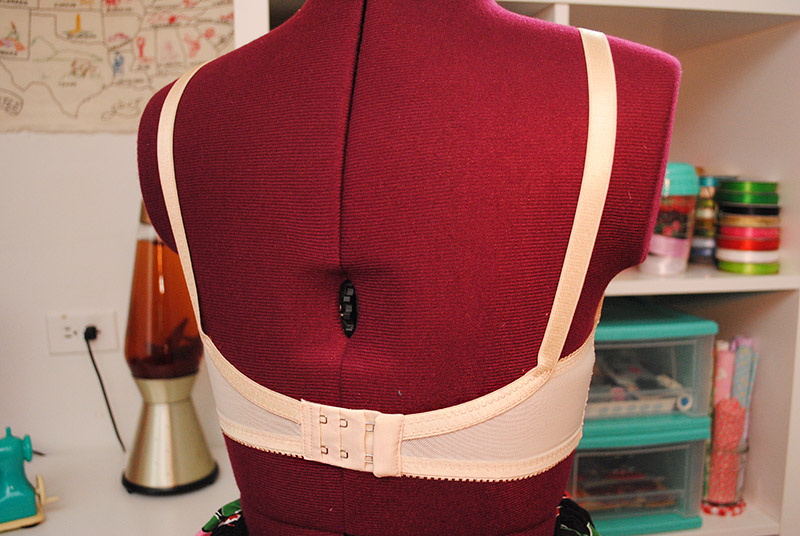
Before I sewed it, I made a couple of small tweaks: I lowered the height of the upper cup ‘strap’ at the top and tapered it a bit because I made it a bit tough to get into a 5/8″ ring let along a 1/2″ ring. I also moved the frame seam to the side of my body, meaning the power net portion of the band was smaller. To compensate for less stretchiness, I added 1/4″ to the width of the band.
Now, filed in the category of weird shit I never thought I’d be doing: stuffing a bra on my dress form. It’s kind of creepy, because it’s your own bra, so it’s your real boob size, but it’s on your dress form and… yeah, it’s just weird. Sorry if these look a little lumpy, it was the best I could do with polyfill!
(Glimpses of my very-much-in-progress basement studio space back there… the bones have been in place nearly a year and are wonderful but I need to focus on decorating and organizing my stuff still.)
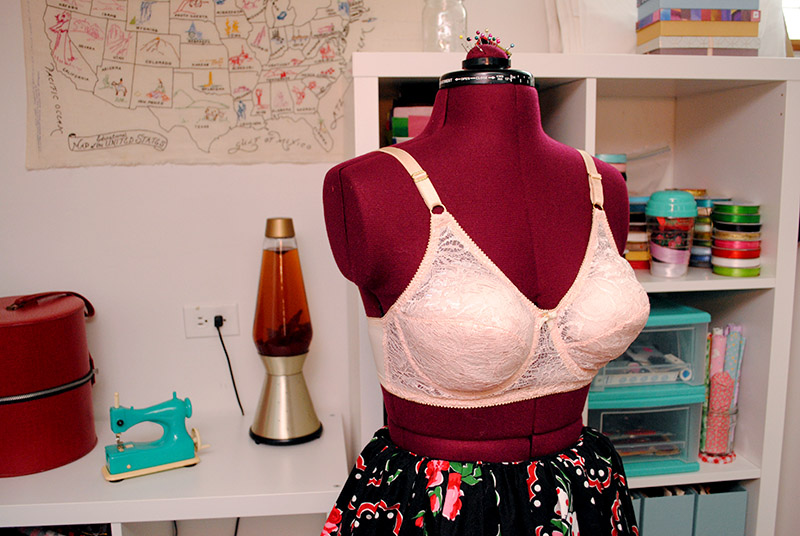
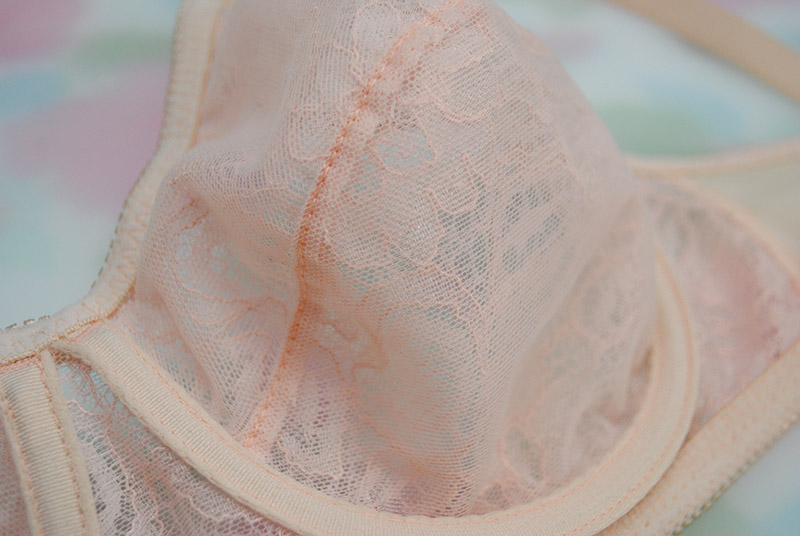
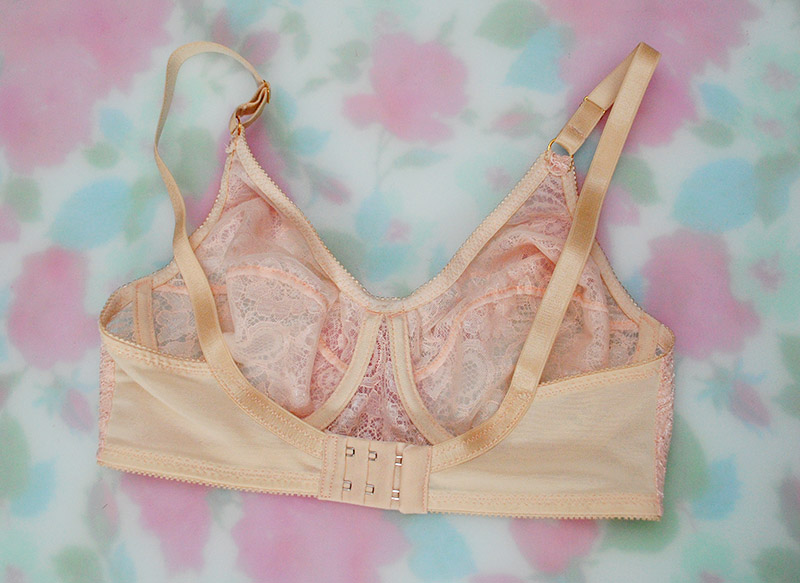
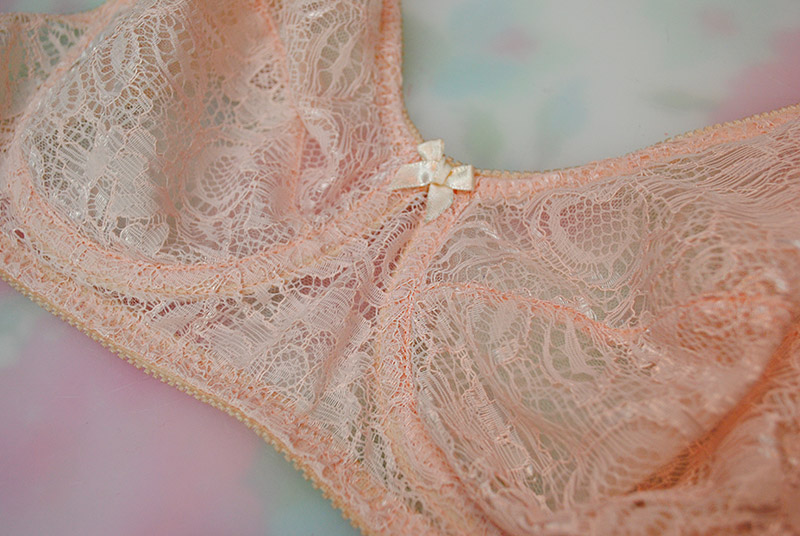
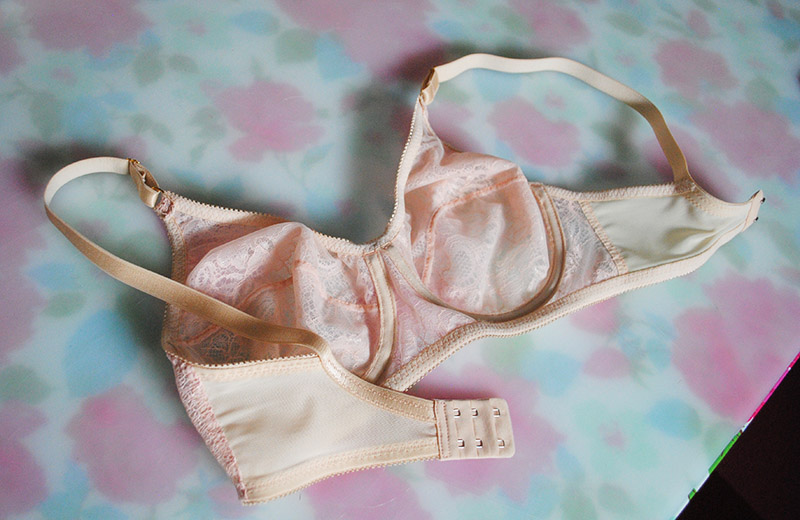
This bra proved itself to be really hard to photograph, but I’m in love with it through and through. The cups and frame are underlined with sheer nylon mesh, and I used another layer to line the cups, too. The fact that you can sew together the cups and the lining through the cross cup seam, enclosing the seam allowances feels like such a great piece of sewing trickery!
I could probably have trimmed down the seam allowances a bit further, but I’d literally never worked with lace before and didn’t want to risk it fraying, even enclosed and topstitched as it is. (I throw my bras in a lingerie bag in the washer. Shhhh don’t tell.)
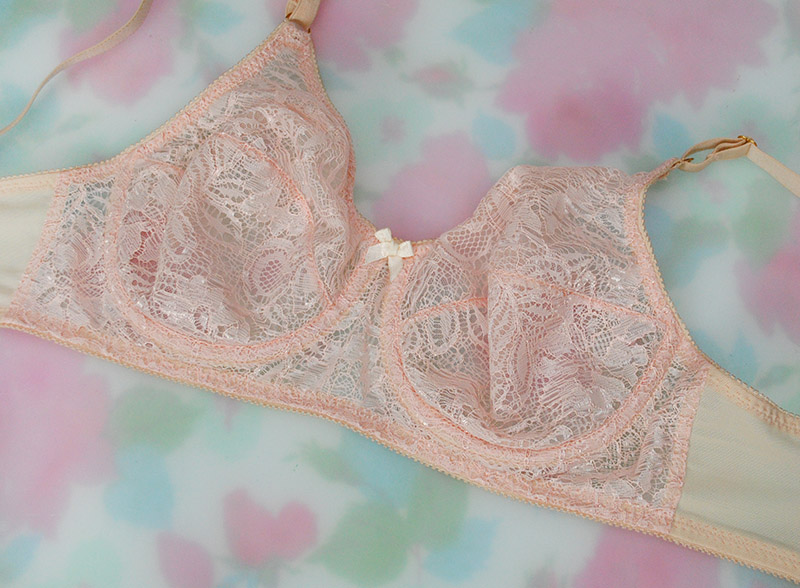
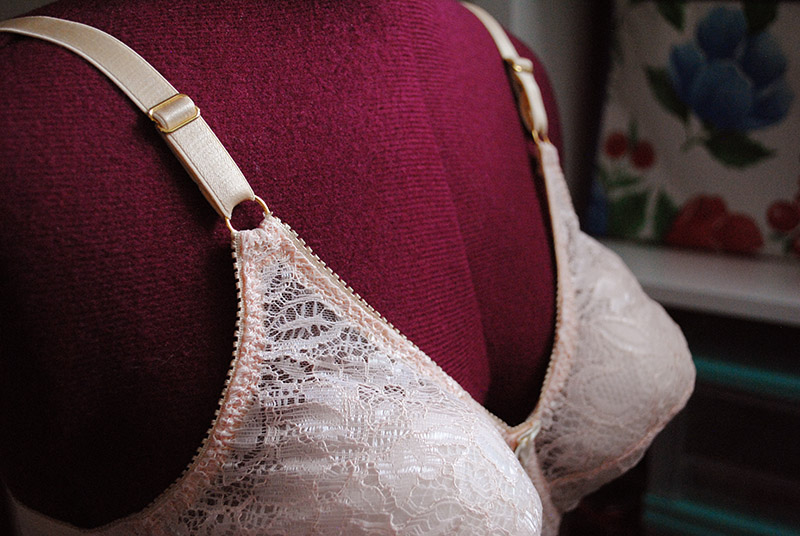
I love how simple and elegant the gold rings and sliders look. All the supplies for this one was from a kit from Emerald Studio. I just adore how it all looks together.
It sounds funny, but looking at these photos gives me such pleasure! It’s deceptively easy to sew a bra, and it ends up looking really professional. And even if a couple of things end up imperfect (my three step zig zag went a little wonky on one of the armhole sides), no one ever sees it.
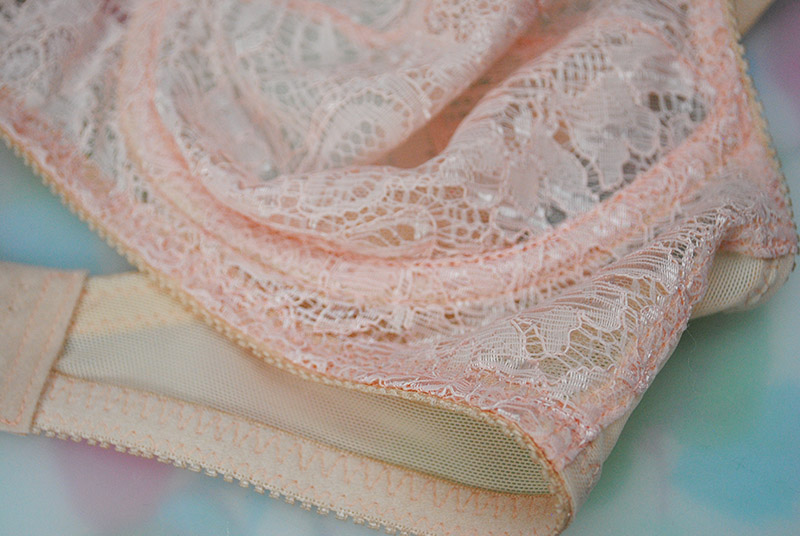
Below is a comparison of my blush lace bra to one of my Bali Flower bras. It’s worth mentioning the RTW bra (on the bottom) is pretty well worn at this point so the band has stretched out a bit I assume, but you can see how much wider it is! The band on my version is so much more comfortable and just feels like I’m wearing less in the back… which I am!
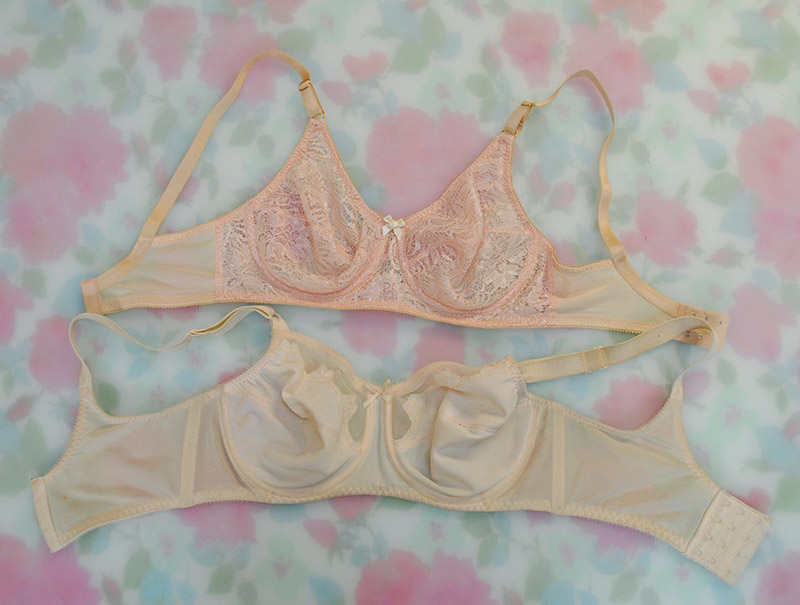
Now how’s the fit? Well, I’m not going to model it so you’ll have to take my word for it. I’d say, pretty damn good. I’ll likely shorten the frame and band a little bit on the bottom, because through the course of the day, it can get a little bunched. I don’t notice it while wearing it, and it does it more on the lace version than the orange one since I used a narrower elastic for the band (1/2″ vs. 5/8″) and the channeling doesn’t overlap the band elastic.
And the cups are good, although it’s possible I have a tiny bit of excess fabric in the lower cup. I’ll have to suss this out over time and future versions, because I used a different underwire style in the lace bra versus the orange bra and that changed the fit slightly (for the better).
All in all I couldn’t be more pleased with my first adventures into bra making. I can finally, finally make retro styled bras in any fabric or color combination that I want! And now that I’ve learned in one of Beverly’s classes that you can modify an existing pattern to have a horizontal seam across the cup (which theoretically should give my preferred shape), I may try a couple of the lovely looking modern patterns and try to modify them. We’ll see. Even if I only ever churn out variations of this bra and play with tweaks to it, I will be a very happy person indeed.
I can’t wait to make more!

Wow! That’s such a beautiful bra. I’ve had the supplies and patterns to make bras for ages now, but can’t seem to bite the bullet. You may have managed to give me the final kick up the arse that I needed!
Thanks, Charlotte! Well if you have the supplies and patterns then I’d say it’s high time to get this show on the road, yes?!! 😀
Tasha,
You have been missed! Girl, our country needs your mojo. Don’t stop being you. What you do in the big scheme of life is important and helps with balance. I don’t sew but I learn so much from reading your posts. Okay; here is the deal seventh grade home economics teacher said “I was stupid” so that has influenced me. Enough about me. Let’s talk about those awesome bras you made and their detail is so professional. They are so feminine and soft. I want one.
Cheers, and welcome back.
Linda
Thanks, Linda! Finding balance is more necessary now than ever. 🙂
And by the way I’d like to kick you seventh grade home ec teacher in the butt! Who tells that to a student, ever, for any reason?! Terrible. Maybe you need to give them the one finger salute and learn to sew someday. 😉
Hi there,
I’m also a ‘secret’ reader of this blog; discovered some time ago when I wanted a tutorial on easy vintage hair styles. I love reading it and get so much inspiration whether it be clothes styling, having a go at (very) basic sewing, interior design or to get shoe envy! I have been checking if you have added any recent posts and not to sound too strange, seeings as I don’t actually know you, was getting concerned that there hadn’t been. It’s so good to have you back! I live in the UK and recent political events, including in your country, have got me down…But we have to make our own sunshine. Reading your posts contributes to that for me. Warmest wishes, Marcia.
Thanks for the kind words, Marcia! While I haven’t been blogging much, I’m pretty regular with my Instagram account, if you do have that: my username there is bygumbygolly. And I agree, we definitely need to make our own sunshine! Especially in dark times.
I don’t know the first thing about sewing, and I often get lost in the descriptives, but I love your flair and beautiful creations. How do you DO that? What an inspiration you are!
Aw, thanks Regina! I’ve always been crafty and I’ve always had fun playing with fashion, though sometimes more successfully than others, ha ha! Thank you! <3
The amount of planning, work and skill that went into making this obviously paid off; incredibly impressive!
Thank you! I’m glad to finally get to a place where I’m happy with what I have going on in the bra making department and even if I don’t change up anything, I can keep sewing ones that make me happy. It’s amazing though because it really is so much easier than it looks!
Wow! I’d really like to get into making slightly-retro bras (to match my slightly-retro aesthetic) and I think the horizontal line really is the key based on my current bra collection. Your bra looks wonderful–much prettier than the original!
Thank you! Yeah, the original comes in black, white, and beige. I mean it’s fine, but not very exciting options of fabrics to be sure. So I’ve literally opened up a whole new world of options which is pretty awesome. 🙂 I’d highly recommend it!
I just ordered my first bra kit yesterday, and today I see your post! Now I’m impatient to get my order. Also thanks for the heads up on the Craftsy offerings. Gorgeous bras btw.
Thank you! Yeah, I can’t recommend the Craftsy classes enough, honestly. I know a lot of people talk about them and for good reason, she holds your hand through everything without coddling you and makes it seem really easy. And then suddenly boom, you’re sewing a bra, too!
Tasha, I kept checking your blog in case I wasn’t getting notification! I can understand how you feel about your Country as of course we in Northern Ireland are going through similar traumas despite still being part of the UK plus Brexit!!!!! I also watch everything that is happening iin your Country too and I totally understand your feelings! Its very difficult being like us as we care so much, but feel so helpless! Please don’t let those things interfere with your whole life as if we do, we’ll go completely mad! There are plenty of those around already both here and with in your Country, don’t you think, without us joining their ranks, so stay strong and stay hopeful, as there are many others who care too……well done on the bras, the lace one looks gorgeous. I’m about to go down that route too, but starting with panties first (partly because they’re replacement is more urgent) then I’ll start to dissect old bras for their wires! Thank goodness I didn’t get round to that clear out! Another thought as yuour style is vintage…..the old sayings posted around UK during the 2nd World War…..Keep Calm and Carry On (sewing and making Bras)……..
Yes indeed, keep calm and carry on is a good phrase for right now. And keep sewing and making bras, too. 😉
You are a perfect combination of adventurousness, curiosity and logic…with a large dose of patience thrown in. You inspire me!
Awww, thank you! That is a really lovely compliment, I appreciate it. <3
So beautiful and professional! I love the lace one.
Thanks, Nicole!
Oh Tasha, I understand. I am in the UK, looking on with horror at the world around me and had stopped sewing for a while as it felt so frivolous against the backdrop of awfulness that is the political situation in both our countries, and in the world. However, I eased back in last week with sewing a simple shift dress. I think we need this balance and positivity. I missed your blog too!
I completely agree about finding balance. It’s been difficult but my hobbies do give me a lot of pleasure and keep me sane, and those are VERY important things right now!
Well, I would not make a bra, because i am happy enough with ready-to-wear. But I really enjoy seeing what you did. I think we often try to make things that we can’t acquire another way. It was very smart to take apart a ready-to-wear item to make a pattern. I am very impressed with the sewing on this, because there is so much visible stitching that must be done right to appear professional. I am especially impressed with the zigzag elastic stitching on the armholes.
Thanks so much! Actually on one armhole the layers were having a hard time getting through the machine evenly so the stitching got a little goofy but when I’m wearing it, who would ever know. That’s one of the refreshing things about sewing bras I have to say! And I agree about wanting to make things we can’t acquire. I literally can’t find many bras that are lots of colors in the styles I like, which makes this very exciting for me.
Your bra making adventure is remarkable. You are incredible in the steps you take to get the end results you are looking for. Very encouraging for me and inspiring to be more bold and to try the adjustments that might give me the results I am looking for. Your craftsmanship on your bra making is impeccable looking very professional. Thank you again for your blog, I always learn.
Marie
Thanks so much, Marie! I have a strong stubbornness in my crafting sometimes, ha ha!
What Melissa said! And I love “make your own sunshine”. Boy, does that apply to me. You are an inspiration always, but the bras are gorg!
Thank you, Cherie!
If you are having trouble stuffing your bra (on your dress form!) have you considered knitting a pair of “Knitted Knockers”? These are knitted breast forms that some women use while waiting for reconstructive surgery or in lieu of more “traditional” prosthesis. A lot of knitters will do these for charity and there are a ton of patterns out there. I’m sure you can take a couple of measurements and work out a couple in an evening or two. It might make your photography and bra-shaping activities a bit easier! I love this blog! Keep it up please!
That did occur to me although I’m not sure I can be bothered frankly! lol We’ll see!
Excellent job. Though it looks like the channeling was installed upside down. The side that looks like grosgrain ribbon goes on the inside so the plush side can be against your ribcage.
Thank you! And that’s really funny about the casing, it didn’t occur to me since both seemed relatively plush. I used that side since it seemed similar to a type Beverly Johnson showed in her first class where there’s that very slight ridge and you could use it as a stitching guide (not that I really did), so I didn’t even think that the one I was using might be upside down!
The ones with the guides it looks like a dashed line that you can barely see with the visible eye. I’m not even sure they are meant as guides because in the factory the channeling is actually underneath the fabric and the sewing operator can’t even see it. 😀
So beautiful! What camera are you using? These pictures are really great.
Thanks! I have a Nikon D3000. There’s a LOT more I really should learn about it though! 🙂
Thank you so much for this post. I am about ready to try sewing bras. I recently discovered that a vintage style bra makes all my fitted clothes fit better whether they’re vintage or not. All I had to do to get all my darts and princess seams in the right place was to change bras. What a revelation! The only problem is that I’m fanatical about seamless cups. Playtex has two seamless cup bras that are vintage shaped. One has a ridiculously wide band. The other, the one that will go under my summer dresses without showing, has foam lined cups and I’m worried that they will be too hot for summer. So, maybe I should try to get over the seamed cup thing and make them myself.
Well, I can’t really comment about truly seamless cups, as I certainly don’t notice the cross-cup seam in my bras at all (and I have pretty sensitive skin and other parts of some bras do bother me). But you could line a bra cup which I’m not sure would be better or worse in your opinion, like I did hear, so everything is enclosed. It couldn’t hurt to just try one and see what you think, maybe you’d be a convert! Alternately, you could take apart one of the Playtex seamless style you like with the too-wide band, trace it off and use a narrower band. That’s kind of like this one… it’s the best part of my Bali Flower (the cups) but with a much more comfortable band, and it doesn’t rub or chafe!
I’m more worried about the seams showing through clothes, as they will with some knits especially. But maybe I’d be better at making smooth, flat seams than the commercial bra manufacturers are. Can’t hurt to try anyway.
I started sewing my own “unmentionables” this year too – though have been a bit scared to try bras! – and so far it is my favourite way of “sticking it to the man” through sewing!
Keep your chin up, times are really tough but the world needs good people and you are definitely one of those.
<3 A new fan of yours (and fellow Whovian!)
Such a fantastic idea! I have a couple of favourite bras that were chomped by the washing machine. I can’t repair them but I now can make patterns out of them!! Your bra looks gorgeous- I also love this cup style. Thanks for the inspiration!