
I’m so happy to say I’ve tackled the ultimate wardrobe staple: jeans!
Yep, my Ginger jeans are finished. And honestly, they might be my favorite thing I’ve sewn. I LOVE THEM. All caps kinda love. Actually there’s a lot of all caps in the next couple of paragraphs, I’m that excited! 🙂
They’re not mistake-free, nor a completely perfect fit (is anything ever?). And I’ve done tailoring, and sewn jackets, but this is some of the most precise sewing I’ve ever done. I am just SO FREAKIN’ PROUD of these jeans. There are a few minor issues, but I don’t think I’ve ever looked past them so easily as I have with these Ginger jeans, because everything else about them tickles the living hell out of me! They feel durable, they look good, and I’m going to wear the hell out of them.
They make me look down at my legs and do a double take. “Those are some nice jeans I bought—no I didn’t, I MADE THEM. HOLY COW.” And because I’ve read nearly every jeans blog post I could find to psyche myself up for it, I know my thoughts are not alone. There’s just something about sewing jeans that feels like you’ve really crossed the RTW border!
Boy, it’s a triumphant feeling!
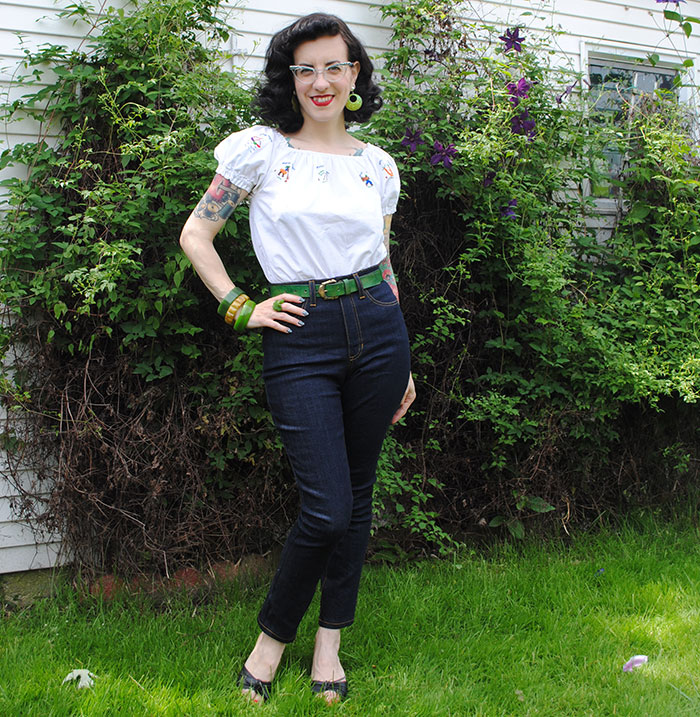
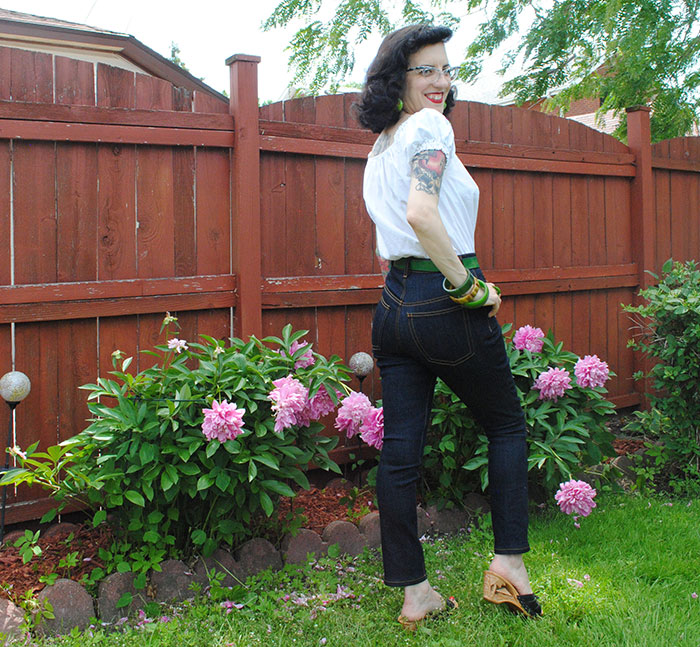
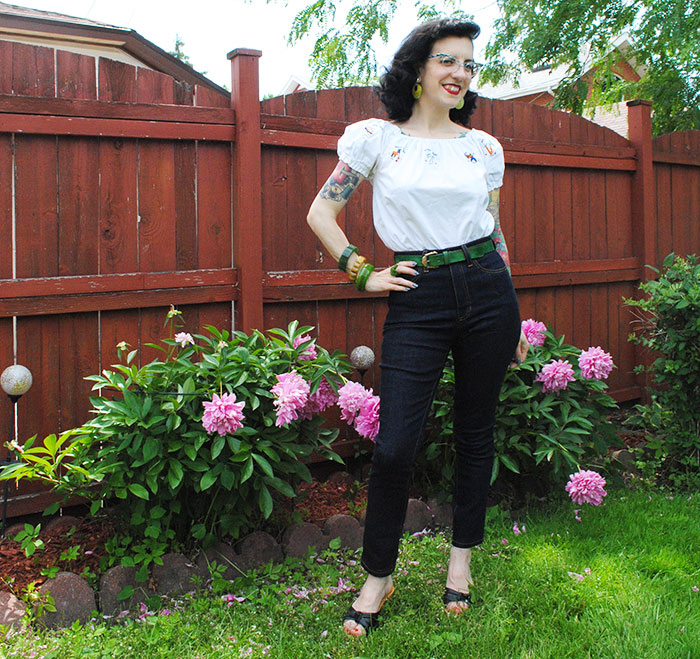
As I discussed before, I wanted a pair of skinny jeans that had a bit of a vintage vibe to them, it being me we’re talking about here and all. And I think I succeeded! I know a big part of that is because I’m the one wearing these. I mean, if someone who dressed totally modern had them on, they’d look modern. So of course personal style is a big part of it. But I also did raise the rise 1″ so they’d fall closer to my natural waist (although they don’t quite reach it still). They are indeed skinny so they’re a tight fit and kind of give off a rock ‘n roll vibe, I think. I still generally prefer non-fly-front pants for more of a vintage feel but can’t argue with the ease of wearing a fly front now and again.
I used an inexpensive denim from Denver Fabrics (this one here), because I want to do a few versions before cutting into the good stuff. I have to say, I actually like this denim a lot! It’s a medium weight so it’s hefty enough not to show every panty line or pocket stay line in existence, and it’s not hugely stretchy (only 2% lycra, though I think it caused some of my issues with the fit being too tight first basting). The description read “This medium weight cotton fabric has a stiff hand and slight stretch” which is totally accurate. I wore these a lot this weekend when we were in St. Louis, plus there and back in the car (12+ hours round trip sitting on my butt), and they’ve stretched a bit but are totally still wearable. Not saggy baggy ridiculous at all. And bonus, I bought 2 yards and still have enough leftover to make a pair of shorts.
I’ve actually come to really like sewing with denim. It doesn’t shift around, it’s not difficult to cut (especially if you use a rotary cutter like me) and it’s about the most well-behaved type of fabric I’ve sewn with. Seriously! If you’re nervous about sewing with denim, Handmade Jane did a post on denim tips, and Sallie Oh on Madalynne’s blog did a post about sewing jeans a couple of years ago. It’s really not hard to work with at all. Plus, that “stiff hand” was really pleasing to work with. Sometimes lightweight and really stretchy denim is nice, but I generally prefer a more rigid denim, and this is pretty close, but with some stretch. I’m impressed for such an inexpensive, purchased as “these are kind of a first muslin” type of fabric.
Technical stuff:
- I used one sewing machine, my new Bernina 350. Switching back and forth between topstitching thread and regular thread is a bit annoying, but not that bad since you don’t ever have to change the bobbin thread (which uses regular thread). Totally worth it to do all my sewing on my new machine and not switch between it and my old one.
- I used my serger to finish all the inside seams. I’d have picked a fun contrasting thread except I wanted it to match my pocket bags, which were black, white and shades of blue. Not exciting options. So I just went with navy.
- I didn’t use a walking foot on any of my seams, which I would have with my old Singer. I mostly didn’t because the walking foot for my Bernina literally comes in its own box and I haven’t investigated how to use it yet. Ha!
- I don’t have an edge stitch foot for my sewing machine yet, so I used the blind stitch foot for all single topstitching rows, with the needle in the furthest position (right or left, depending on which way the seam was facing).
- I bought my rivets and jeans button from Cast Bullet. I really wanted the shinier copper ones but Taylor Tailor’s shop was closed when I was purchasing (however it’s back open now). But in the end the antique brass ones I used looks really nice with the gold topstitching thread I picked (Gutermann #412). I used a 9″ #4.5 YYK brass zipper with navy tape. Which gave me plenty leftover off the top to cut off in the end, even with the raised rise (and still will if I go another 1″ higher).
- I used a jeans needle for all the sewing, even when using topstitching thread.
- A couple of people asked about the “hump jumper” trick I mentioned in my last post… intersecting thick seams are difficult to stitch over neatly without ending up with wonky long or short stitches (or breaking a needle if it’s really thick). If you put a piece of cardboard, or plastic, or rolled up fabric behind the presser foot just as you approach the seam, the results are much neater as the foot doesn’t go over a little hump.
While I don’t think of sewing in terms of being less expensive than buying RTW, I made these jeans for about $17 in supplies. Whoa!
I talked about my progress in-depth already, but here’s a rundown of most of the adjustments I made or options I went for:
- Raised rise 1″ to try and get closer to my natural waist. I split this on the back between the yoke and back leg, so 1/2″ each (and obviously 1″ on the front too). Next time, I’ll raise it at least 3/4″ more which I might only add to the leg piece, so the yoke doesn’t get too big. That would also mean nipping the waistband and yoke in a tad to correspond. Currently these jeans sit about 3/4″ to 1″ lower than the narrowest part of my waist. Which is interesting as I’ve seen some non-altered versions of the same view hit other people at that spot, so maybe my short torso above the waist is coupled with a long torso below. (Oh, bodies!)
- Used size 6 pocket even though I cut a 2. I wanted them a little bit bigger, which Heather talks about as a possibility in the sewalong. Really glad I did this, I think they’re a good size for me. I wanted to embellish them but one try failed (forgot to interface) and I ditched the idea for a possible next time.
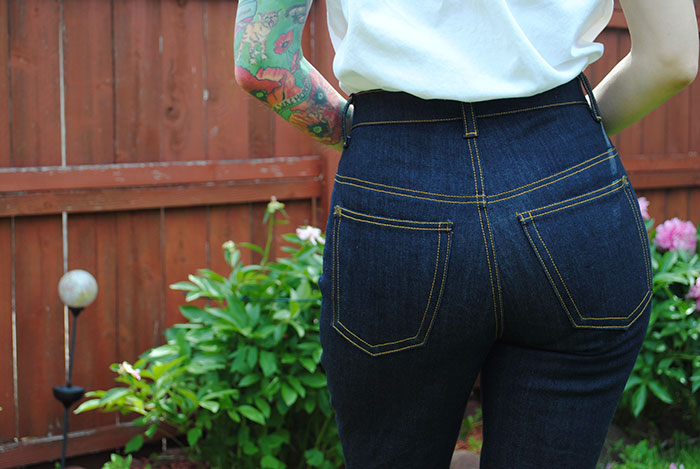
- Changed the back pocket placement. Since I was changing the rise anyway, I had to baste and eyeball this a few times. I didn’t sew them on until everything else was done, which I’m glad for, but was a huge pain to do with all that bulk flapping around. As I said last post, I used the center of the two topstitching lines as the center point to place the two pockets.
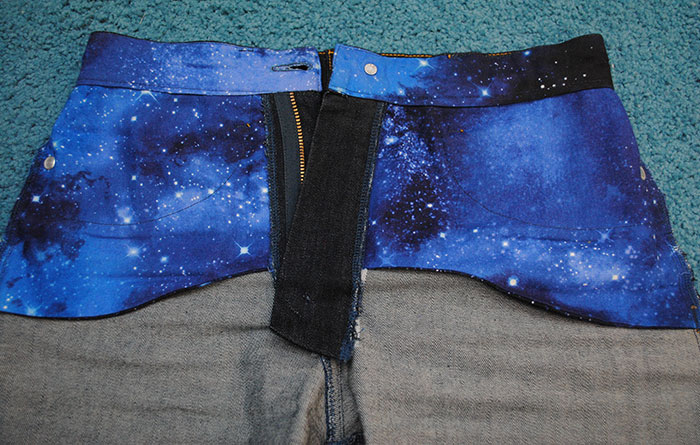
- Used the sewalong tutorial for turning the pocket bags into pocket stays. This gives you a bit of a “tummy tuck” which is great for the high rise version. Sooo glad I did this! (p.s. I think Heather just incorporated this in the updated pattern.) I used galaxy print quilting cotton for both the pocket stays and the inner waistband and I love this part of my jeans! Both the look and feel. Plus, absolutely no bunching up of pocket bags that way. These puppies stay put.
- Didn’t interface the waistband, except for where the belt loops attached. Several months ago I discovered I really like a quilting cotton waistband facing for denim trousers, but I usually interface the quilting cotton with a thin fusible knit interfacing. I didn’t for my jeans just to see how I like it, and for this medium-weight denim that’s not overly stretchy, that’s been just fine. No stretching out. Next time I’ll place the belt loop interfacing squares before sewing the two pieces of the waistband together as the facing started to get a little stretched out and I was worried topstitching it shut would be a problem, but worked out okay.
- Used a contrast regular thread for the buttonhole. My machine wouldn’t do one with topstitching, so I picked light turquoise regular thread for fun, and to kind of go with my facing/pocket bags, even though those are on the inside obviously.
- Started the waistband topstitching at the center back seam. That means you don’t look at the thick backstitching with topstitching thread at the most visible point (center front), and bonus, the backstitching gets hidden by a belt loop. Brilliant tip from the sewalong!
Look at the fun innards!! I used an out of print Timeless Treasures galaxy print fabric. I bought it to sew a dress (that I haven’t made yet), but seeing it inside my jeans puts a huge smile on my face. The sentence “I love the galaxy inside my pants!” actually came out of my mouth on accident and I was so blinded with fabric love, Mel had to point out the hilarity or what I’d just said. I’m tempted to use this fabric for future waistbands and pocket bags because I love it so much. Ooh, I might try this constellation fabric!
The contrasting buttonhole is something I’m really happy I chose to do. While sewing obviously allows you to create anything the way you want it, having the option to do a tiny little personal touch on an otherwise pretty standard item (does it get more standard than jeans?) is really fun. I definitely plan to do this on future pairs. I think I forgot to interface the buttonhole area and it could nicer and more filled-in up close, but it’s not hideous. (Of course, my samples looked a lot better.) Also, I’m glad I went with a somewhat dark fabric for the waistband facing as try as you might, it’s really hard to not have a tiny bit peek out on that left center front seam.
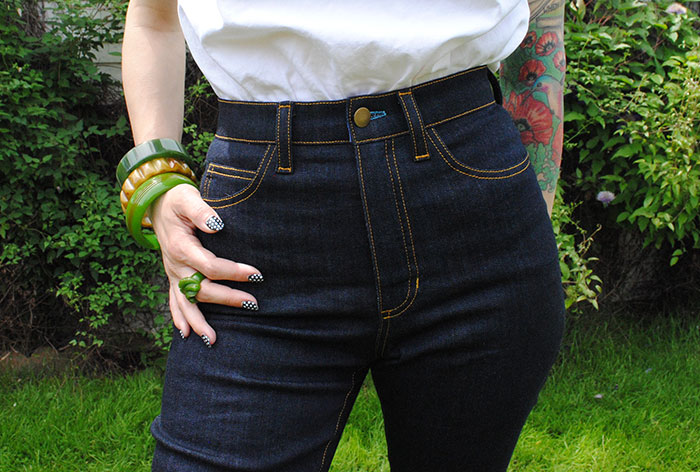
What you also see some of in this photo is one of my proudest points on this project, the waistband. I really dreaded this part, I admit. All the topstitching (around corners and the slight curve of the yoke), the fiddly bits at the center front that I never quite get lined up right (thankfully most of my pants fasten at the side, ha ha), the belt loops. But I nailed it. Well and truly. And I never say that. It’s an honest “I am genuinely pumped about how this looks” and not me saying “it’s good enough and I’m fine with it”. Definitely the neatest waistband I’ve sewn.
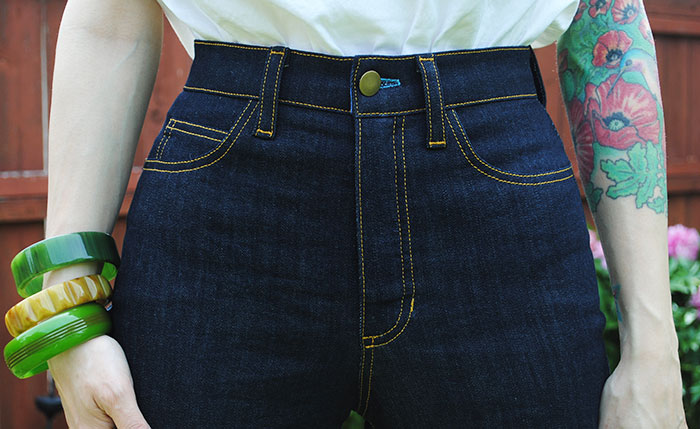
Sorry, enough with the creepy crotch closeups. But man, you work so hard on all that topstitching and the waistband and fly you do kinda want to show it off. 😛
So from proud points to DUH points. Here are my big areas of stupidity on this project:
- All the bar tacks up until the belt loops. Finally, I sorted out the tension. But I did two crummy bar tacks on the fly, and then later 2 in regular thread on the side seams (that look decent but are a smidge too long) first. I later set the tension to 3, and Heather told me later on Instagram she usually uses 1 or 0 on her Bernina, so I’ll try that in the future, too. More of the story: even though topstitching thread likes higher tension to sew normally, it likes lower tension for bar tacks.
- Hammered my button in sideways. Yep, I totally did. ^&^%$@%@# Thankfully you can’t tell and it seems to be in there tight.
- Back pocket rivets are a little too high. They’re maybe 1mm too high so they’re juuust off the edge of the top of the pocket. I should have checked the placement first instead of creating the hole right in the center of my ‘square’ of topstitching.
- I had to sew the entire fly twice. I talked about it in my progress post but if you didn’t read that, it was because I was 1/4″ off at the center seam, not because I did a crappy job installing the fly. Actually I did a really nice job… twice! The bright side was that I realized I prefer the look of a single line of topstitching at the fly opening instead of two, so that’s what I did the second time.
- I missed catching the waistband facing for about 2″ closest to the buttonhole. Since you want to do topstitching in one pass to minimize visible backstitching, I just hand-stitched this oops closed. This happens to me a lot and I finally realized why: because for some reason, when folding a waistband inside out to sew the outer edge, I always tuck the facing seam allowance in a bit higher at this place because… well, I’m stupid, that’s why. For some reason in my head I thought this would make it less visible, which makes no sense since it’s the inside. What it does is means I don’t catch the facing with the topstitching, obviously! This is hard to explain, but at least it’s finally a lesson learned.
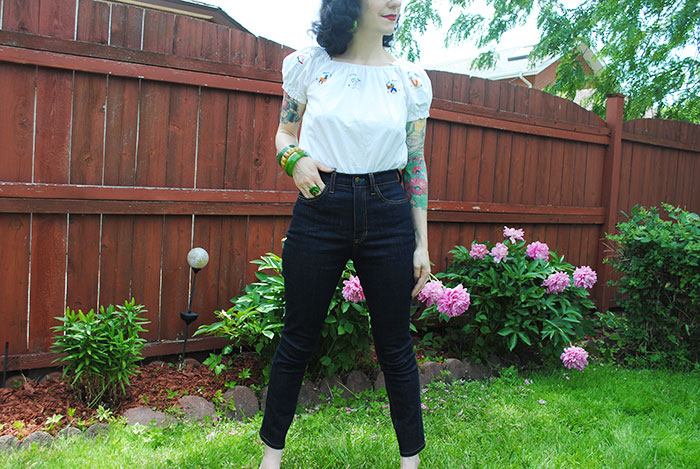
In terms of fit, I mostly really like how these fit. I did have to let out a lot of the seam allowances from 5/8″ to 3/8″ (except the waist and crotch) to get it to those point, so I need to decide how to cut the pieces out next time.
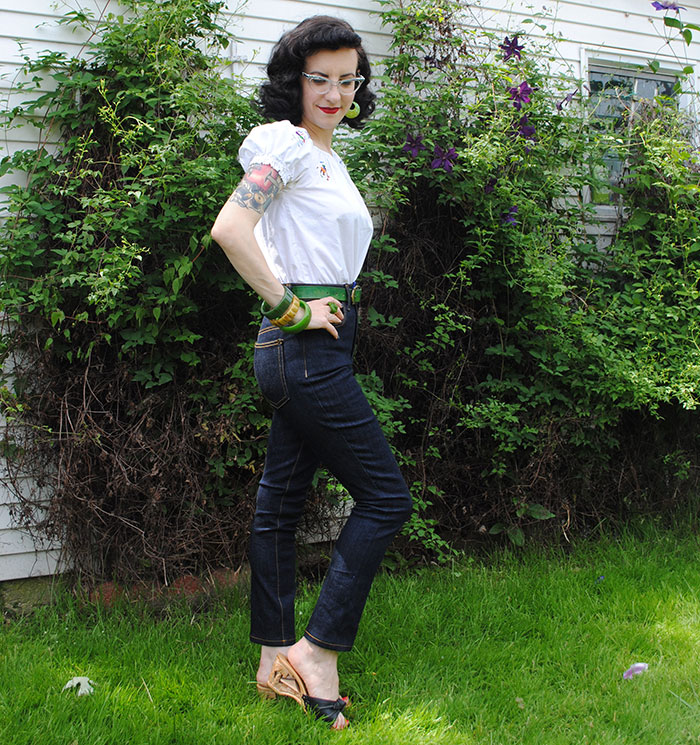
The upper calf and knee is a bit too tight, enough that I sometimes have to pull the ankles down a bit after standing up as it gets hung up at my knees, although it’s not as tight as I remembered when I basted them together. Wait, is this why most skinny jeans are bunched at the ankle, so when this happens you don’t notice the legs riding up? Anyway, by comparison the ankle is too wide. I could have gradually gone back down to the original 5/8″ seam allowance but didn’t notice until after they were done. Oops. And while I do tend to hyperextend my knees while standing (which is extremely obvious in jeans this tight, who knew), I don’t think that’s the source of the calf tightness. I think it’s more due to shortening on the lengthen/shorten line, a whopping 5 1/2″, which probably drastically changed the lower leg proportions, so I’ll address that all next time. I kind of ended up with a skinny/stovepipe hybrid here.
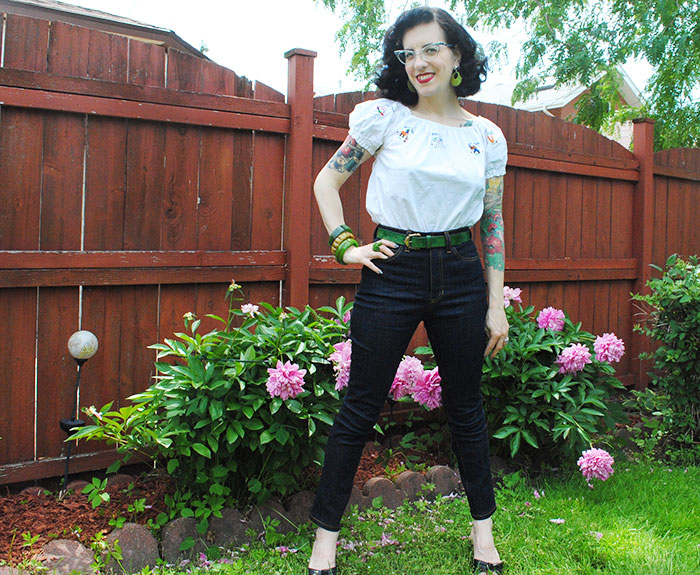
But the side seams hang straight and I’m not busting out of them! Especially not after wearing them a bit (these photos were literally their first outing). They’re fitted but skinny jean fitted, not “my jeans are really way too small” fitted. I feel pretty awesome in these, I have to admit!
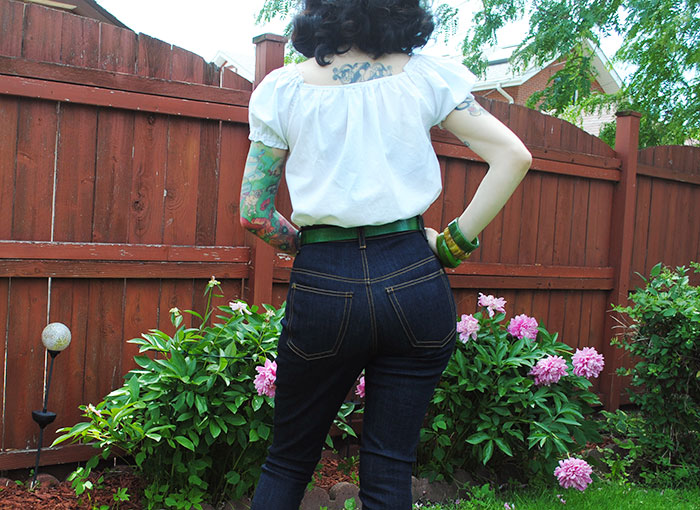
Oh, I didn’t need to do a swayback adjustment after all, this surprised me! Unlike on my Butterick cigarette pants where after a wear or two, I develop a hump of excess fabric at my lower back after a few hours of wearing post-wash (need to try and correct this on my next pair), my Ginger jeans are pretty good in the back for me. Only a small bit of excess fabric after a few days. I suspect that could change if I raise the rise again so I may need to adjust.
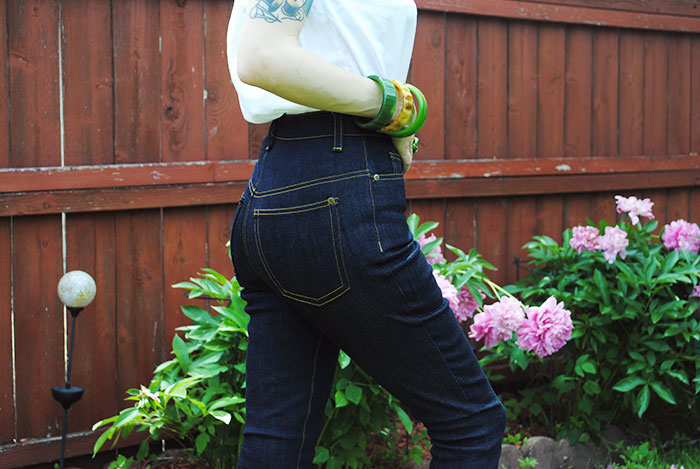
Speaking of the back…
Not bad if I do say so myself, right?? These jeans make you feel great about your ass, ha ha!
In the end, there’s actually a lot less wrinkles under the butt than I thought when putting these together, woo hoo! Of course wearing them a few days means there’s more, but that’s the way that works. The bulk at the side seams that I saw as folds of fabric when basting was just because the seams weren’t pressed and trimmed, so I’m quite pleased with how the thighs look. And I’m happy with my back pocket placement. Next time I may try to deepen the back crotch curve a bit for my low butt, but I’m happy with the front crotch curve. Any wrinkles you see there are mainly creases from sitting and movement. No real frowns or smiles.
Let me just say this about rivets: there’s nothing to strike fear into your heart like pouring your sewing soul into an involved project and then driving holes through it and hammering on hardware that you hopefully won’t mess up. And I could never get the rivet slightly hammered in to check if it was going in straight, so I just had to go for it. I also had a really hard time with the denim “heeling” back around the holes. Only afterwards did I realize small diameter knitting needles would be perfect to expand the holes after I use my awl, so I’ll try that next time. Also next time, I’ll probably add rivets to both sides of the back pockets and the coin pocket, but I couldn’t stomach more this go.
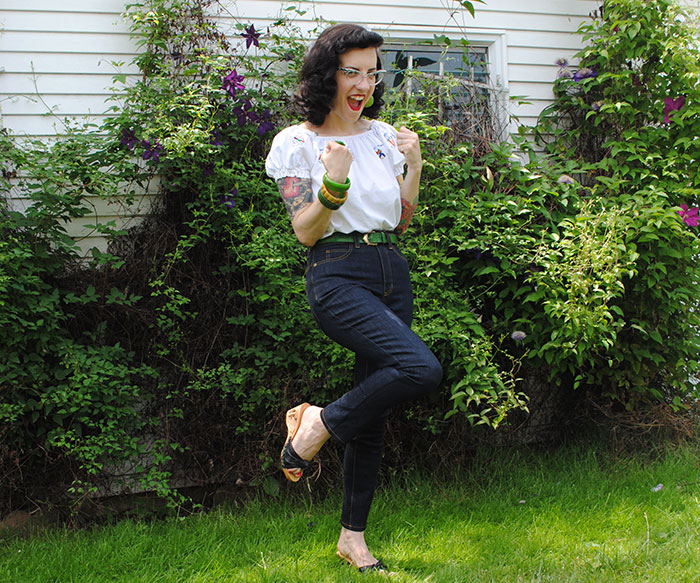
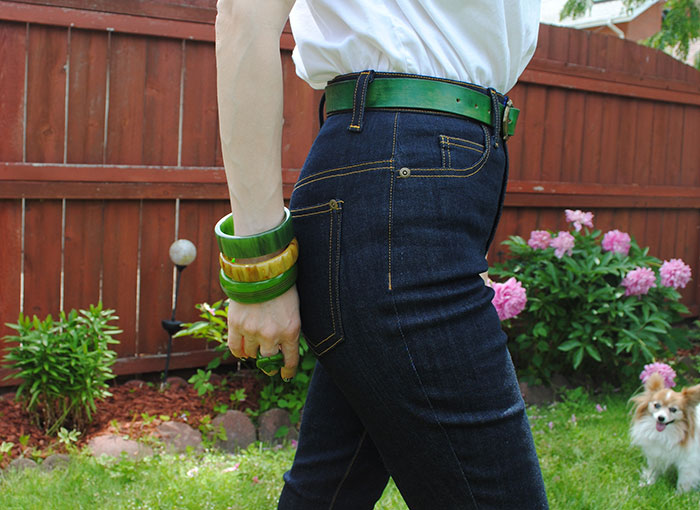 photo bomber!
In the end, I think it’s a great starting point for a slim jean for me! I could see making several variations. Slightly higher rise, less skinny leg, capri-length, maybe side-fastening. Now I feel like the sky’s the limit!
Following the pattern instructions and the Ginger sewalong, I learned SO much. I couldn’t have asked for better resources, seriously the best starting point to sewing jeans I could have hoped for. If you’ve made it this far in this post, and you’re thinking “oh maybe some day” or “my skills aren’t there yet” or “jeans look scary” I’ve been there, too. Just dive in. Take it one little step at a time and go slow. You’ll be surprised how quickly you’ll realize you too are sewing jeans, and it’s amazing and awesome, and you’ll feel like a sewing rock star.
But there’s still a big part of me going, “OMG I made jeans.” I still can’t get over it! 🙂
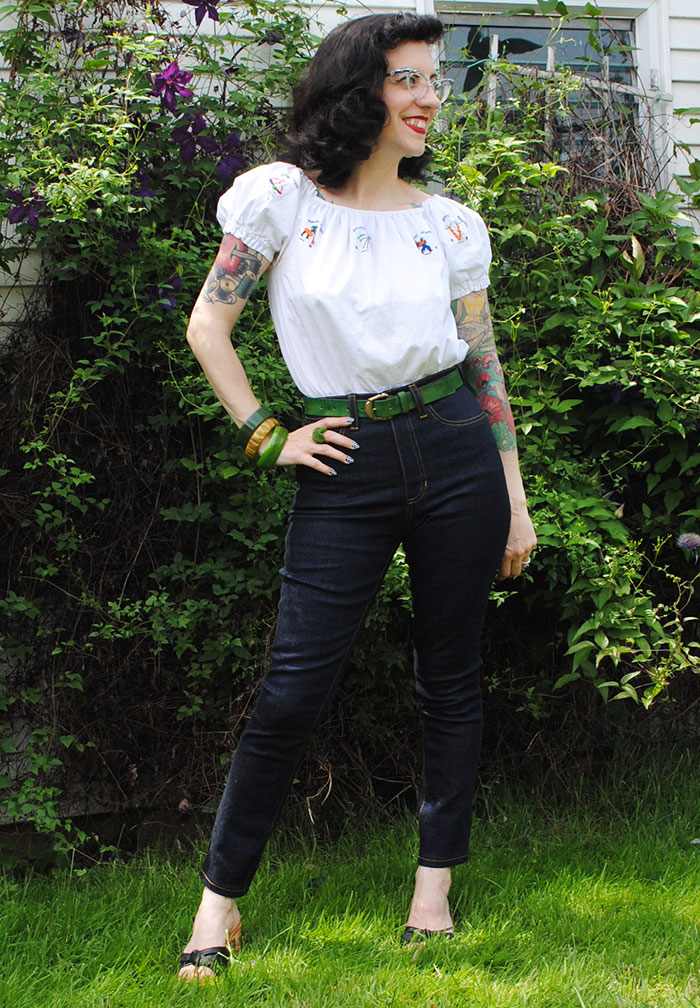
outfit details
Ginger jeans: made by me OMG!
vintage peasant blouse: misc.
Bakelite bangles: Truly Vintage and misc.
fakelite ring: misc.
earrings: made by me
belt: Leather Artesunia
shoes: Lucky Lou (birthday gift from Mel years ago)
NAILED IT! DOUBLE NAILED IT! These are magnificent, seriously Tasha! The fit is profoundly good. I can’t get enough crotch close ups, haha. I love this rise on you…. I actually made a test pair with a 1″ higher rise way back when but it was a little too high on me…. felt like it was sucking the life out of me every time I sat down, but a non-interfaced waistband (and non 12 oz denim!) probably would have helped. So smitten with these and so happy you had such a great experience! This post made me feel really good 🙂
THANK YOU! Coming from you I can’t tell you how much that means to me. 😀
Those Ginger jeans make ME feel really good, so I’m tickled the feeling is mutual!
Wow, I think these are my favorite Gingers to date – I love the higher rise and the slim line leg. Very flattering. Well done! I’ve been making tons of jeans lately too, but the Ginger doesn’t work for me, so I’m using a BurdaStyle pattern from last year.
Thank you! It’s hard to find the right pattern for you, and I was really lucky that this worked well for me (well mostly, obviously still a few tweaks left). I consider it my treat after making 30,000 muslins of my other favorite pants pattern to work out the fit. LOL!
WOW! WOW! WOW! Those jeans are amaze-balls with awesome sauce! Congratulations on nailing it. Talk about fitting you like a glove — you look VA-VA-VOOOOMMMMMMM!
Thank you!! 😀
These really look great and totally work with your style! Congrats!
Thanks so much!
These are so amazing Tasha! I’m soo impressed. 🙂 The fit… the sewing on these are all perfection.
Thanks, Liz! I still can’t believe I made them. 🙂
Great job! They’re so flattering and cool!
Thanks!
Completely fantastic on you Tasha! Well done
Thanks Kerry! 🙂
Seriously, girl… These are fantastic! You did a wonderful job and they look amazing on you. You totally nailed it!
Thank you! I feel pretty awesome about it. 🙂
You did a great job; they look far better than anything I’ve seen in a store! Thank you so much for sharing all the details.
Thank you! Interestingly I was cleaning out my closet yesterday and tried on a few old RTW slim jeans I used to wear for work. I found mine WAY better by comparison. And that was a great feeling. 🙂
I can’t believe you made these! They are amazing! 🙂
xo Rachael / The Paraders
Thank you, I kind of can’t either! lol
I’m always impressed with your ability to sew and knit your own amazing clothing, but WOW, those are some CUTE jeans!
Great job and even better for challenging yourself to push past the edges of your comfort zone — the results are FANTASTIC!
🙂
Aww, thanks Kate! It’s scary going past that edge. You who amazingly recovered two entire sofas knows that first-hand, I’m still in awe of that! 😀
ok, this is my new most favorite ginger jeans post and the one that I will use. All the notes and detail are great. I love the extra 1″ rise – it looks so good. And yes, show that crotch stitching! lol. it’s so perfect, you *should* be proud.
Thanks, glad they’re helpful!! I tend to get really gushy and wordy when I’m excited about something, glad it will help someone in the future. 🙂
So glad to have a community that can appreciate some good crotch stitching, bwahaha!!
Absolutely fabulous jeans! They fit you soo well! A big well done!
Thank you! 🙂
Wooow!!! you did a great job!! Of course you must be proud of making them!!
I am super proud, thanks!!
Hot, hot, hot!
What a fantastic job you did on fit. Makes me want to run out and make my own.
Do itttt!!!
Tasha, your jeans look amazing! I can’t wait to sew my own pairs, thank you for the inspiration 🙂
Thanks, so happy to give inspiration! It was a great pattern to work with!
That waistband! That top-stitching! The pocket placement! Gah!!!!! Absolute perfection! Seriously, you give all the high-end RTW jeans a run for their money. The fit is spot on and styled beautifully. Perfection! I’m muslin-ing my first pair now and will definitely keep you post tagged for reference and inspiration 🙂
Awww thank you, I really appreciate it! Good luck with yours!!
Oh sweet lord, those jeans are fabulous!!!!!! And yes; your ass looks great in them 😉
I am just amazed that one can make such good looking jeans at home (well, some of us)! Well done 😀
Ha ha, thanks!! I had no idea I could do it, but having done it, I can safely say I think anyone can do it with enough patience and practice!
Oh my golly…. these are awesome! Thanks for such a generous post!
Thank you! 🙂
These are AMAZING! They fit you beautifully and the top stitching is so great! I’ve been eyeing this pattern and now that it has been rereleased I’m getting it for sure.
I’d highly recommend it! Also Id’ recommend following the sew-along posts, using the two together was a bang-up resource!
They’re amazing! You really did a fabulous job on these!
Thanks, Michelle!
Wow! You’ve done amazing! You’re an inspiration and are right to be proud of your work.
Aw thank you, I really am proud of them I have to say. 🙂
Those are spectacular!! What a triumph!
Thanks Moe, I feel pretty triumphant!
They look awesome! Good for you!
Thanks! 🙂
These look amazing on you! I had just finished taping my pattern together when Heather re-released it, so now I’m torn on what to do… seeing yours makes me really want to get going on them though!
Thank you! Good luck with yours!
They’re spectacular and you look precisely that in them, dear Tasha. Way to go on creating jeans you adore so much. I bet that is an amazing feeling (seriously – I can try on 500 pairs of jeans and not find one that works well for me, so I can just imagine how great it feels to sew up your own and have them fit and look so great!).
♥ Jessica
Thanks, Jessica! It feels pretty great. Who knows if future versions will be as successful but I’m super happy about these!
Wow, these are fantastic, you’ve done an amazing job on them!
Thank you! 🙂
OH MY GOD, TASHA!!!! These are seriously flipping awesome. And If I were you I’d probably be checking my own ass out every time I walked past a mirror or a window, fo’ sho’. You did an incredible job on these. Major motivation to lose this baby weight fast so I can get started on a pair myself! 😉
Ha ha, thanks! 😀
Wow, these are amazing! I’m definitely going to investigate the Ginger jeans with a view to making some for myself. Nice job! *High Five*
Thanks! I’d highly recommend the pattern!
Whoa these look fab!! I would def wear the hell out of these. The fit is great and I love this style on you. Makes me wanna try and tackle jeans!
Thanks, I totally have been wearing the hell out of them already. lol
You could totally tackle jeans! Do ittttt!! 😀
These are amazing and look great on you! Your topstitching is PERFECTION!
Thank you! I really appreciate it because topstitching and me haven’t always gotten along very well, so I’m super pleased about how it came out on these. It was one of my most dreaded things about this pattern (well jeans in general) before I started this project!
They’re perfect Tasha, absolutely perfect! And they’ve just gone straight in at number one in my Ginger jeans chart, seriously! I love how you’ve styled them too, if your top was black instead of white and you had a massive blonde perm, you’d be a dead ringer for sandy in Grease after her ‘transformation’! xx
You did an amazing job on the jeans! The brown stitching is spot on, very late 1940s look. Your jeans remind me of the dark denim Original Fit Wrangler jeans.
Lots and lots of photos – I would have done the same, because you totally nailed the jeans in every aspect. Thank you for the inspiration. You truly deserve every compliment posted.
What more is there to say? You did a beautiful job on the stitching and the structure is so flattering. The jeans look incredible on you!
Whoo-hoo! You came, you top-stitched, and you conquered! These jeans are nothing short of fabulous, and I think you really did nail that waistband! It looks so neat and tidy, and I’d venture to say way better than any RTW job.
The galaxy print is too awesome, and I thought that pocket thing you did on the inside was such a neat trick! I hadn’t seen that done before, and if I try my own pair of jeans someday, I definitely want to do that. I really enjoyed reading all your extensive notes because I hope they’ll help me conquer jeans myself someday. Thank you for sharing! ❤
xox,
bonita of Lavender & Twill
Jeans are the one thing I REALLY want to learn how to make. It’s what I would go to a class for since I wear them everyday with different geeky t-shirts and hoodies. I want jeans that are mine!!
Tasha!!! Congrats you bet 5 star for the amazing fit!! Gorgeous jeans!
WOWOWOWOWOWOW
I am so impressed! From all angles they look great and will probably come back and check you out again and again. Great job. They’re a perfect vintage look all round. I don’t even wear jeans, or like jeans that much… so I’ve got little interest in them… but your ones may have wooed me!
You look fantastic and those jeans are indeed made for you!! 🙂 It’s actually difficult to find 1950s repro jeans that fit perfectly so glad I stumbled upon your site. Excellent job! Greetings from Italy
OMG – these are so amazing and the fit looks perfect! Congrats on a great project!
Fabulous version of the Ginger jean. Love the contrast thread on your buttonhole. You are probably right about the tightness in your calf. In general no more than 2″ should be taken out or added at any one point. Regardless they look amazing.
Wow, pants are so hard to sew. Amazing that you made these jeans froms scratch. Lovely blog 🙂 Just discovered it 🙂 xo
Amazing how you made these jeans from scratch, pants are still a bit too hard for me to sew.
Love your blog, just discovered it recently.
XO maureen
UM these look AMAZING! Well done!!!
Wow! That is truly impressive. Congratulations on such an accomplishment!
Beautiful!!!
These are AMAZING!!! This is exactly what I am hoping for!
I haven’t sewn for 9 years so I am a little terrified about this project. I just spent today making my Ginger Jean muslin and, uh-oh- it’s WAY too small. Did you get the impression that the seam allowance is INCLUDED in the Ginger Jean pattern, or do you have to manually cut 5/8″ away from the edge for your SA? I couldn’t find this info anywhere!! (only that the SA is 5/8″, but not a mention on if it is included in that pattern or not!)
xo Emily
Eep, I don’t know of any pattern where you’d have to *cut away* a seam allowance! Some like Burda magazine ones you have to *add* a seam allowance though, although I’ve never personally sewn one like that. So when it says 5/8″ seam allowance given, that’s the one you use to stitch the pieces together on your machine. 🙂
I am truly jealous. If you ever want to make one for me I am happy to order them!!#
Alright, I’m super suggestible and now I need to make these jeans because of this post. They’re FANTASTIC!! How did you go from your first cigarette pant muslins to *these*?? You give me hope…
I just came across your site whist googling how to adjust pant fit. We seem to have the same under butt issues even though my waist is quite low. Any suggestions would be great!
I’ve signed up for your newsletter and look forward to seeing all the neato stuff you make! xx