
Thank you all so much for all your comments and suggestions on my post about my pants fitting struggles and seemingly endless cycle of muslins to try and fix the bagginess at the back of my thighs. I really appreciate your thoughts, helpful ideas, and commiseration.
After my post, I mulled over all the suggestions, did more research, and started to try out some new adjustments on one of my previous muslins (the ugly green stretch twill version that I showed you sans zipper). It’s amazing the things you can learn about how your body is shaped when you delve into adjusting pants.
First, to sort out one issue without tinkering with others, I did a full butt adjustment. Reader Lauren send me a link to a video goldmine: a Silhouette Patterns recorded webcast on jeans fitting. While what she explained about the back of the thigh didn’t help me, she did an adjustment on a live person to fix the waistband dipping down at the center back (at about 10 minutes in). Oh my goodness, let me tell you, that was SO enlightening seeing that adjustment done on someone! Sometimes I find the concept of what an adjustment is actually doing difficult to grasp, so this was perfect for me to see. (There’s also a pants fitting webcast reader Desedera pointed out and I now want to watch that, too.)
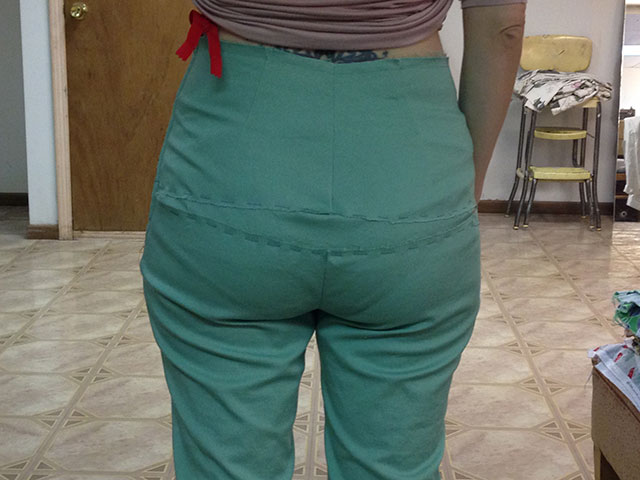
I took what I learned in the video, slashed up my muslin, and gave myself, well, a butt smile. I discovered at the widest at center back, I needed about 1.5″ extra fabric to get the waistband in place (not quite level in the below photo, but you’ll see it level later on in this post). This worked like a charm. One problem fixed!
So then I proceeded to the thighs. I played with three things a bunch, trying to come up with a magic combination: the depth of the back crotch curve, the scooped out shape of the back crotch curve, and the width of the back inseam (never at the same time of course). All of these I was able to tinker with on an actual muslin by taking in and letting out basted seams, which was nice, since it meant no more new &^%#$!#@ muslins. Because no. Not again at this point.
But it never felt like I could reach a perfect combination. Lowering the crotch curve helped a little, but too much and it felt awkward between my legs. Deepening the scoop of the back curve seemed to help a little, but doing it too much made the fabric feel like it was cupping my butt in a really weird way. And in neither case could I ever hit upon a way that actually made the wrinkles directly under my butt disappear.
I also took in the back inseam a variety of widths. The more I took in the tighter the fabric was (obviously) pulled across my thighs in the back, which helped somewhat, but I didn’t want to pass the point where they became skin tight on my thighs, since I’m not going for quite that tight here.
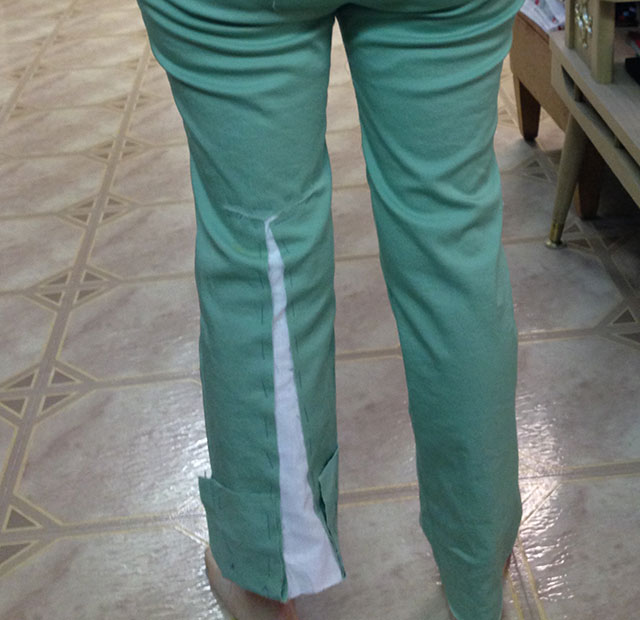
Here’s one view when I had the plain left leg with the tinkered with right leg. I did my back inseam alterations to only one leg at first so I could easily compare. I have no idea at what point this was, but you can see the right leg looks a bit better.
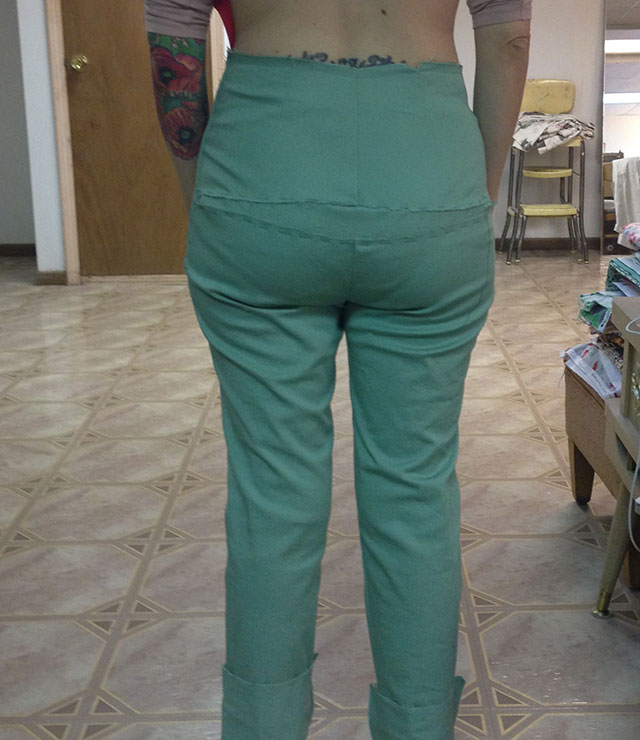
Somewhere in here, I also tried an adjustment suggested to me by Rebecca, who noticed it looked like I may hyper extend my knees. She’s totally right, because I actually knew I did this sometimes. This (along with large calves, which isn’t an issue for me) can cause fabric to kind of bunch up above your knees. I thought for sure this adjustment would help, but in the end, I decided not to do it. It helped a little bit with the lower thigh wrinkles, but it swung the side seam towards the front, where it had been perfectly straight down my leg before. Although in looking at the below photo again, perhaps I’ll try a smaller one in the future.
I also tried a bunch of other things I didn’t photograph, like taking a horizontal tuck around each thigh (didn’t fix it) and taking a horizontal tuck around the front and back at the lower part of the crotch (didn’t fix it). Ultimately though, I decided I had to just stop and transfer the alterations I felt made a bit of difference onto the back leg pattern piece, and sew them up in fabric and see what happened.
Here are the alterations I settled on, with a photo of my new pattern piece below. For reference, I did these alterations using the same size as my red stretch twill pair, which was an 8 waist and leg, graded to a 10 at the hips. There were no previous alterations to the pattern pieces other than that and the lengthened leg.
- Full butt adjustment—Used the slash and spread method in the Silhouette Patterns webcast, I added 1.5″ at the center back, tapering to nothing at the side seam. Basically it adds a wedge to the pattern piece. If you do this, don’t be an idiot like me and accidentally add the wedge to the side seam and taper to nothing at the CB seam, like I first did. I even cut out and had halfway sewn up the pants before realizing my mistake! Thankfully I had extra fabric.
- Lowered back crotch curve—I settled on lowering it half an inch only. More than that and it felt weird, and I don’t feel like it helped any more, anyway. This made the back inseam 1/2″ shorter than the front inseam. I did not make any alteration to the length of the front inseam. I’ve read in a few places (and Sandra Betzina mentions it in her pants class on Craftsy) that in RTW, the back inseam is regularly 1/2″ shorter than the front inseam, and the back is stretched to fit the front from the crotch to the first notch. Supposedly this helps the fabric snug up to the body through the thighs, though doing a different adjustment under the butt that leads to this same 1/2″ difference didn’t really help me in previous versions (though we’ve now established I don’t have a flat butt anyway). So I figured it could only help. Plus, I wasn’t entirely sure how you’d adjust the front to match whatever you lowered on the back anyway.
- Slightly scooped out the back crotch curve—I found a really interesting post on In the Mood for Couture on how to adjust trousers for a baggy seat, by changing the crotch curve. Again, this may more be reflecting a baggy seat due to a flat butt than whatever all my issues are, but I tried it out. I had a hard time figuring out exactly how to follow the instructions, and in the end the amount I needed to take in according to the wrinkled I had pinned out was more than exactly comfortable when transferred into a new seam (oh the caveats of playing with fabric in delicate areas), plus it didn’t really remove the wrinkles when everything was unpinned and stitched up anyway. So I let it out a little bit, and just left it at that.
- Took in back inseam at thigh level—I tinkered with this a ton, and ultimately settled on taking it in 5/8″ at the crotch, tapering down to nothing at about knee level.
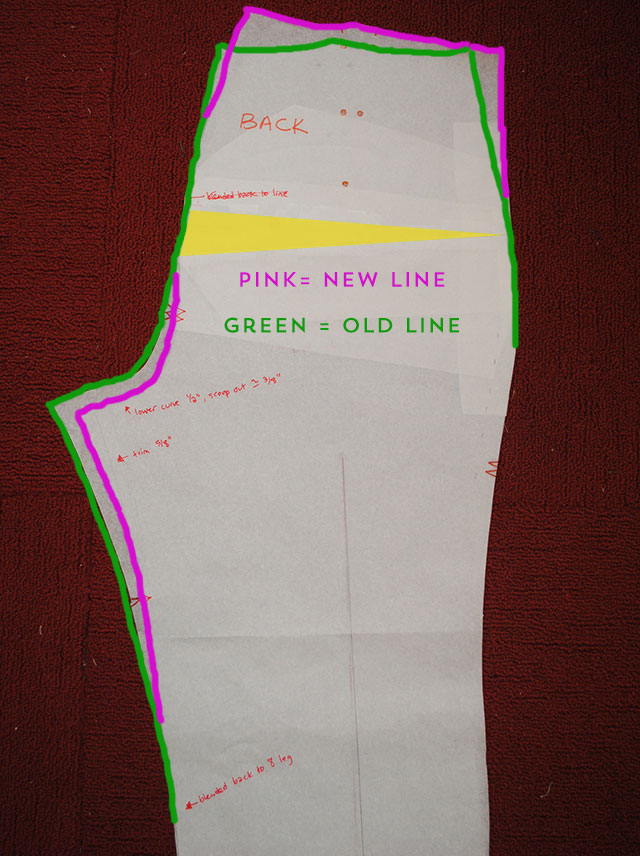
And here’s how that translated to my back pattern piece. The green line is the original line, the pink line is my new line. My full butt adjustment is the yellow wedge.
It’s amazing when you look at it how little difference it really looks like (aside from the added wedge which tilts the upper half of the torso).
I then used my new pieces to sew a new pair in a stretch denim that I got from Denver Fabrics. It’s not black like the description says, but a great dark, dark blue. Now why I was suddenly possessed on the night before Thanksgiving and decided that I absolutely needed these denim cigarette pants for Thanksgiving is beyond me. But by 1am Wednesday night (would have been a lot sooner if I hadn’t had to rip out a crotch seam and inseams and cut new back pieces due to my aforementioned adjustment error where I tried to put my butt on my stomach), I had new pants.
Right now, you’re going to have to make due with these quickie photos. We took photos on Thanksgiving and each of the two subsequent days I wore these pants (which will show up in a post soon), but you can’t see the pants at all in any of the photos. So this as good as it’ll get until I wash them and can take some photos in decent lighting.
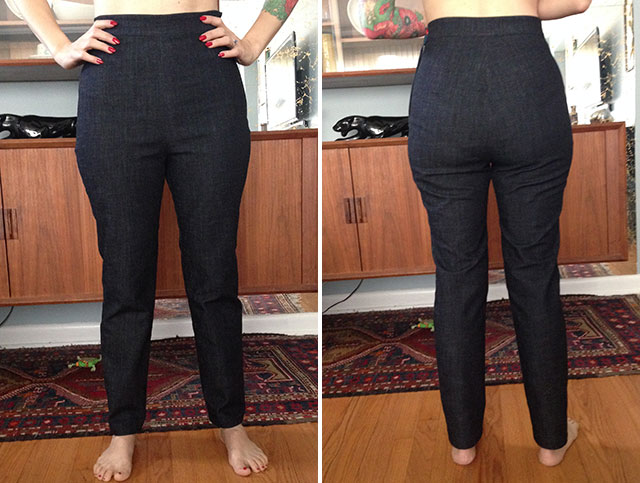
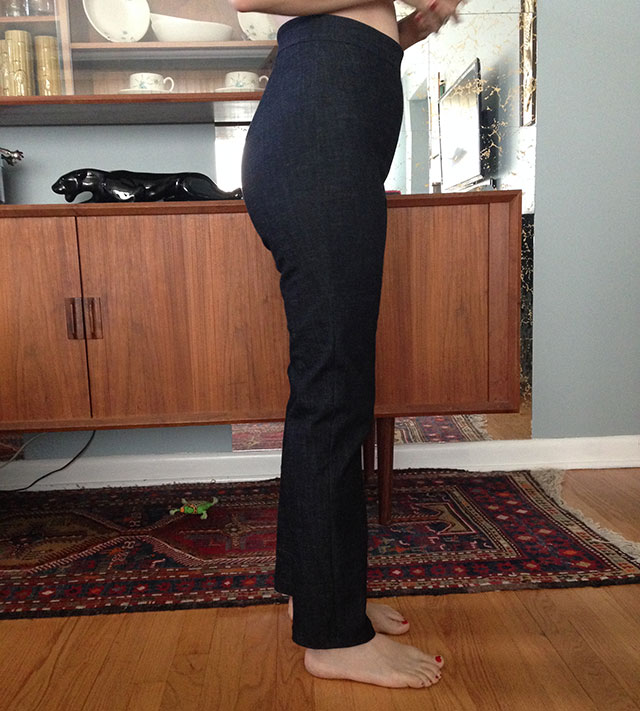
I think we can all agree these are pretty rockin’. Don’t you think they look good? Not a huge difference, but enough that I feel pretty happy about it. Any they’re not so tight that I look poured in or they look like leggings, and not too loose for what I was envisioning in my head. Here’s a side view for you, too:
It’s hard to say for certain how much is dumb luck due to the fabric (which may be part of it, because the wrinkles directly under my butt seem to just be horizontal, not come down at a diagonal angle from the side seams like in the muslin), and how much due to the new alterations I made. Only time and future pairs will tell. But I really love these pants. So much that I wore them 3 days straight, so I can now confirm that after about 3 days, the stretch denim starts to bag out a bit, but that’s expected with a stretch woven. And they made it through Thanksgiving without getting crappy looking, so I’d say that’s a pretty good test. I saw Denver Fabrics is currently running a 20% off sale until December 8th, and I’m actually tempted to buy more to make a backup pair, I love them that much.
Yeah, the fit is still not perfect, and my rear end adjustments have caused a bit of ‘whiskering’ on the front crotch. They fit at least as good—if not better—than RTW pants fit me in the back. And it’s not like I’ve been able to find RTW vintage-style cigarette pants to buy anyway (because I probably wouldn’t have gone through any of this if I could have, and that’s the truth). So I think I’m at the point where I’m ready to say I’m done with fitting these, and go ahead and keep sewing them like this, unless/unless I decide to make future changes. But right now, it’s time to step back and just stop and call this mostly a win.
Eventually these will show up in a post in better light, but for now you’ll have to make do with the ones above and the below (a reject photo for a future post) which is lightened up considerably, but hey, at least you can kind of see them in action in real life as I was wearing them over the holiday weekend.
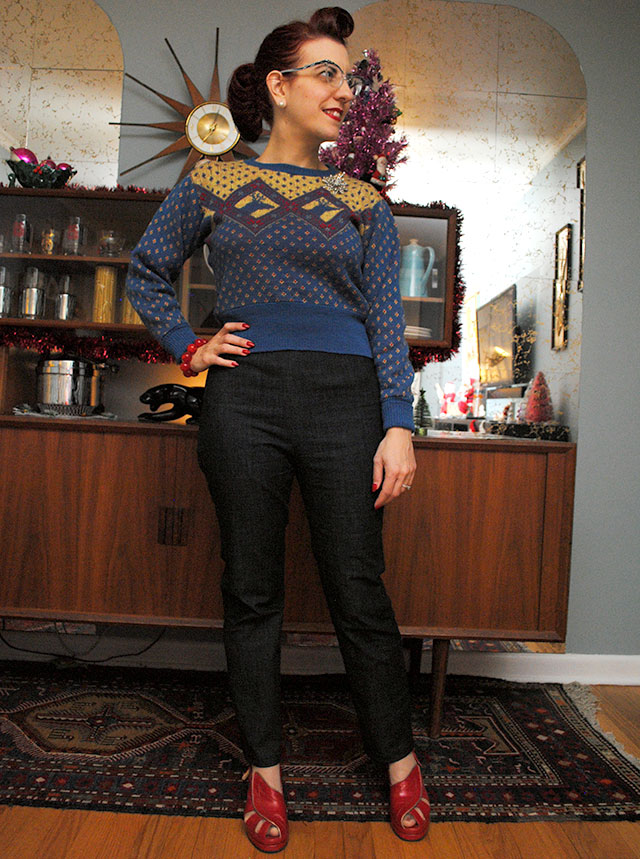
Although you may not see them again until I sew another Jenna cardigan in some super awesome fabric I got from Spoonflower after my initial inspiration to make a printed cardigan with denim cigarette pants. I’m halfway to that outfit. Stay tuned!
Your patience and determination blows my mind! I can tell though that you are going to have an amazing pair of pants when you’re done! They’re already looking so good!
Thanks so much! Yeah, I pulled out ALL THE PATIENCE for these, let me tell you. ;P
the hard work was worth it – what a great Tried and True Pattern to have. You’ll make a ton of these I’m sure. I love the styling too – great festive look!
I definitely intend to make a ton! I’m pretty sure I wouldn’t have gone through this much trouble otherwise. I’m mulling over all the fabric possibilities!
I think they came out great! The full derriere adjustment was just what you needed. I wouldn’t worry too much about the wrinkles that are left because for one you need to be able to sit, and two if you have a forward hip, you may simply not be able to adjust those out. Though, if I were still playing with my muslin, I might try a fish-eye dart just below the derriere about 1/2″ wide in the middle tapering to nothing to the seams – the opposite of what you did for the full derriere adjustment. It may work or not, and I don’t think it’s needed – just a small thing to tinker with in the future.
P.S. You inspired me to try cigarette pants for myself – I bought a pretty red-red cotton sateen just for them!
Thanks Isaboe, and for your previous advice, too! I tried a fish-eye dart in a previous muslin, however I’m curious if it could help a bit now that I have a much better fit overall than I did at that point. I’m so glad all this cigarette pants talk has inspired you to sew a pair, too. Red cotton sateen sounds lovely! 😀
You are going to have a perfect fitting pants pattern. I’m very impressed by your attempts to modify and tweak your muslin to get the fit you want. I might have to take a look at the videos you linked up to.
Thanks Michelle! This was one of the first times that I felt I really successfully tweaked a live muslin (turning it into a Frankenmuslin). I’m definitely going to have to sit down and watch both of those videos in full one of these days!
These look great and I would definitely agree that it’s time to stop fitting before they drive you insane! So impressed with your perseverance and only wish I could make exactly the same trousers in exactly the same denim! 😉
Thank you! Yes, I was definitely on the brink of insanity with these!
Wow! This is impressive and I never would have thought about that area being the area in need! It’s always wonderful to learn something new! And your ‘butt smile’ term made me giggle! Fabulous job in the end!
Also do I spot a bit of Starburst in the background in your hutch?
xoxo
-Janey
Thanks Janey!! I hope this post helped you not be scared off from my last one. lol
That is indeed a spot of Starburst in the hutch! I don’t have much at all yet (basically what’s in the one shelf of the hutch) because I have so many other dishes, but eventually I’d like to collect a bit more. 🙂
You’re my pants-fitting hero. I want to be you when I grow up.
Awww thanks, ha ha!
I want to try this pants pattern and out of a stretch corduroy. Like others have said, I don’t think you can get rid of any more wrinkles on the back without compromising they ability to walk up stairs and sit down. I have an original 60s pattern with a pair of these pants that I also want to try to compare, but those have a lot of crotch ease built in to accommodate non-stretch fabric.
I’ll likely have to try the full-butt adjustment when I sew up the gertie pattern so thanks for the forewarning. We’re not at all the same size but even at 6′ I think my proportions are similar – I’ll just have to add length to the rise, and above/below the knee.
Yep, I absolutely want to still be able to sit and bend and all that comfortably (even in stretch fabric which does give you an advantage). I think the fit that I had with the non-stretch gabardine and corduroy pairs I did is about as good as I’m going to get them, because when I had tried to pinch out more thigh ease, I could barely down. So I want to eventually work on giving my butt more room for the non-stretch, maybe a tad more ease in the hips in general now that the gab ones are a little tight (oops), but that’s going to be about it. Like you said, have to sit and all that. 😉
I did try to muslin up a similar vintage pattern for non-stretch, but there was just way too much ease overall to be cute. (Cute cigarette pants on the envelope artwork, kind of dumpy not cute grandma pants on me.) So I think for me sticking with this one and just modifying the size and ease a bit for non stretch will work out for me.
Wow, all your hard work is really paying off! These look great!
Thanks Sonja! 😀 I think I can finally be proud of all the work I’ve put in. lol
Have you thought about putting princess seam lines down the back of the pants? I have broader hips and skinny thighs and being able to pinch out extra fabric out of the middle (and not just the side seams) has helped me to fit my thighs. Just a thought – good luck! The pants are looking great though!
I’m not really a big fan of doing two part pants pieces, but I can see why that would be a huge help for fitting issues like this!
All good things come to those who wait…. or keep trying! Well done! These look fabulous and I’m actually a little jealous because I want a pair to wear with a short fair isle jumper I’ve knitted. I’m feeling very inspired by you 🙂
Thanks Claire! Sounds like they’d be lovely with your jumper. Maybe you need a pair yourself! 😉
They look great, definitely worth all the effort you put in. And I like the way you styled them!
Thank you! 🙂
Hi,
Great job! Pants fitting is a nightmare, especially when trying to fit yourself.
I love your clock in the background, I have a feeling that you’ve got a very stylish home to match your wardrobe!
Thanks! We do try to keep a fairly stylish home. 😉
These are beautiful! Totally rockin’. You and I seem to have been in the same pants fitting hell. I spent about half of my tailoring class just trying to work on fitting pants with my teacher! I think I’ve got a bit more to go to get them just right, and you might give me the oomph I need to make it. Bravo.
Thanks Lauren! I feel like it’s not until delving into pants that you truly realize how utterly different bodies are shaped, even when two look relatively similar, or vice versa: two totally different bodies with similar fitting issues. Argh! This was a beast to work through, but I’m so glad I can now feel relatively confident in making more pair. Good luck if you attempt more changes yourself, it definitely takes stamina, doesn’t it! 😀
In your quest for a perfectly fit pant did you run across anything mentioning a poufy pelvis area? I have been dabbling with a 1940’s pattern, and my prototype ended up with a giant “Maternity airbubble” in the front waist to hip area. Kind of like your butt issue but the other side. They are super high-waisted so I look like I’m wearing a parachute when I try them on. Any suggestions would be appreciated… 🙂
Ha ha! Well this might not resolve it for you, but Lladybird Lauren actually addressed a similar issue, although it’s more like at the lowest part of the crotch where it’s, er, bubbly. lol But maybe a starting point for you??
http://lladybird.com/2014/08/14/completed-ultimate-trousers/
Thank you! I have been scratching my head for a while on it…
Well done!!! 😀 Yay, your pants look fab!! I have a muslin I have been scared to put on again, but I will get there… haha.
Hey! Neat! Inspiring! The links will come in handy. Thanks!
Heather
“Butt smile”, hahaha! Your pants look so much better, congrats. 🙂
Seriously rockin! Way to go. This post is a powerful reminder in the importance of gumption and sticking with something until a solution (or solutions, as the case may be) is found.
♥ Jessica
I feel all inspired to resurrect my pants muslins now. Just wanted to say thanks for posting how you got to this point, it’s so hard finding posts that actually talk about how pants were fitted. Maybe people get so worn out they can’t face talking about it.
I don’t know if this will be of any help to you, and may be a little late as you are virtually ‘there’, but I just read on another blog about using a flexi ruler (the kind that hold their shape) to get the correct crotch shape. I have to say I admire your perseverance but it is definitely paying off.
Fantastic job! I do think you’ve gotten a great pair of pants after all that fiddling. I’m really geeking out over your comparison to the original pattern piece; I’ve got a late 70s/80s Stretch and Sew jeans pattern all traced out and am already anticipating I’m going to have to make a similar full butt adjustment. (I’m on the quest for the perfect, high waist jeans that I can play around with the leg width for either a 1950s straight leg, or a more modern close-fit.) Thanks for the links to the videos too; I’m bookmarking those to watch before I get started on my pants making quest. Kudos to you for seeing this through!
The butt looks great!!! I think that adjustment really worked for you. I’m sure you will find a way to fix the under butt wrinkles eventually. You should definitely be pleased with your most recent pants. They look really good.
Your work is totally paying off, these look really good!
And it’s interesting to hear that hyper extended knees can change the fit. I had no idea until six months ago that I had hyper extended joints. My yoga instructor pointed it out to me!
Thank you so much for your exhaustive series on pants fitting! I have been working on a pair of jeans and your tips have been tremendously helpful. I watched the Silhouette Patterns video you linked to and added a butt smile to muslin last night- and it fits great now! (I also added a triangle at the bottom because I have big calfs, so thanks for that, too.) Sorry you had to go through so much pain for these, but thank you for sharing the process. 🙂 And of course, your finished pants look awesome!
Those trousers look fantastic on you! And those red shoes – I might steal them right off your feet.
I feel for you trying to fit trousers. I was searching the internet to find some advice about what to do about fabric pooling under my buttocks and came across your blog and the two detailed posts. Your dedication to getting a good fit is amazing!
I am trying to make the same sort of trousers. I definitely have a flat and very droopy bottom. I have mastered getting a good fit with a vintage “Oxford bags” pattern but, like you, wanted something sleeker and more modern, especially because I have no pair of RTW trousers in any style that does not have the same problem. I feel I might be getting there with the pooling under the buttocks by taking a tuck across the back ( I tried several variations on the amount and position) and then slightly increasing the length on the back only at the crotch point. Now I have to try and and resolve the problem of thin outer thighs and fleshy inner thighs. Wish me luck! Happy New Year and I look forward to reading more of your posts.
Oh my gosh! I could have written your pants posts. I ve had the same frustrations exactly made all the same alterations. I seem to need a J type crotch with the back of the crotch lower than the front. The upright needs to be very upright., lean forward or back and new diagonals appear.Patterns help Current favorite is Trudy Jansens 906. Looking forward to reading more about your success.
You’ve given me hope for my fit issues. I WILL try again, dammit!
Wow – good job. I have been tediously reading your pants posts to figure out how to fix mine. I’ve got some gaping above the knee (kind of on the back and side) and I cannot for the life of me figure out how to fix it. Any advice? I’d love to send you a picture and get some help?? I’m desperate to figure this out.
I am so excited to copy your alterations. I, too, have made 8 muslins for the exact same problem. I, too, have done fish eye, darts, taking in the centre back (which actually helped the most), just about anything you can think of. The problem always persisted. I also fwlt I do not have a flat butt, so this whole journey spoke to me in a big way. Your final ones look so great and I will be pleased as ounch if I can get there.