Recently, I bought something and then returned it: a coverstitch machine. I don’t feel like writing up a long blog post about why I returned it… so instead I’m writing a long blog post about something tangentially related to it, ha ha.
The short story is that I felt mine was probably a lemon. It was a Janome 900CPX and lots of people love theirs… and many people (experienced sewers) think they have duds, or they just can never get into a rhythm with their machine not skipping stitches, not going over different layers of fabric (i.e. neck bands)… I think I was one of those some. The whole experience was extremely frustrating and time consuming and after a few days I really felt like, “But I could actually be sewing right now instead of still tinkering unsuccessfully with this machine!!!” So I decided it wasn’t in the cards for me right now, and I did the right thing and sent it back. I may try again in the future but for me right now, if I couldn’t reliably get it to do a hem and a neck band then it was useless to me, and I didn’t want an expensive doorstop.
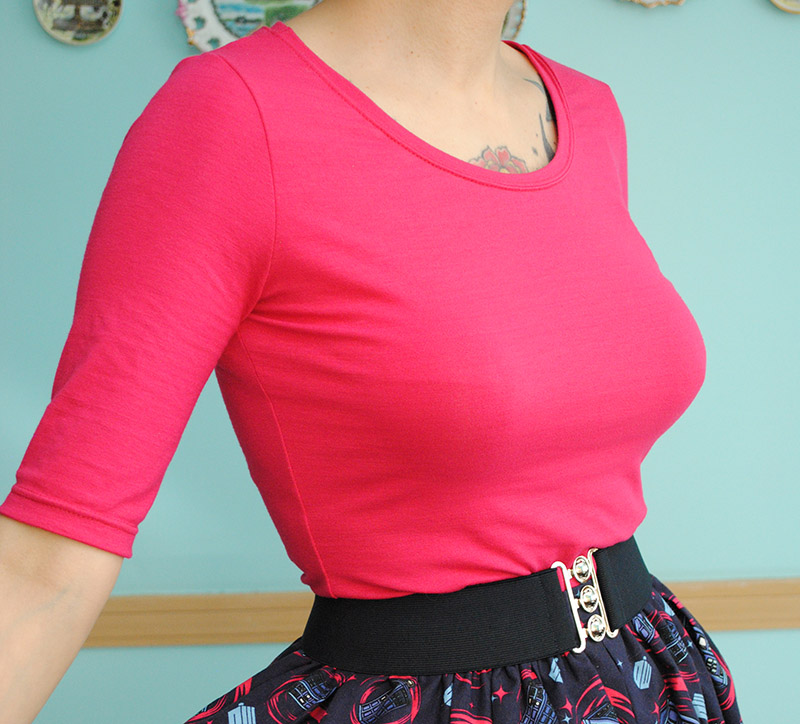
The main reason I’d bought it was because I really want to sew more knit tops this year, especially coming off my green Lady Agnes and surplice/wrap tops. They can do really lovely and professional coverstitched hems (when they work right), avoid the annoyances associated with using twin needles, don’t require re-threading needles mid-project, all that stuff. A bunch of reasons that have had me a bit gunshy about sewing with more knits. But no matter, I’m back to doing knits with my serger and twin needle only. So that meant that after a weekend of utter frustration, I decided that it might be good to set myself up for success for my next project with knits: another Lady Ages tee in a hot pink modal/spandex mix from Koshtex (worth mentioning I’ve been really pleased with their fabric, I’ve placed a couple of knits orders recently!).
I’ve read blog posts where people recommend sewing in chunks or units—do all the seams you can, do all the pressing you can, do all the serging you can… whatever it is. Generally it’s talked about in the context of being faster and more efficient. And frankly, I’ve ignored it. I don’t care about sewing faster! So I’ve ignored the efficient part of it.
But after that weekend, I thought to myself, “Hmmmm surely there’s a way I could construct a tee in an order that doesn’t have me switching needles in the middle of the project.” So I sat down and wrote out some notes. I want to sew knits, and I want to be happy about it.
My sister-in-law once said about our nephew that she’d accidentally “set him up to fail” with a particular thing, and I realized there can be the opposite side of the spectrum, too: setting someone (or yourself) up for success. So by planning out the steps, I wanted to set myself up for success for this project.
I wrote down a construction order that wouldn’t have me switching between a regular and twin needle on my sewing machine, and wrote down what step was done on what machine (i.e. regular needle, sewing machine / serger / twin needle, sewing machine). So all the regular needle stuff earlier on (ruched elastic neckline, any basting, etc), twin needle topstitching at the end. Serger anytime I needed, because that didn’t involve switching up anything.
I also wrote down steps I sometimes forget, so that I wouldn’t: what exactly I needed to interface and with what product. That way it would all happen at the same time, at the beginning when the pieces were still flat, because trying to do it in later on the round is nuts and maddening.
I also addressed some “problem” areas that I typically have with knits, to try and make them go better for me. I’m often just really crap at is lining up a neckband seam with a shoulder seam. So I decided to try the other method of adding on the band with only one shoulder closed, then closing the shoulder with the band in. (And I learned I like that method except it makes attaching clear elastic in that shoulder much more fussy when you sew your shoulder seams on a serger, since you don’t want it under the bulky neckband. So I may add in a note to baste just the beginning into place on the seam to make it easier.)
I also sometimes manage to mess up serging a neckband on evenly when I do it straight on the serger and need to trim a seam allowance at the same time. Especially bad if it’s a narrow neckline like the Agnes pattern. I thought of a couple of ways to solve this, so in my notes I tried the first idea: sewing it with a zig zag stitch on my sewing machine, then serging/trimming the seam allowance. (Which worked nicely—perfect band—but the seam allowance is a bit bigger than I want although it’s trimmed almost to the stitching line, so topstitched straddling the seam it still can flip up a bit inside, and that annoys the occasional perfectionist in me. Next time, I think I’ll take everything but 1/4″ of the seam allowance off the pattern pieces, baste the neckband on the sewing machine outside the seam allowance to help me with precision, and then serge on the neckband with the 1/4″ seam allowance on the serger. Possibly with the neckband in the round, to eliminate as much of the issue lining it up since there will only be a dinky seam allowance. Or if I do none of that, I’ll try the two lines of topstitching on the body instead of straddling the seam.)
Anyway, I wrote down all of the steps, in order to set myself up for success! A construction order that made sense and accomplished things in a nice order that didn’t annoy me switching needles and such, and addressed a couple of tricky bits. And then, I sewed.
Did it work? Yes! I felt like I wasn’t bumbling between needles and machines, forgetting things like “Oh right, I should have sewed X at this point because now I need to do this and backtrack” and the like. The process went along quite smoothly.
My cheat sheet looked something like the below. Things like pressing, tying off knots, trimming bulky areas and such not included. By the way, Betty is my Bernina and Sergio is my serger. 😉
Tee assembly:
- stabilize hems, neckline – neck 3/8″ in from raw edge, on hems at raw edge
- close one shoulder seam, insert elastic (on Sergio)
- sew neck band on at 5/8″ SA (on Betty)
- serge/trim neck band on 2nd line of serger (on Sergio)
- close second shoulder seam, insert elastic (on Sergio)
- tack band at shoulder seam (on Betty)
- set in sleeves (on Sergio)
- sew side seams (on Sergio)
- optional: elastic ruching (on Betty)
- hems: serge raw edges (on Sergio)
- hems: twin needle topstitch (on Betty) ** only time I’m switching needles **
- neck: twin needle topstitch (on Betty)
I doubt I’ll write down a cheat sheet for many types of projects, but for a repeatable staple like a t-shirt that I plan to sew over and over, now that I’ve done it, I can say that I think it’s a great idea! Especially if you’re like me and pretty bored with the idea of sewing basics. I mean, it doesn’t really get a lot more basic than a t-shirt, you know? So having a game plan ahead of time that helped the process go smoothly was really nice!
Have you ever tried to set yourself up for success in a project? I’m so glad I did!
p.s. you’ll see more of this (my second Lady Agnes tee) and the skirt I’m wearing with it soon! 🙂


I love the fact your serger is called Sergio and your sewing machine is called Betty. I have been remiss in not naming my machines!
Mel actually named my serger Sergio recently, when I was complaining that I’d named my sewing machine but not my serger. And I mean really, could it get any more perfect than a serger named Sergio?! 😀
That top is super cute and your hair is gorgeous!
Thanks, Kristin! 😀
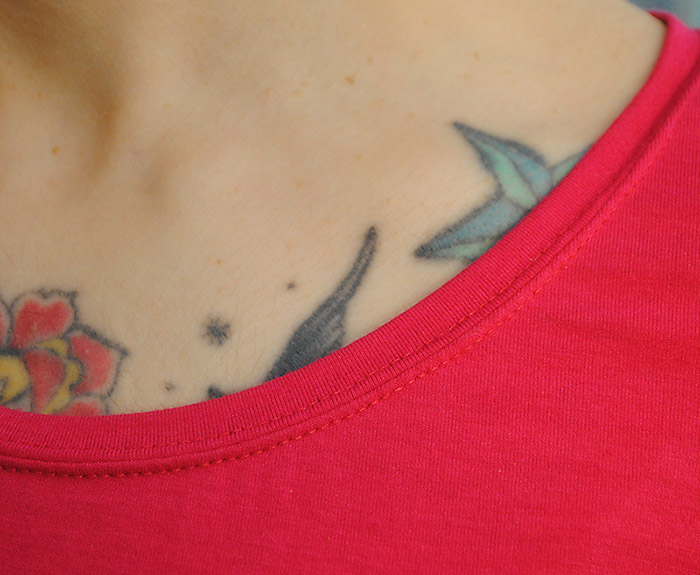
Wonderful finishing on that neck edge! I’m a experimental research scientist, so at my work, I “set myself up for success” all the time. I have to, and your post made me realize that I like to do that in my hobbies too. I am teaching myself some drawing and painting techniques as a total novice (yay, youtube how-tos!) but for multi-media things I want to do, I don’t really know how to order the steps (e.g. how waterproof is that ink–can I watercolor over it?) and that is driving me a bit crazy. Your post has pointed out to me that I should design some pilot art experiments to figure these things out.
Yes, I have done that for a while. The Big 4 patterns often have you do things that I consider “out of order”. I know when I sew a top I need to stay stitch front and back pieces. As soon as they are cut out I stay stitch front and back and I go on from there. This is especially time saving if I have multiple garments cut out and lined up ready to go.
I never prep multiple garments but I can see how that would help. That’s a good reminder to staystitch right off the bat, it doesn’t always say and sometimes I find myself doing it after an “Oops I should probably staystitch this before I go to the next step!”
I got a Babylock Evolution serger/coverstitch combo machine and the coverstitch functions can be really, really finicky. It’s irritating, but I persist (with occasional cries of frustration.)
Have you tried inserting the neckband in the round? I find this method much easier than inserting it flat after sewing one shoulder seam, and I like the finish better. To each their own, though. 🙂 I would definitely recommend trimming the seam allowances on the neck & neckband, though – I really don’t understand why pattern companies insist on using 5/8″ seams for knits. 3/8″ or 1/4″ are so much easier and more convenient when using a serger.
Thanks for that link to Koshtex, by the way – I just went and bought a bunch of fabric, which I have been TRYING not to do. I’m consoling myself that the prices are very good and I know exactly what I’m going to do with most of it.
Yep, done it many times in the round, but unless I trim the seam allowances down, I just always have trouble lining it up (which is why I mentioned that as an alternative way I may do it in the future, trimming the seam allowance now that I’ve ironed out the pattern). Although I didn’t mind doing it flat or the finish (many RTW tees do that, I think if the band is done with a binder which can only work flat as far as I learned in my coverstitch research, lol). I probably will eventually just trim down all the seam allowances on this particular pattern to 1/4″ for my serger! But I think a lot of patterns don’t do that since you can’t expect people to have a serger and most people are comfortable/familiar with 5/8″ as a seam allowance.
I should have mentioned but Koshtex also has really fast shipping for a fabric company! I find that’s few and far between. 😉 I got several modal or rayon blends and the colors are fabulous, and very true to their photos.
Wow, you’re not kidding about fast shipping! I just got a shipping notification from Koshtex – only three and a half hours after placing the order. o_o I live in the same state as their warehouse, so here’s hoping I get my fabric in time for some weekend sewing. 🙂
I figured you must have done neckbands in the round, but had to mention it anyway. Whatever way they’re done, they’re still my least favorite part of sewing tshirts.
Boy I couldn’t agree with you more! So annoying to enjoy the look of neck bands but hate the sewing of them! 😉
I have a love/hate relationship with my finicky serger. I have not given her a name.
Very nice fitting top and very professional twin-needle stitching.
Thank you! Sorry you’re at odds with your serger, may your time together get better. 😀
If it’s not something I’ve made a zillion times before, I always sit down and make up a cheat sheet. I used to just maverick it out, but then if I liked it and wanted to repeat (or if something didn’t work, or I hated it and wanted to change, haha) I couldn’t always remember what I’d done. Most of my patterns live in three ring binders now, so they can stay with all of their own scribbled note sheets.
Which gets me thinking, how do you store and organise your own pattern stash? I have such a mountain of notes and traced and/or altered pieces that there’s no way they’re going back in the envelope, which is how I wound up with the binder notebooks. Now I’m kinda curious about what other possibly more sane individuals do. 😀
Well, I have a big notebook for sewing notes, each project gets a page (or more if it’s a huge project like jeans or a coat). But I don’t keep the notes with the patterns, which are shamefully not organized in any good way at ALL and something I still need to rectify! 🙂
That’s such a great idea! I also sew out of order because it saves me trips to the ironing board and time spent switching machines. Sometimes I’m just in a zone with sewing and I want to stay there. I’ll be tackling more knits this summer so this will be very handy. Thanks!
It definitely seems like a good idea for knits, where there can be a lot of jumping around. I’m glad I tried it!
This is a great idea! You have such a professional approach – and it really shows in your results 🙂
Thanks, Dawn! 😀
That is seriously a fantastic idea! Must remember to make a notes like that next… There’s nothing worse than fussing around with machines when you are in the middle of a good sewing streak! And your top looks so professional and neat! You are giving me serious t-shirt envy… ❤
xox,
bonita of Lavender & Twill
Agreed about fussing with machines! I don’t mind going from the serger to the sewing machine and the iron, but changing out needles (especially to a twin), ugh, hate it. And thank you on the top!
Terrific result! What size (i.e., distance between the twin needles) did you use for the topstitching around the neckline?
Thank you! I’m still kind of trying to figure out the Schmetz twin needle spacing and getting it wrong when I order. 😛 This one is the 4.0/75 size.
Then that’s what I’m ordering — the results look very nice. I know it requires meticulous patience, though! Kudos!
This is so inspirational! Someday I hope to get my on Sergio, but for the time being, I must live with my oldie but goody machine that does overlock. So far I have been minimally successful. Is it the machine? Is it me? Dunno. I’ve been sewing since I was 13, and on a Singer Featherweight no less. (Still use it when I am in a “vintage mood”) But this whole overlock has me beat. Is it as touchy a method as I think? Maybe I’m not setting myself up for success.