
Hello everyone! I bring you this post while I’m off on a long weekend trip!
You saw The Dress last week. In case you missed The Dress (I feel like I have to use all Title Case here since so much went into the damn thing), let me catch you up: it’s a strapless sarong dress that I sewed, in collaboration with WAWAK Sewing Supplies. They provided most of the inner supplies, I bought the fabric and pattern to the party, and you got to learn a little about them (plus get a coupon for 10% off $40 using code WR1015, still active until September 15th).
Today you get the serious sewing nitty gritty, which I know some of you were waiting for. Dig in your heels, grab a drink. You know the drill when I warn you I have a lot to say!

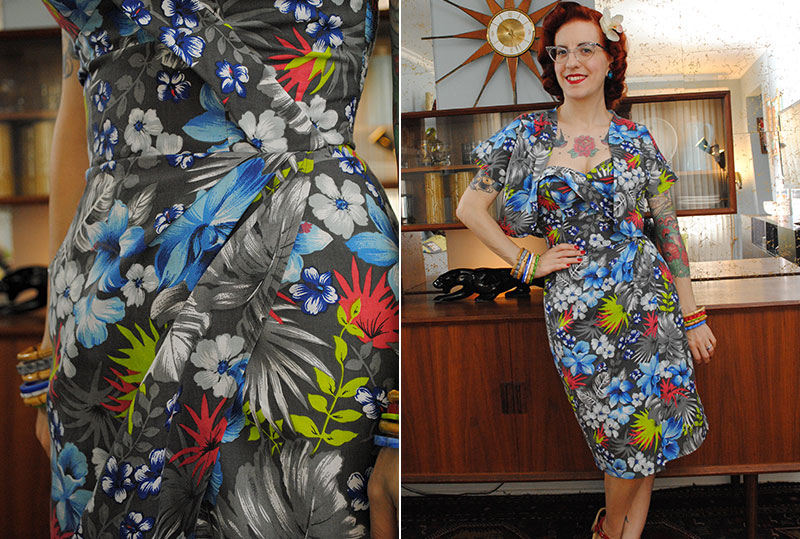
The pattern is Butterick B6019, designed by Gertie (Gretchen Hirsch) for Butterick. It’s styled after vintage Alfred Shaheen dresses, which are phenomenally gorgeous and equally phenomenally expensive, these days. Here’s the line art from the pattern, which frankly gives a much better indication of the style than the photos on the envelope. It’s a beauty, right?
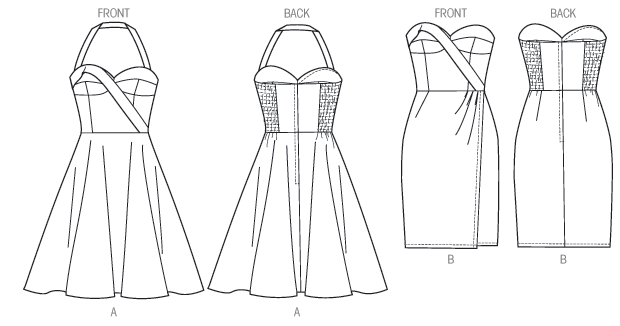 Source: Butterick B6019 pattern
I knew right off the bat that I didn’t really want to make a muslin because of the drudgery that is shirring and batting and boning and all, so I picked a cheap poly-cotton tropical fabric from Etsy. I intended it to be kind of a “wearable muslin” with any luck, but honestly so much effort went into this, I’m not sure I can stomach sewing it again… at least, any time soon. So this is definitely the For Real Dress.
While beautiful to look at, the fabric was stiff as a board when it arrived! Not thick, just like it had enough sizing in it for 60 bolts of fabric. But it was sooo pretty and vibrant, so I desperately wanted to make it usable. It went through three trips through the washer and dryer, including two long pre-soaks in hot water, a cup of vinegar and several glugs of conditioner (hey, it works for hair, right??). The result was much, much more wearable! (And the conditioner makes it smell really nice when I press it, ha!) So thankfully I could use the pretty fabric for my dress after all. Crisis averted.
According to the pattern’s chart, my waist was a 10, my bust and hips between the 10 and 12. But I already had an idea that I should size down, so I sewed a straight 8 (both suggestions I gleaned from others and my previous experience with modern Butterick), except I graded the hips on the back out to a 10. Why? I’d actually sewn the sarong skirt part of this pattern earlier in the month (haven’t photographed it yet!). I was matching it up to a Frankensteined vintage bodice, so I went with a 10 in the back and 8 in the front to get it all the match, and then still needed to slide the seams in of the front a bit to make it a hair smaller. So I felt like I was probably okay to sew the 8 but kind of liked the extra bit of room of the 10 in the back.
Using the pattern’s cup size measuring, it put me in the C size but almost the A/B size, which is just a joke. So if you have a question in cup size in this pattern, go up!
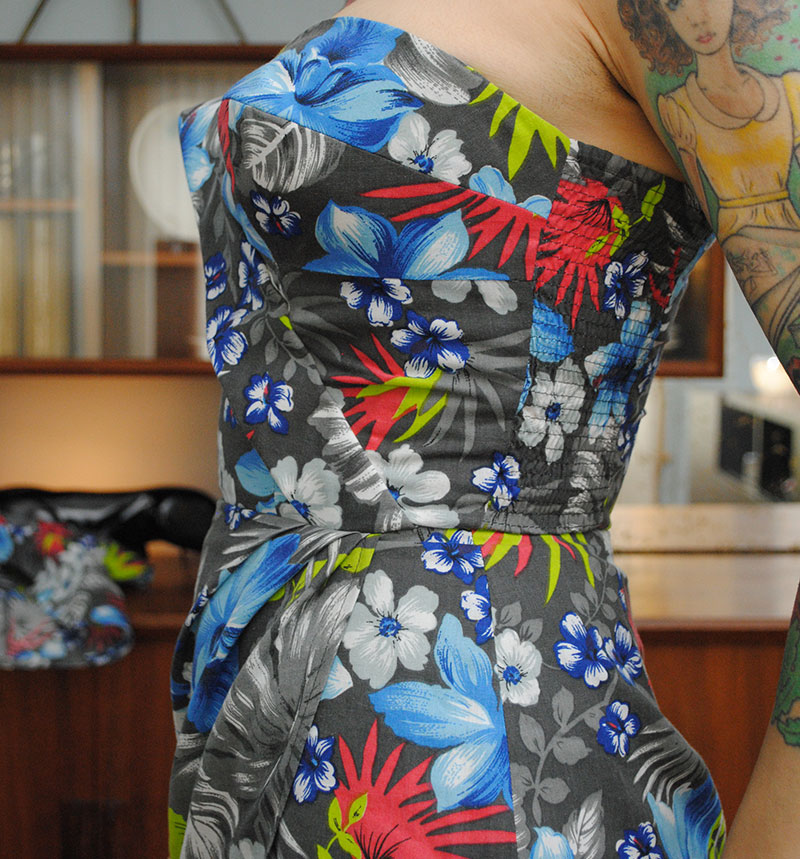
Let’s talk about that cup area while we’re at it, because that was an area of a bit of disappointment for me in the final dress, as awesome as it looks. Once sewn up, I felt like the upper part of the cups were a bit too… short. Not that they didn’t fit, because they do. But at some angles, you can see there’s a good bit of décolletage showing, and not entirely just because it’s a strapless. My boobs do fit in there nicely, it’s just that it’s a bit low on the bust. I’m not sure sizing up to a D cup would have fixed this and it might have made the rest of the cup baggy (as they really do form perfectly to my actual bust size which you can see in the photos above). But I can always try that in the future.
I know that straps would help keep things in place and pulled up, but even still, compared to similarly-shaped vintage dresses in my closet, there’s a bit less fabric to go around. The whole bust area just isn’t as “tall” on this dress as I’d like.

I think the pattern might just be designed to be a bit showy in this area, especially exacerbated by it being strapless and slipping down a tad as you move around (a strapless bra is necessary of course… I’m wearing the Glamour strapless from What Katie Did, which is perfect under this style of dress). Whereas my similarly-styled vintage dresses manage to be sexy and give a fantastic shape as this dress does, while being a bit less revealing, even without the use of the straps.
It obviously annoys me a bit. If there’s a next time, I would use a smaller seam allowance on that upper bust seam at the top (tapering to the normal 5/8″ at the side seam), or try the D cup pieces, or both. I like the va-voom but I guess I prefer a bit of mystery with my va-voom. Maybe I just need to stick with straps. Likely I would anyway… I don’t need that many strapless dresses, and kept this one strapless mainly because I was so amazed it actually fit well enough to wear that way!
So really, for all my bitchy nitpicking, it’s totally personal preference in the end, and the dress still fits and looks pretty nice in that department if I do say so myself. 😉

I also decided to sew a vintage bolero to match! I love sets. Plus it gives me a little more modesty if I’d like, or chill protection.

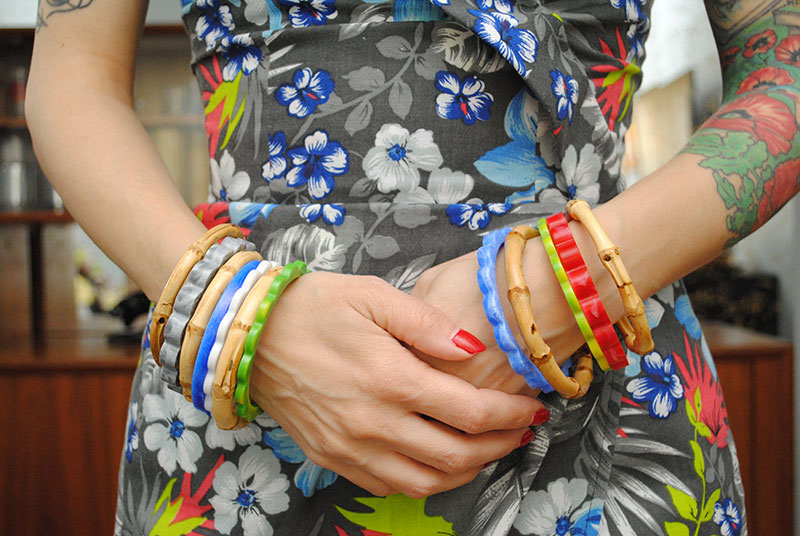
And since I was feeling extra matchy, I made several scalloped resin bracelets, too. These were cast in molds I made from Bakelite bangles. I was playing with some marbling techniques that didn’t all quite work out, but they still came out fun.
Other than the bust, a minor fitting issue I had is that the bodice is about 1/2″ – 3/4″ too long on me, which is pretty typical, so I should have anticipated it and made the bodice a little shorter. It causes a bit of bunching at my waist sometimes because the fabric is riding up a bit, but it’s no big deal and an easy future fix.
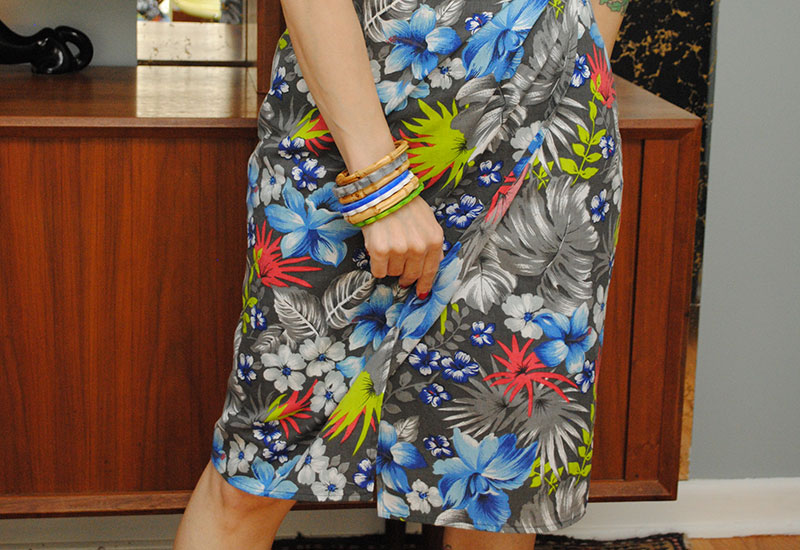
So really, the only other fitting issue was that the left front of the skirt that forms the sarong underlay is not wide enough. You barely move and the thing pops open! There’s no reason why it couldn’t extend all the way to the side seam, giving you another few inches of modesty. I would fix that next time because I like to, you know, walk in my clothing. You can see below I have my legs spread a bit apart, and look at where that side hem is! When standing still, it only just grazes the side of my right knee.
I forgot to photograph it but the pattern’s instructions for hemming left me questioning how to do those two corners, so I just mitered them!
Oh by the way, I think I pleated the skirt wrong, sending them down instead of up, as it’s hard to tell in the pattern. But either way, I do love how they look! It would be elegant in a drapey fabric like rayon.
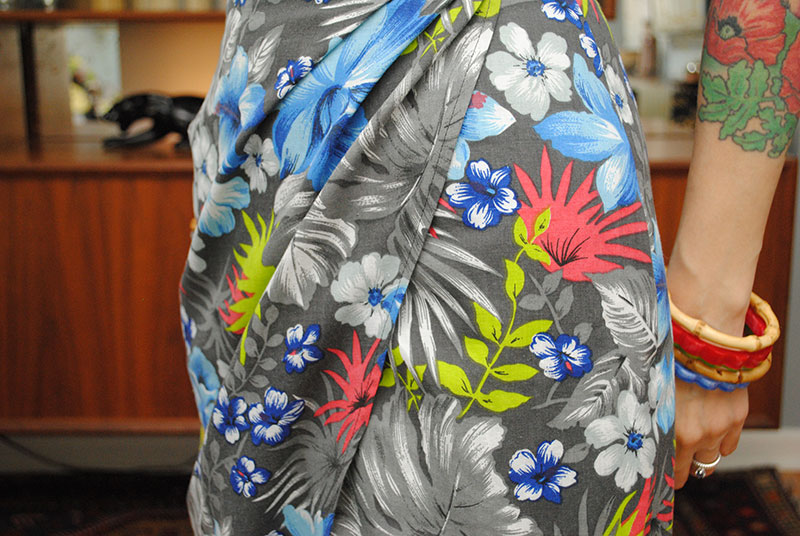
I do wish the hem of the sarong and the band across the bust ended at the same spot. Not sure if that was me placing the band poorly or what. I think I’d prefer if the band reached the side seam anyway if I were using the sarong skirt, so next time (if there is one), I’d see if I could move it over slightly. Although if I do this ever again, I’m more likely to go with a gathered skirt for comfort. But had to bust out the sarong at least once!
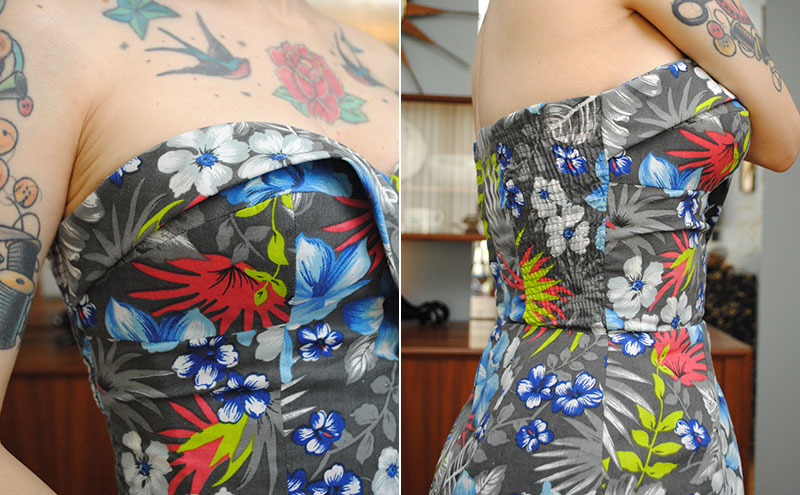
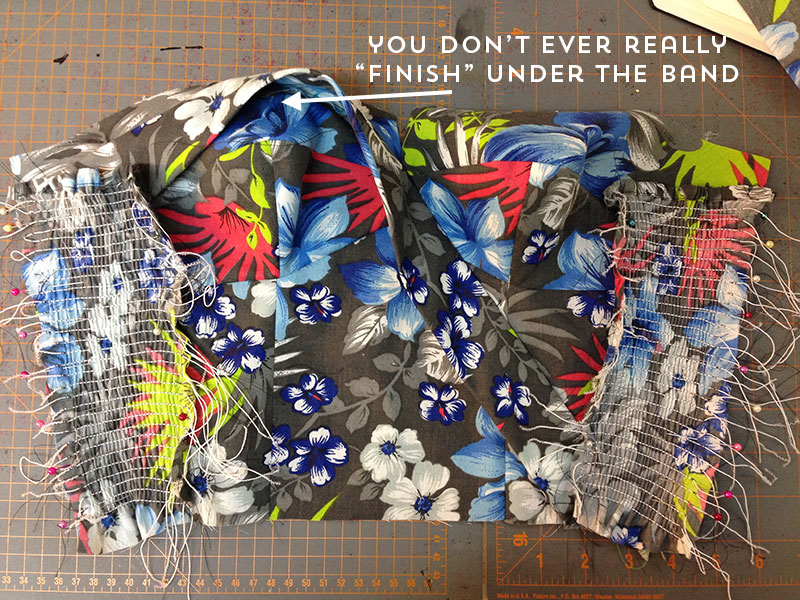
By the way, that band is finished really weird to me. You don’t do anything to the raw edges except fold the band down over them when you stitch it to the bodice. Then at a much later step when it’s a lot more difficult to get in there, you sew it again 1/4″ in from the original seam where you can. Which I forgot to do. Next time, I’d serge the edge first and forgo the second line of stitching (on purpose this time).
OMG, look at all those elastic bits in that photo up there! They give me the willies just looking at them. I hated that part, it took forever. But I did think it was clever that the pattern has you put elastic in a casing (just made from folding down the edge of the piece at the top before shirring), so you don’t get that ruffling thing going on. And I have to admit… as much as I complained about that shirring while I was doing it, I do love how it looks in the end!
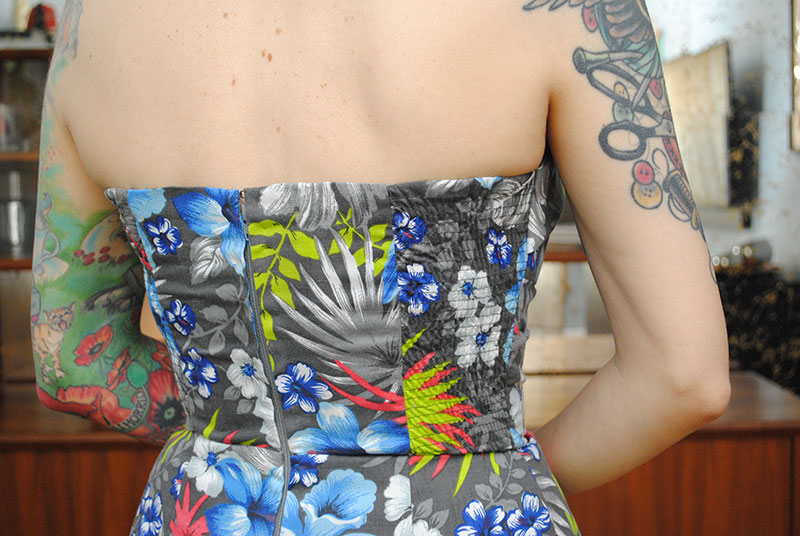
You can kind of see the zipper gaping in the back, and that was a whole separate issue to deal with. The pattern has you install a lapped zipper, which I love and prefer, and it would have hidden any gaping causing by the firm fit of the bodice (which you do want, to keep everything in place with a form-fitting style like this). However, the instructions on how to handle the center back lining pieces with the zipper were iffy and ended up with a really stupid juncture at the CB waist, which I hated the look of. Strangely unprofessional looking compared to the rest of the pattern. So I ripped it out.
Instead, I took a page from several of my vintage dresses that have shirred back panels and boned bodices, which all, like this pattern, have the waist seam turned down instead of up. Presumably due to the boning, and because so can’t hide the waist seam allowances with the lining since the shirred panels aren’t lined, anyway. Those dresses finish the center back bodice seam first, and then install the zipper over the top of that (not unlike this Cambie tutorial from Tasia). Hopefully this photo below will help a bit. I had to annoyingly finish the CB bodice seam by hand because I would have had to undo a huge amount of stitching to do it by machine, and at this point I was mentally done and just wanted to get the zipper over with. No one will know but you and me, anyway.
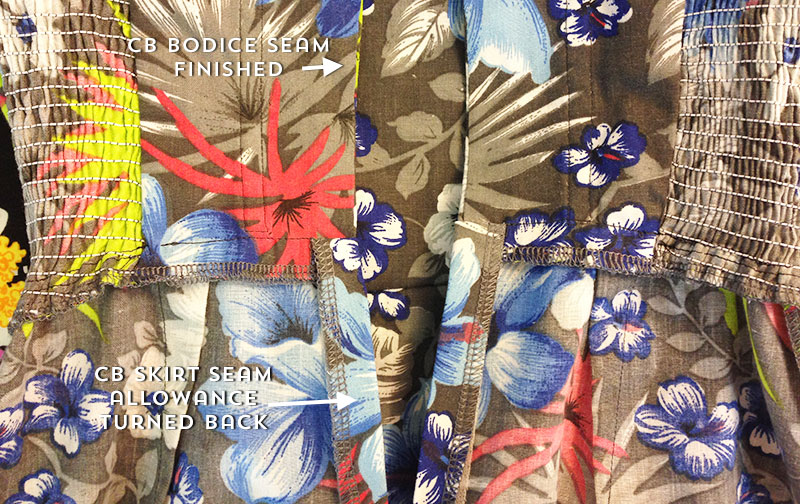
Then you install the zipper, although it’s a pretty difficult way to do it and involves lots of pins, which you can see below. I think if I had to do this method again, I’d zigzag baste the CB opening shut to make it all easier, especially if I were planning to attach the zipper by machine and not hand pick.
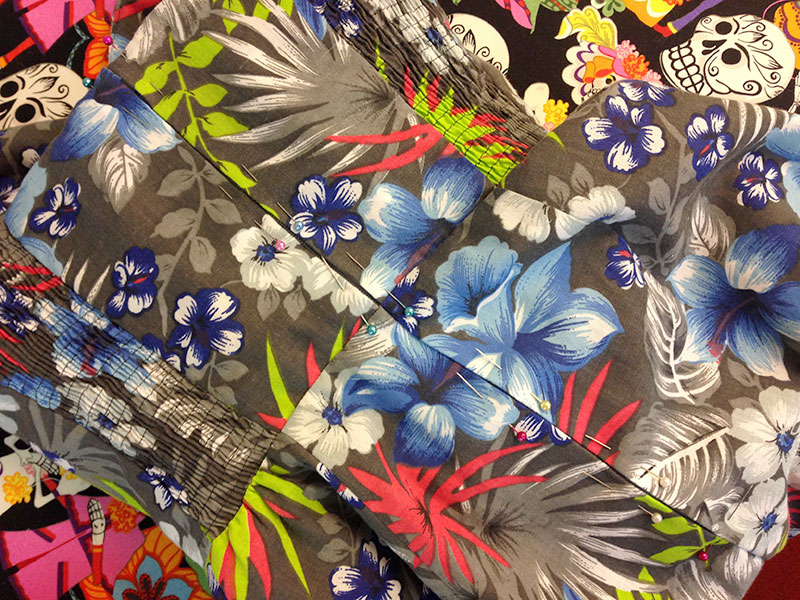
I hand picked it mainly because when I matched my thread color from WAWAK to the dress, I went too dark so I didn’t want big dark lines down my back. I would have preferred doing it lapped like I said, but I realized too late that I would have had to change the left back seam allowance to 1/2″ to do that, and I was already having to do some funky finagling to get any of this to work. So it is what it is. I would really like to come up with a better way all-around to deal with a lapped zipper and this dress in the future. My other thought was just to simply finish the CB lining and shell seam as one and not worry about the damn thing. Then I could install a normal lapped zipper instead of all the monkey business a) the pattern has you do or b) I came up with on this version.
(By the way, the little extra dark bits you see at the waist on the zipper below are some extra hidden stitches closest to the CB seam, so the zipper doesn’t gap worse at the waist where it’s liable to, since it’s your narrowest point.)
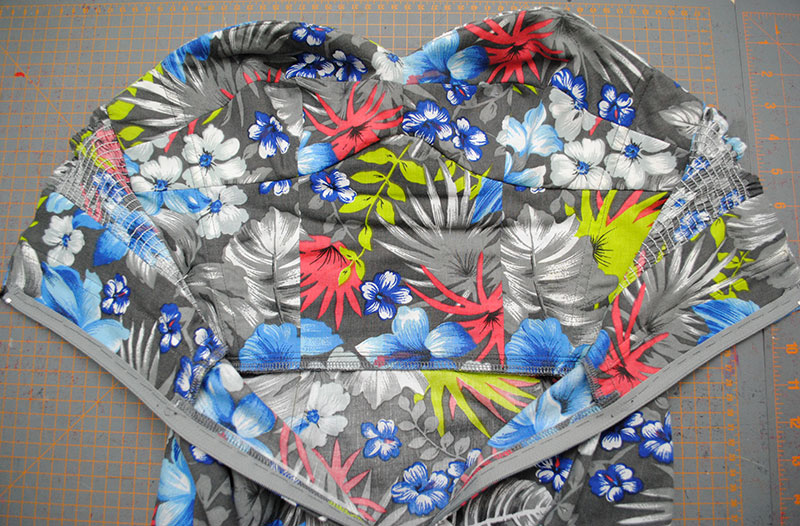
So here’s a fun construction bit for you instead of expressing frustrations, which I feel like I’ve mostly been doing! I really enjoyed watching the structured bust cups and bodice come together.
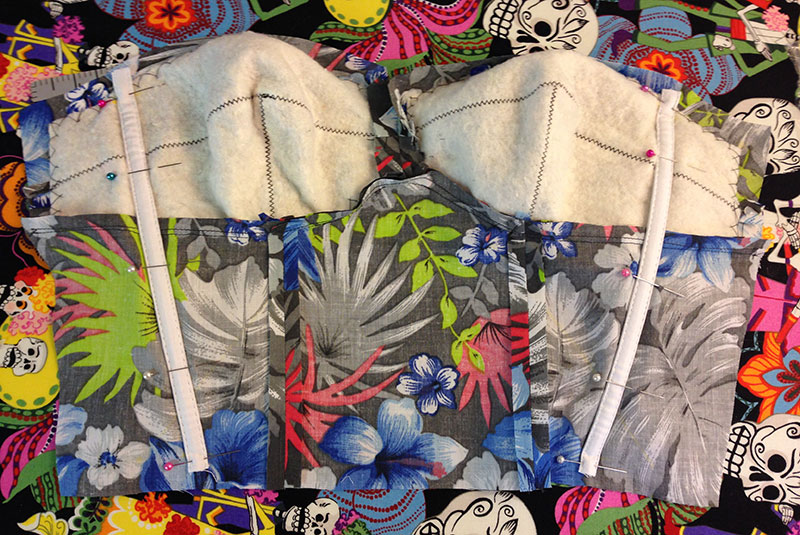
The pattern has you trim off the seam allowances of the bust pieces on the batting, so I just made my own pattern pieces minus the seam allowances. Then you are supposed to catch stitch them together butt up against each other (a “butted” or “abutted” seam) but I just used the zig zag stitch on my machine. Way faster.
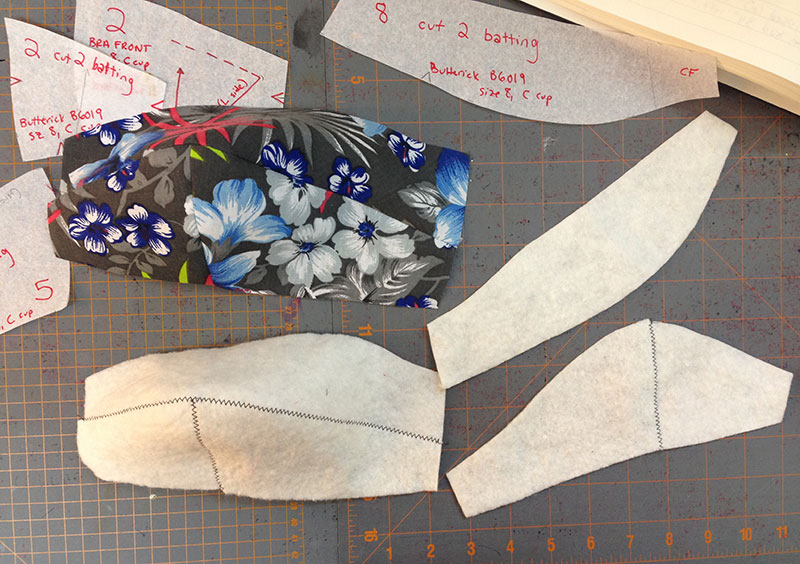
Then you catch stitch the batting boobs (as I started calling them) to the bodice lining pieces, which are the same as the outside. In the future, I’d probably trim the lining pieces slightly to account for turn of cloth, especially with that batting in there, as the inside tended to get a bit wrinkly when I was putting it all together.

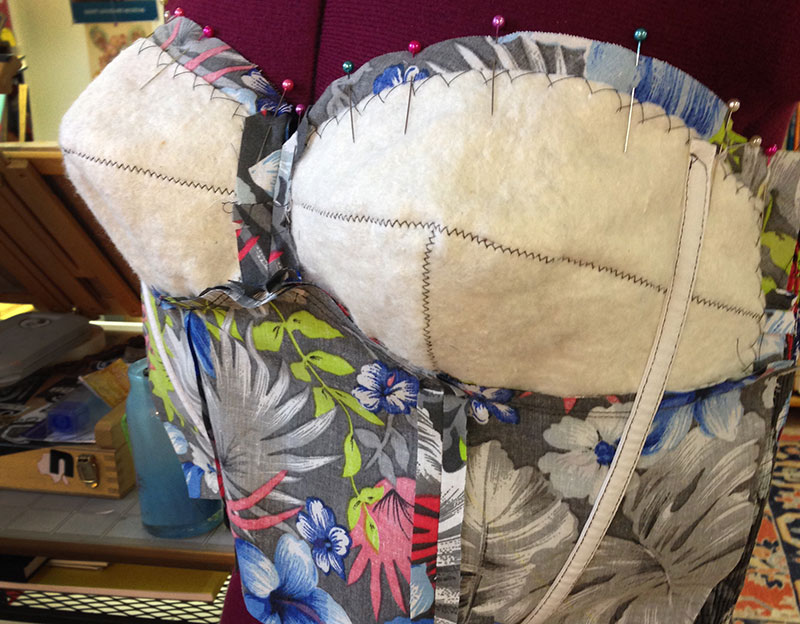
It started to look exciting once I placed the covered boning, which is just sewn along the edges to the lining along the placement lines. (Totally do NOT understand why the pattern couldn’t mark “placement line for boning” and “placement line for band” but just “placement line”. Oh, and occasionally it said “placement line – left side” but there was never a “placement line – right side”. Super frustrating. C’mon, Butterick, it wouldn’t be difficult to clarify, especially with so many lines on the pieces!)
To keep the boning in position against the lining as I sewed (since you can’t really pin into it as there’s plastic in there) I just pinned perpendicular to the left and right of it in a few spots, and that worked great.
Once it was all together, even though none of that was really difficult, I felt like a champ! And it looked really cool on the inside, too.
So admittedly, I kind of told this dress story in reverse order, didn’t I? Mainly so that I could end on a high note, which was the fun bust stuff. It really was a bit of a trial getting this thing together, and while the thought of doing it again makes me want to gag a little, at least I feel much better prepared to tackle some of the trouble areas in the future. If I ever make this again, I plan to….
- Add coverage to upper bust or use the larger cup size
- Add coverage to under part of sarong skirt (so it doesn’t gape open as badly, although likely I’d just swap out the skirt)
- Shorten bodice slightly (for my short torso)
- Think more about how to attach the zipper in an easier manner (and tidier than the pattern calls for at the waist seam)
My tips to you if you want to sew this pattern are: go down a size, think about if you want the bust to have a little more coverage (and/or size up in the cup department), consider making the free edge of the left sarong front wider, and take it really, really slow. The pattern has lots of areas that could be explained far better than they are. None of the head-scratching moments I had were deal-breakers, and I’m really thrilled to have a dress like this in my closet. It’s a great looking dress and I actually really like the fit, but be forewarned it might be a bit of a bear to sew this pattern up.
I’d kind of love to use the bodice again and add straps and a full gathered skirt, to use with some of the reproduction Alfred Shaheen fabric I have… if I can stomach this again.
But it’s getting on towards September now so knows, maybe next summer, right? 😉
Wow, it looks amazing! And amazingly complicated. I love Gertie’s designs. Also, I love love love your tattoos!
Hi Tasha – great job on the dress! That was a lot of technique in one project and I think you handled it well. As for the little things, I don’t see why you can’t make the changes you want; definitely draw the upper cup a bit taller for the next version (don’t use a bigger one, this size fits very well), extend the underlap all the way to the right side seam, and whether you do the sarong bottom or not, no rule says you can’t place the bodice band at the side seam and match the sarong overlap at the at corner – I think they should meet there too, and that they don’t seems like bad design.
For your next zipper, may I suggest that you leave a one to two inch seam allowance in that area, then wait to determine the zipper placement when you’re fitting the constructed bodice (or any zippered garment). That way if you need extra to complete it, you have it. I would definitely attach the bodice to the skirt first too, so I could make the zipper seam continuous and leave the lining for the upper bodice unattached until I put the zipper in. I usually ignore whatever the instructions say about zipper insertions; I do all of mine by hand, even the lapped ones, and follow my instinct about the zipper and lining order of construction – all horizontal seams across the zipper first, then the zipper, then the lining gets tacked down.
Excellent job adding the bolero – I think all strapless dresses should have some kind of cover up available. I hope you do make another version, can’t wait to see what improvements you’ll make!
The bodice is attached to the skirt first, not sure if you thought I meant otherwise? So it’s horizontal seam first as you said. The issue with leaving the bodice lining unattached is that it isn’t a full lining, which is what makes it tricky. If you leave it unattached until you put the zipper in, the issue is that at the bottom where it meets the waist, you can’t fold the seam allowance underneath, as you would if you had a fully lined bodice. In this dress, the waist seam is pressed down and the shirred panels aren’t lined. So if you tack the bodice seam allowance to the zipper tape (like you would with a fully lined bodice where the waist seam allowance was turned UP to get enclosed with the bodice seam allowance), what do you (*neatly* anyway) do at the bottom of that, at the waist? The lining is free to the shirred side panels (which again aren’t lined). The pattern explains this juncture poorly and while I’ve done a lot of linings and such, there wasn’t anything I could come up with to make this make sense. Not sure I explained all that well enough, but it’s a strange area!
Wow, you even explained those monkey-written instructions and I’m still wondering what they were trying to do…. I’m staring at the CB closeup and still don’t know what they mean – good on you for being able to do it! Why can’t you fold the lining seam allowance under if you leave it free until after your add the zipper? You mean by machine? No, probably not; but I attach linings by hand. Is it one of those sew the seam inside out then turn out the corner junctions? Oh, maybe at the shirred panel you’re sewing all three pieces – bodice, lining and panel – in one pass? Don’t waste any more breath on me explaining, I’m no the sharpest with abstract concepts!
How would I neaten that up? Hmm… firstly I don’t follow instructions, so I would line the whole dress, but if I were to keep to the pattern pieces at hand… me I’d’ve sewn the waist seam, pressed that seam allowance up, inserted the zipper, folded the lining seam allowance under and then felled the lining to the waist seam. Then I’d use self bias to cover the bottom edges of the shirred panels. Or if I were back to not following the instructions, I would’ve completed the lining over the shirred panels with softly gathered panels, or tried to!
But you’ve done it and it looks great – who cares about monkey-written instructions? (No offense to monkeys, but if you’ve ever met one, you know what I mean.)
The dress looks lovely on you!
Thanks for showing all the construction bits, love posts like this 🙂
Beautiful dress and really beautifully constructed — especially considering all the trouble it gave you. I will say, I have always found Gertie’s dresses to look a bit “off” in the bust area (her shelf bust patterns is particularly off with the bust line often hitting right in the middle of the model’s boobs). I don’t know if it’s because she drafts her patterns for a small bust, but they always look too stingy and out of proportion to the rest of the dress. Maybe lowering the bust line and increasing the bust size would help?
Thanks, Moe! And I completely agree about the shelf bust pattern, that one makes me batty! While I *have* seen that oddly-cutoff-midway-through-the-boob thing in a vintage dress or two, the majority of that style don’t do that, it goes under the bust (or under at least most of the bust). So I don’t understand a pattern trying to replicate a fairly iconic kind of look would go in that direction. To me, it looks more like an odd mashup of an Elizabethan corset and a 50s dress!
The matching bracelet colours here have me going weak in the knees. Awesome styling, dear gal!
♥ Jessica
Amazing! You’ve done such a great job and you look gorgeous x
Aw, gads!!!! You look amazing and thanks for the in-depth review. I LOVE THE SEWING COMMUNITY! I want to make this dress, and your post is super helpful. I have a small chest and anything too revealing would be just sad, so I’ll definitely make the cups higher when I finally decide to make the durn thing. Congrats on a make well-done and you go out and rock it, girl!!!
This dress is a total stunner! It certainly looks the real deal and could totally pass for a real Shaheen! Congrats on all that complex work!
Love, love, love! Thanks for the pictures of the guts, that’s very informative!
Thanks so much, for that review. I had also been considering getting Gertie’s book because, in theory, it seems like such a fantastic resource. I’m an intermediate sewist and have started working with vintage patterns within the past year and a half, so I think I’ll be sticking with those!
The dress looks great, and is far beyond anything I could tackle right now. Kudos to you, for making such a complicated garment look so adorable!
Waow good job!!!
I was wondering if the padding in the bra part is really necessary?
Holy crow, what a gorgeous dress!
This is the most amazing dress I’ve seen! I just love the fabric (so glad it softened up!)…thanks for the thorough review!
I think you did a fabulous job on the dress, it looks wonderful on you!
I had some questions about putting this together. Ty