
Ready for our kitchen reveal?? Okay, “reveal” makes it sound like we did a big remodel. We didn’t. We really we just painted, hung up some new blinds and installed a new doorbell. But if you’ve seen my previous two kitchen posts (where we painted and the “before before” photos), you may agree it’s a pretty big change! Especially since that old paint kept me from ever sharing the kitchen on my blog.
And now, a little tour. Actually a looong tour of a little kitchen, but I know you want to ogle all the retro goodies I’ve been holding out on showing and not only see the paint, right?? 😉 So this post is a big one. This is our real life kitchen, with no staging except me tidying up a bit so you don’t have to look at unopened mail or dishwashing soap or the ramekin that usually lives on top of our microwave housing the “where the hell is this from?” screws that fall out of random places.
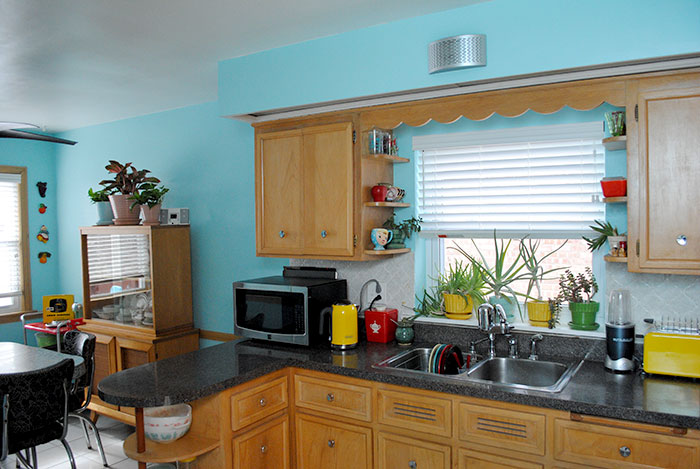
So I present the Golly Ranch kitchen. Now with more aqua and less poo green!

Ta da! Indulge me in one dramatic before vs. after shot. The day we moved in, and present day:
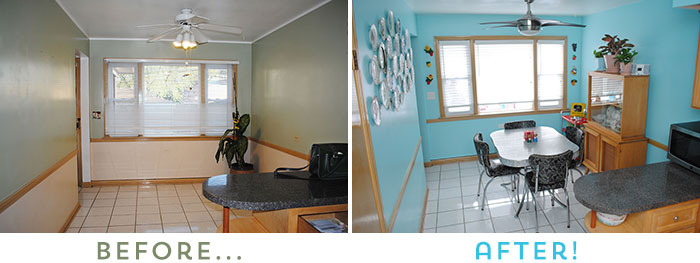
Isn’t it so cheerful now?? I love the paint color (Behr Aqua Spray as I mentioned in my previous post).
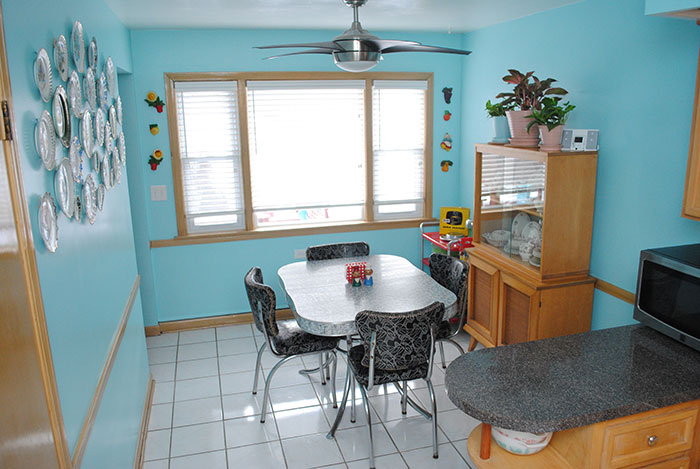
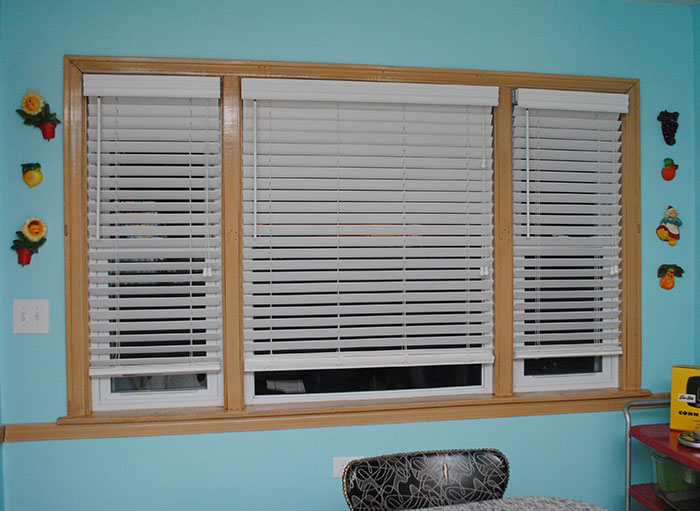
So those windows, let’s talk about that for a sec. The old blinds were 1″ metal mini blinds that were old and grubbier than you could believe. The one over the picture window was a behemoth!
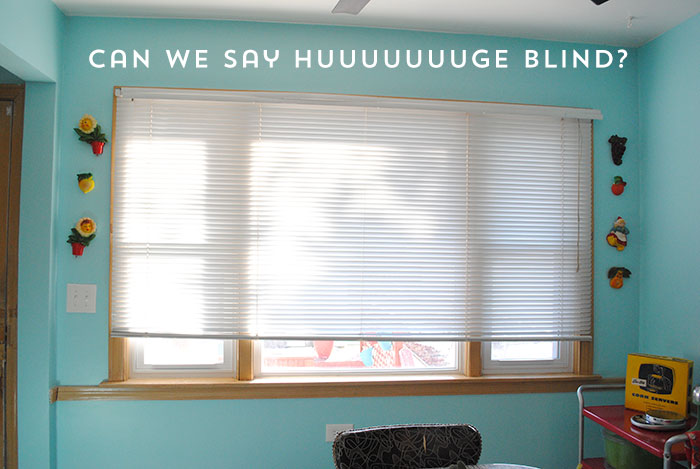
Hard to tell it’s even three windows above, right? So when we painted, we ordered separate inside-mounted 2″ faux wood blinds (these ones from blinds.com) and we love them. (Second time ordering from them, the first was our cellular shades for the den and our bedroom which we also love. I’ll do tours of those rooms at some point. Worth noting they often have sales, I think we got these for at least 20% off, if I recall.)
Here’s a daytime and a nighttime photo for comparison, since it’s reeeally hard to photograph a window:
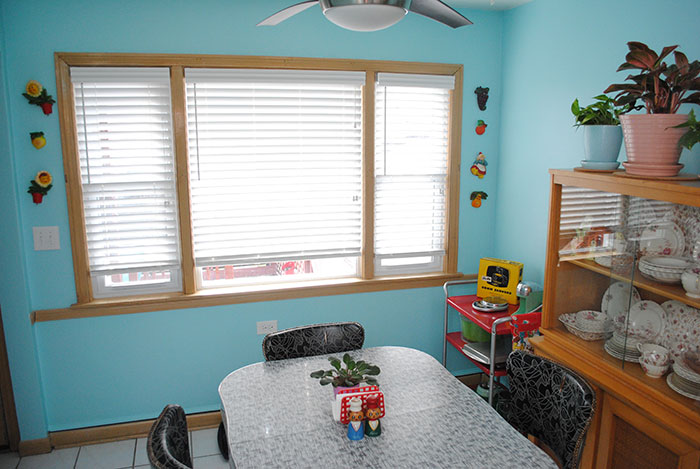
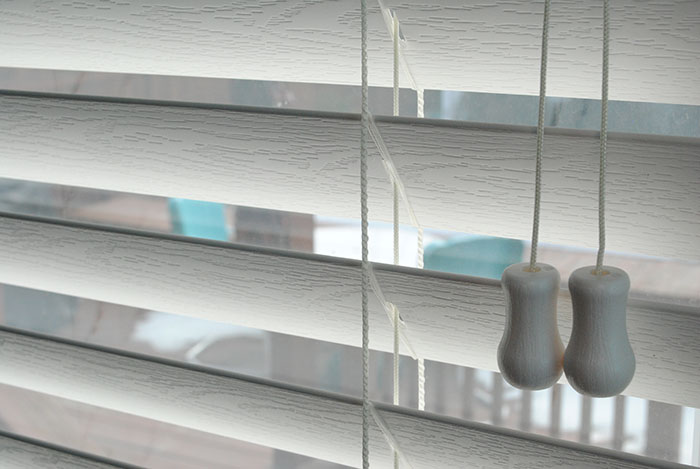
We picked ones with a slight wood grain texture and they’re really nice! I considered getting cloth tape too to cover the strings, but realized white cloth tape in a kitchen… nope. And I really wanted to go with white blinds in the kitchen to keep it nice and bright.
Eventually I plan to sew a cute fabric valance, which will cover the very tippy top of the window, so at that time we’ll remove the valances that come with the blinds. We also replaced the blinds over the sink window to match (that one probably won’t get a new valance since it’s kind of a cramped space). You can see what it looked like while we were painting. We removed the old blinds so we could patch, so we lived with no window treatment and stared at our neighbor’s house for a month. Oh, city living.
We did have a false start with the matching one for the back door (which is just to the right of the big picture window), realizing they may stick out too far, so we’re currently working on that.
I’m just so freakin’ happy to have the new blinds up, along with the new paint! Since over the kitchen sink, we always left the old mini blinds halfway up because of the plants, we saved ourselves a few bucks (and a thick stack of blinds) by getting this one cut the actual height we wanted. It’s mounted on the inside of the window, too, so just the valance sticks out.
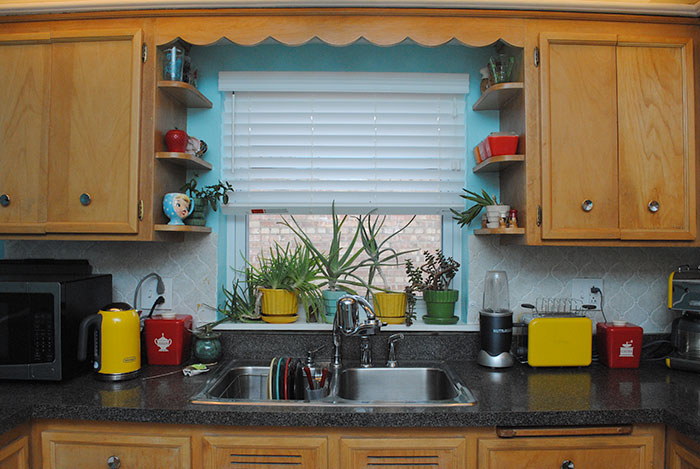
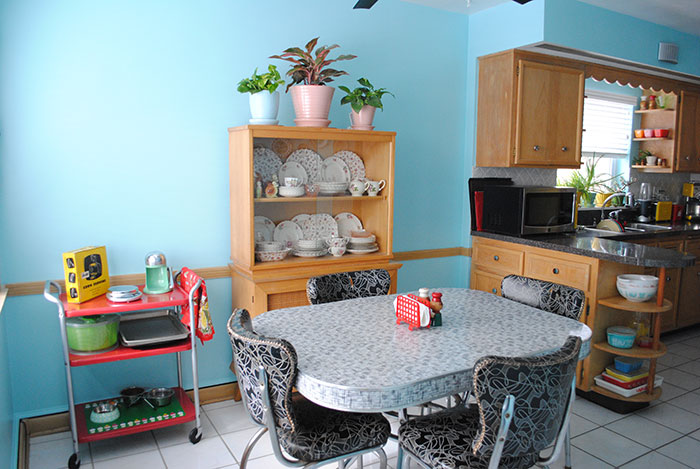
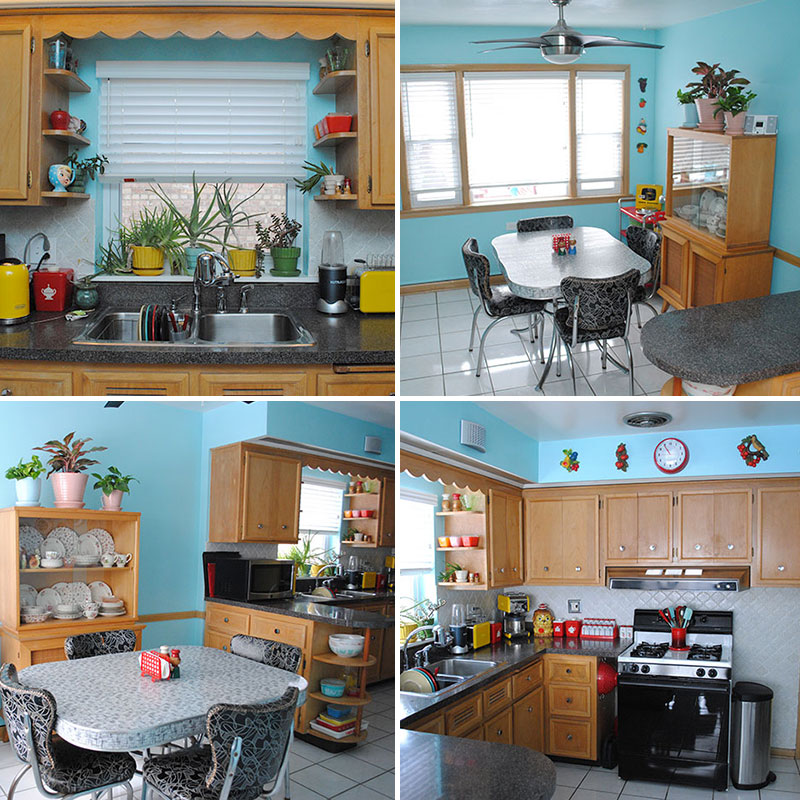
As you can see in all the photos in this post, the main color scheme is aqua with red accents, and we have a mix of kitschy, vintage and modern all working together. I’ve been collecting red vintage kitchen items for over a decade! Salty and Peppy salt and pepper shakers, red Bakelite flatware, plastic canisters, you name it. But I’ve also picked up a couple of other accent colors over the years. The yellow started when we got a vintage lion cookie jar for Pia’s dog treats and a couple of sunny yellow pieces of chalkware, back in our condo. So when we needed a few new small appliances in the new kitchen, we went for yellow ones. And then two of my yellow vintage planters that were in other rooms in the condo were moved into the kitchen and are perfect, too. So boom, second accent color.
I’ve also subconsciously accented with pink too, picking up several pieces of pink Pyrex and two vintage planters over the years, then more recently, when I was given my step-grandmother’s two patterns of pink floral Spode china that I display in the hutch. It’s trickled down to things like heart-shaped measuring cups and spoons. I wish I could remember where I got those as they’re so cute, I think it was on Amazon.
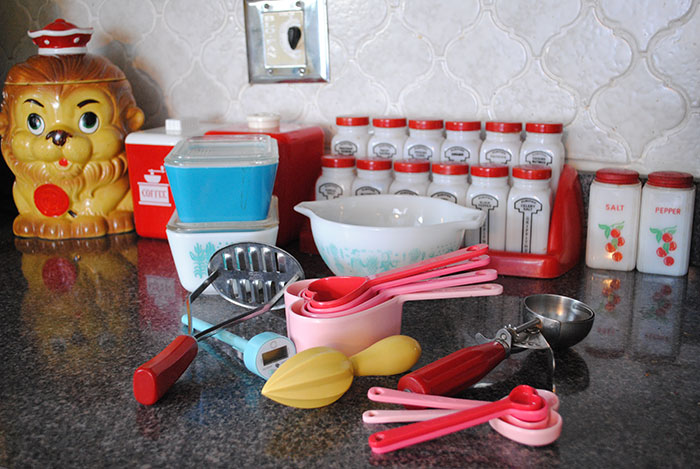
Below is a red Le Creuset utensil holder my mom gave me, stuffed with all the cooking utensils we use, including vintage Bakelite-handled ones and aqua spatulas from Martha Stewart’s kitchen collection at Macy’s. I also have her aqua-handled food storage containers, hand mixer, digital thermometer and probably a few other things from that line. Hey, when you actually spy aqua things you need, you have to get them!
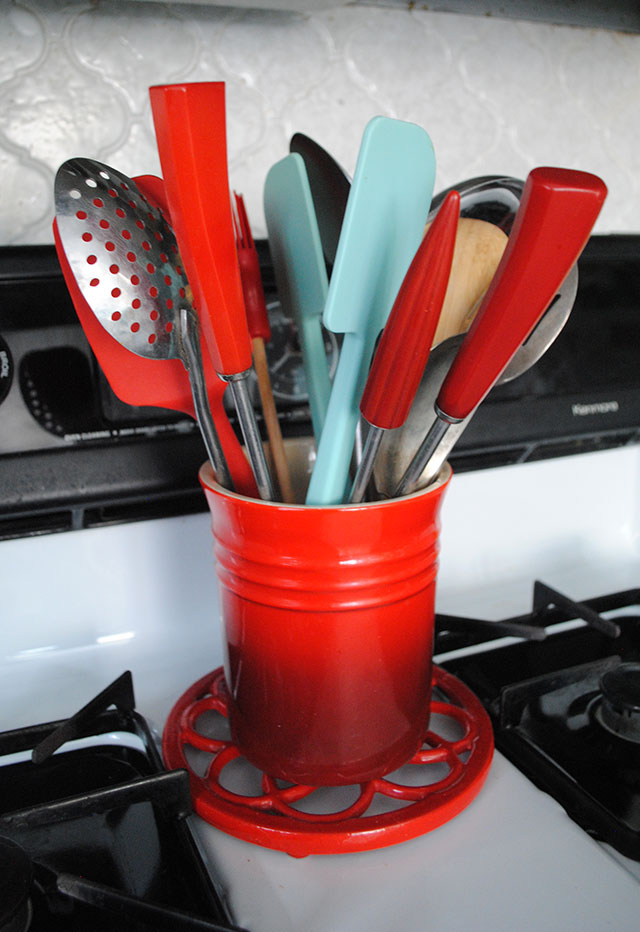
We also use (modern) Fiestaware as our daily dishes, and have narrowed down the palette to ivory, turquoise, sea mist (retired since 2005, so I’ve had to supplement on eBay or at outlets), scarlet and black.
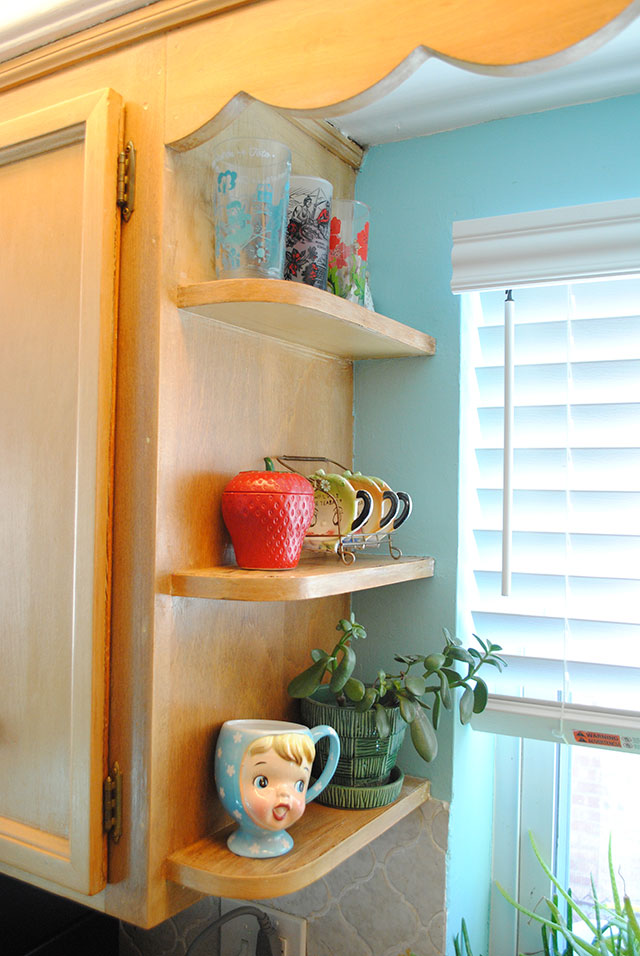
Love the hilarious country-ish shelf paper, by the way? I need to find a better one to cover up it and other equally bad shelf paper in other cabinets. I reaaaally don’t want to try to steam all the old stuff off so I’m thinking something else I can stick on top. Red gingham, if it exists?
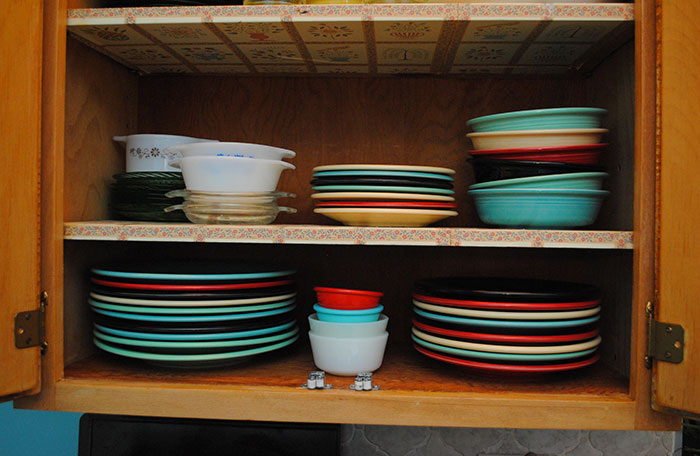
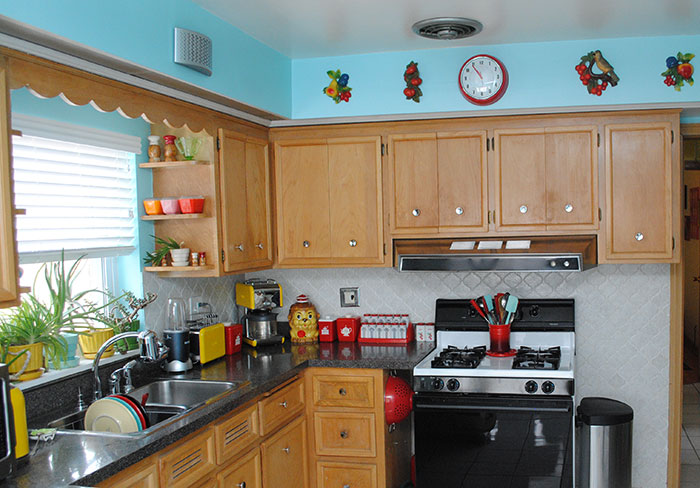
You can see throughout the kitchen there are little pockets of my accent colors. I guess green can also be included, too! From the sea mist Fiestaware to my Juice-O-Mat juicer (another thing I’ve probably had at least a decade), to accents in the chalkware and plants. And not that you can see it on display except for one cup on a sink shelf and some of the small plates in the photo above, but I also have my step-grandmother’s collection of green depression glass, too.
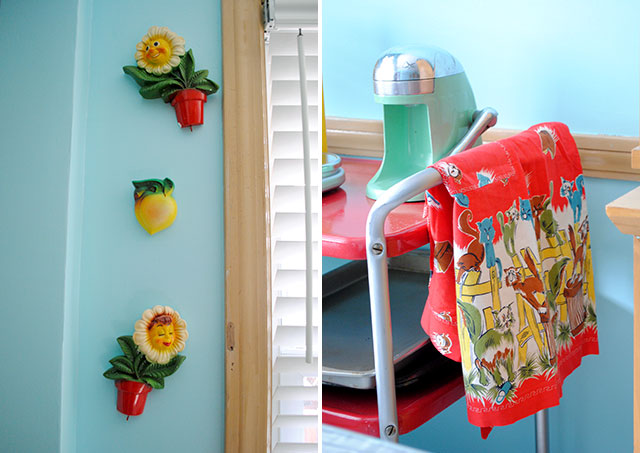
The amazing vintage angry cats apron on the bar cart below is something my mom gave me this Christmas, it’s a hoot!
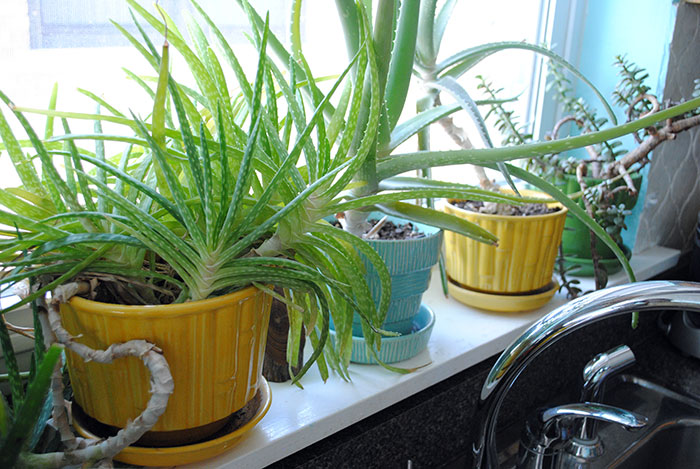
The two yellow and one aqua planter you can see behind the sink are all vintage McCoy, but the green one at the end and the aqua hobnail one above the hutch were actually from Target some years back. It’s nice to have something lush and green to look at while you do dishes, especially in winter. In our condo you just stared at a wall.
Our house was built in 1955 and the kitchen has the original cabinets, but that’s about it. Fortunately, that’s the biggest part that gives it a fun 50s touch! The scalloped wood valance over the sink, the little display shelves to the sides of the sink, and a peninsula all made me (internally) squee when we first toured the house. And I was honestly a very down-to-earth house shopper, so that’s saying a lot!
It really feels like our “meant to be” kitchen, when you consider the majority of the vintage items we’ve put in it were things we already owned before we even had this house, yet they really look right at home in here. 🙂
(The little plant below could use a stick for support, I know!)

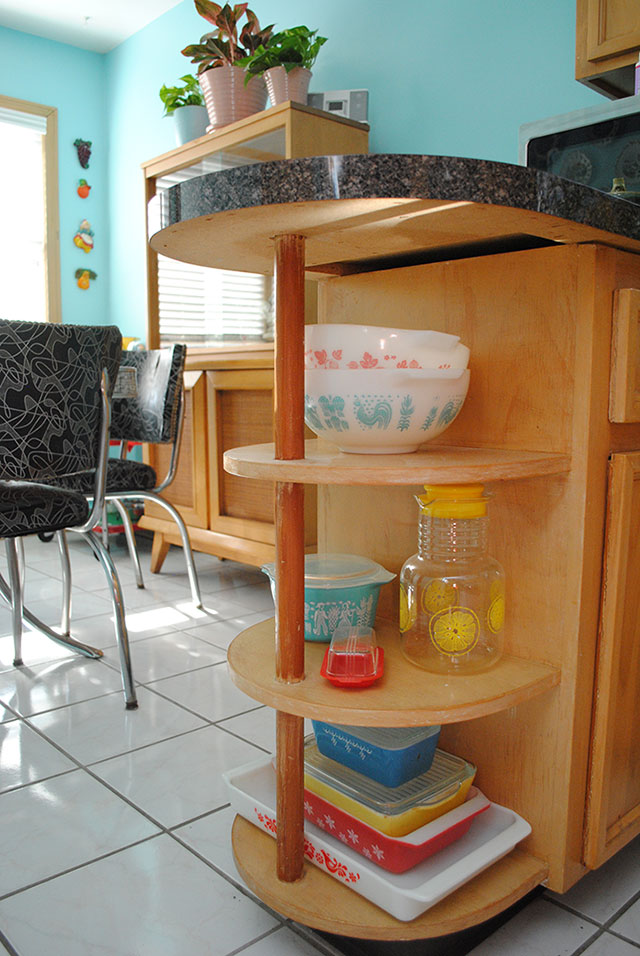
You know the second I saw the peninsula I thought, “Yep, my Pyrex would go right there.” And so it did. The other neat thing about the peninsula is that you can access the cabinet from either side.
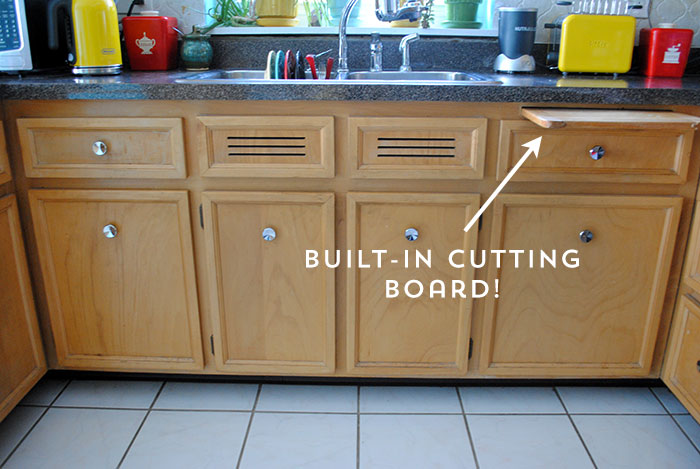
There’s even a built-in cutting board to the right of the sink… which frankly I usually forget about (and by the way, it does pull completely out so you can properly clean it). I love those special little bits!
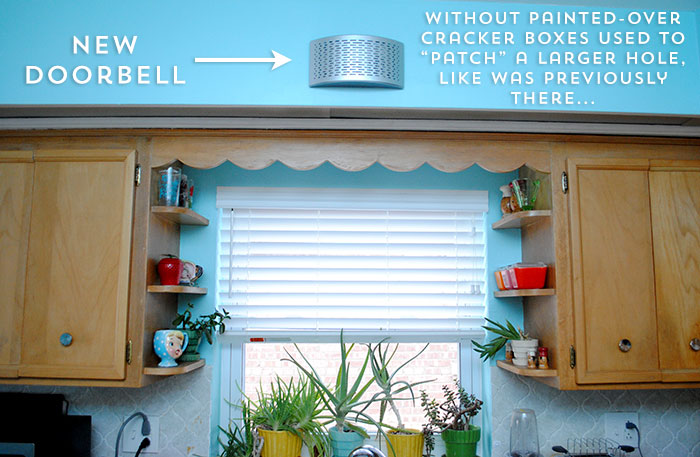
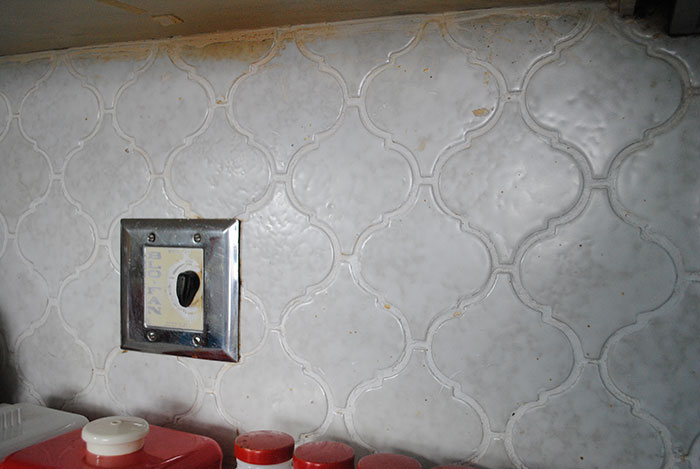
Unfortunately I forgot to take a close-up “before”, but that box on the soffit above the sink is the doorbell. The old one was very yellowed plastic from the 80s or so. At one point in time the doorbell was obviously bigger, as the previous owners had literally taped and painted over pieces ripped from a cracker box on either side to make the hole smaller, instead of properly patching it. Um, oookay. Needless to say, that’s all gone now and it’s done the right way!
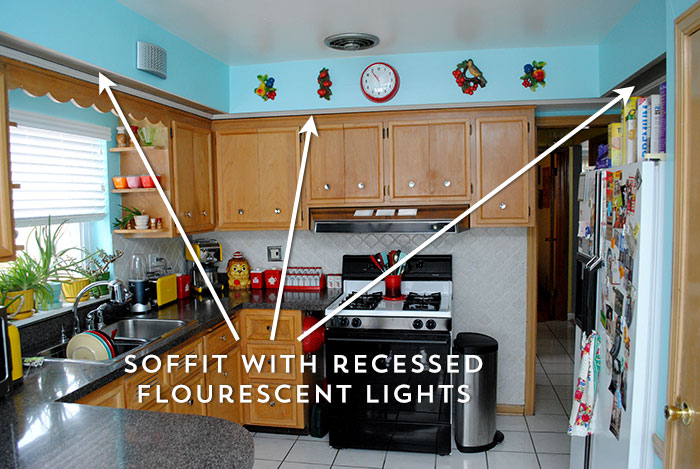
By the way, I feel like 1950s kitchens typically don’t have soffits that extend out beyond the cabinets but are usually more flush up against them, so our configuration is kind of interesting. Not sure why it’s like that. Maybe the original owners really wanted to make sure they got in enough lighting? It’s an oddity in our kitchen. I’ve only seen something similar in this 1961 kitchen (from this post), but with no lights.
At some point we replaced the bronze cabinet knobs for the saucer-shaped chrome ones you see. I think I used the knobs mentioned in this Retro Renovation post as the cheaper alternative to Rejuvenation knobs, or some similar ones from the hardware store. Eventually we need to swap the hinges for chrome, too. But man… that’s a lot of hinges. So the box of hinges has been sitting in the basement waiting for a rainy day.
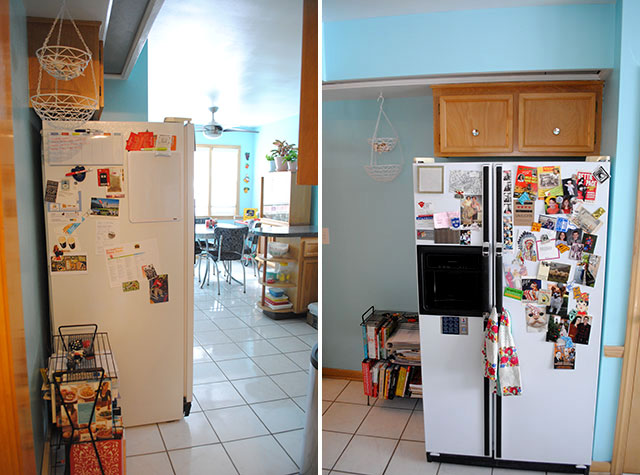
There’s also matching cabinets above our fridge. To the left of the fridge is a little vintage wire shelf we use for cookbooks and our keys (keep meaning to find a key hanger for the broom closet). For the photo on the left below, I was standing in the hallway looking into the kitchen. For the photo on the right below, I was literally sitting inside the sink to get far enough back, ha ha!
I’d love to say we’re the type of people who have a squeaky clean fridge but nope, we fill it full of photos and postcards and crap. And there’s always cereal and cracker boxes on the top, I only moved them to show you the cabinets. 😉
An interesting thing to note is that our wood cabinets started life painted white! The previous owner told us she had them stripped at some point (she bought the house in 1979 and we’re not sure when she did it). I don’t think they were ever meant to not be painted, however, since the wood actually doesn’t match, even within individual cabinet doors! So we’ve discussed that if we need to build any additional boxes or shelves to change things slightly at some point down the line, we might paint the cabinets white. I do love the light wood though, even un-matchy as it is. We’ll see.
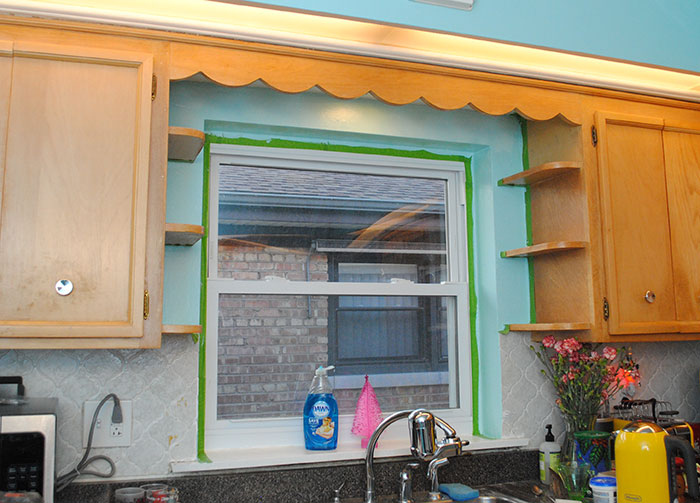
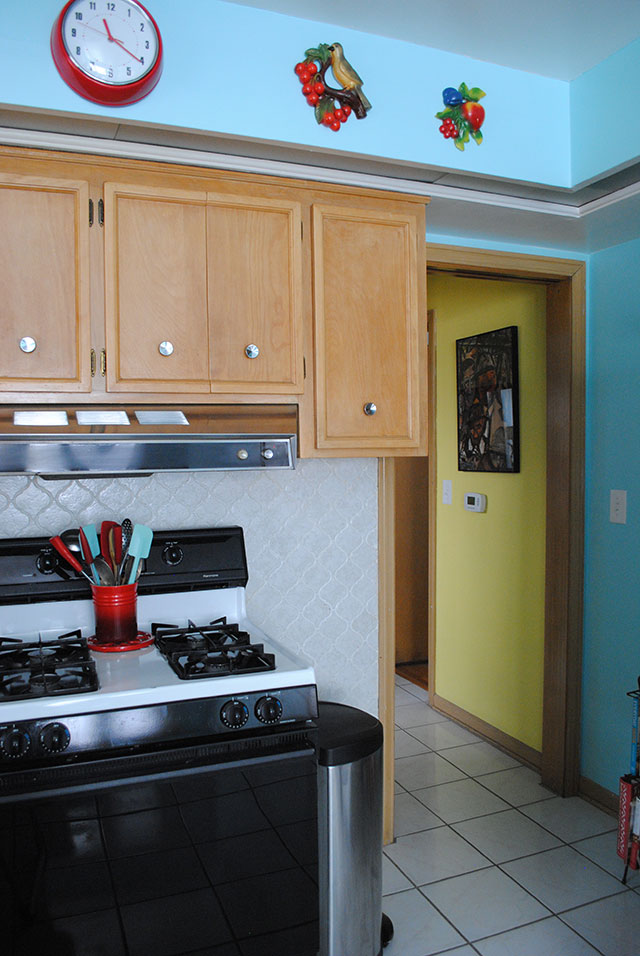
The large arabesque-shaped tile back splash was maybe a 1960s or 1970s addition, although similar tile is still sold so who knows, really. It’s like the world’s most pervasive back splash, going all the way down behind the stove and everything! Thankfully around the sink window was drywall so we could paint that and bring a bit more of the aqua into the kitchen proper, other than just the soffit up by the ceiling.
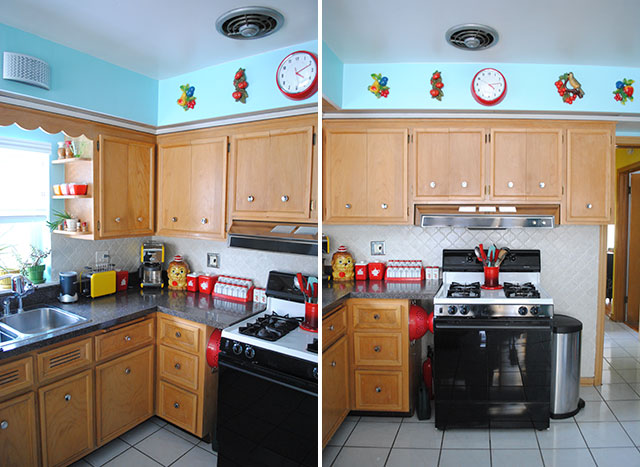
The back splash tile has a gray tinge to it, making it always look kind of dirty, although fortunately that’s a bit improved with the aqua paint. I don’t hate it, but it was poorly done around the edges (pretty sure it was layered on top of whatever was behind it), it definitely has had the grout painted (not very well), and in some spots has weird gunk we can’t get off. So someday, it’ll go. You can also see the dial to our original working Blo-Fan vent that’s in the ceiling! Someday we want to get the vent re-chromed.
The stove and fridge are from the 1990s (I know because I called Sears to find out if the fridge was pre-Energy Star, and it is by a year). You may have noticed there’s no dishwasher, which I’d like to eventually resolve if we can do it without losing much storage that we can’t add back elsewhere… that’ll be a really tough one, though. I’m not sure it’s really possible.
We also have a huge 40″ vent hood above the stove. I don’t think it’s original, but more than likely the original stove and hood were both 40″ wide as the built-in cabinets were obviously shaped around a hood that size. It’ll be hard to figure out what to do about that in the future. You can see the smaller stove was centered under it and an extension of the counter built to meet it, but it’s a bit silly having a normal stove under a huge hood.
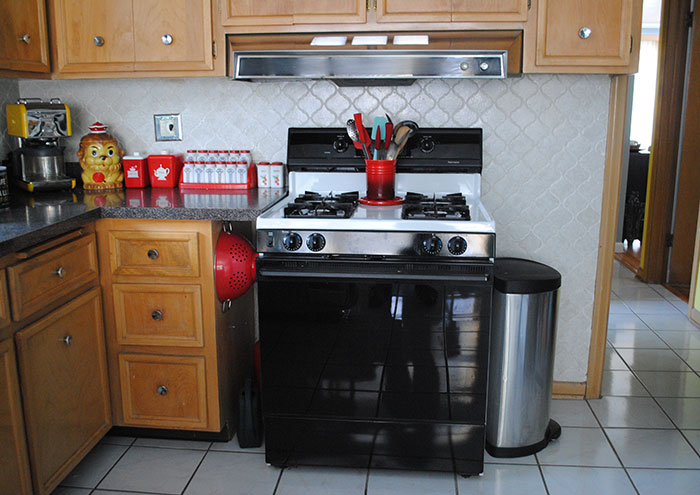
Plus to the right of the stove there’s a cabinet above where we keep our trash can, just hanging out in space as a shoulder buster when you turn the tight corner from the fridge into the hall.
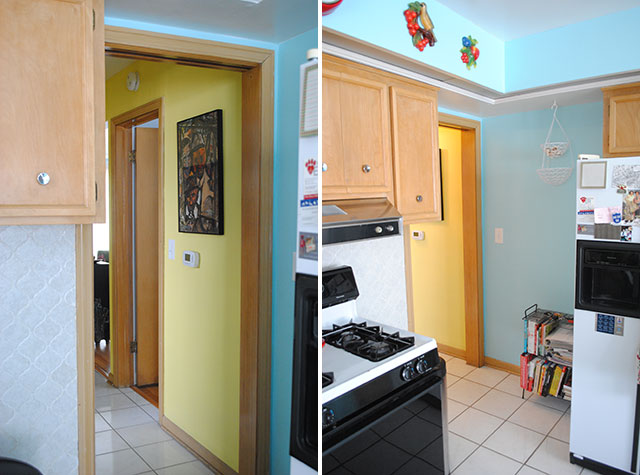
This is kind of my “WTF” wall. Our kitchen layout is like a scaled-down and slightly more odd version of Kate’s kitchen from Retro Ranch Revamp (you can see it on her House Tour page, a little bit down from the top), except she doesn’t have the same WTF wall. 😉
It’s all a bit awkward, especially with the shoulder-busting cabinet by the doorway, but it works, and I’ve yet to come up with any ideas to make it better in the future because of the cut-out cabinets above the stove and hood! It’s a periodic source of head scratching for me.
I dislike white-and-black mixed appliances and the fact that ours add a 90s vibe to the kitchen (along with the dark laminate counter top), but they actually work great so we’re in no rush to swap them out! And much as I looove swoon-worthy retro appliances like Big Chill and Northstar, the astronomical prices mean we’ll just upgrade to something more modest down the line. I really dig the way-more-reasonably-priced and still-retro-reminiscent GE Artistry line that I first saw on Retro Renovation, (and omg, if they really do skins, how cool!). I don’t love the idea of a bottom freezer (and we’ve both gotten surprisingly attached to the external ice dispenser), but as another plus to the fridge, it’s a little narrower than our bulky side-by-side… so it’s something we’ll have to chew on when we cross that bridge.
It’s hard to figure out the life stages of this kitchen, but fun speculating! I wonder if in the 60s or 70s, the original 40″ stove was removed, and the arabesque back splash was added (since then there was a lot more wall space behind the stove), and perhaps that was when the psychedelic wallpaper remnant we found went up. Neon orange with yellow and black swirls, with arabesque tile? Who knows. Boy, to be a fly on the wall! 🙂
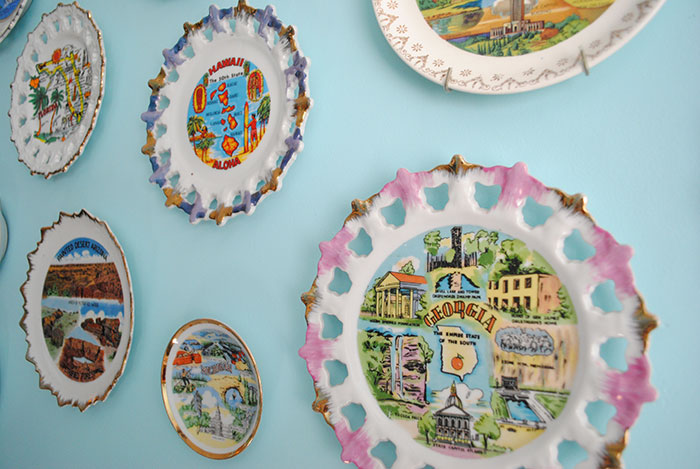
Anyway, I have the perfect place to showcase my collection of state plates on the only large wall in the kitchen. We actually put these up awhile ago when we could no longer stand trying to live with nothing on the walls until we painted. I really liked the configuration, so I took a photo before for placement, then carefully found all the nail holes after and had a fun puzzle getting them all back up in the same spots (it worked!).
For reference, that door is the same broom closet and attic access I showed in my last post, when we were insulating.
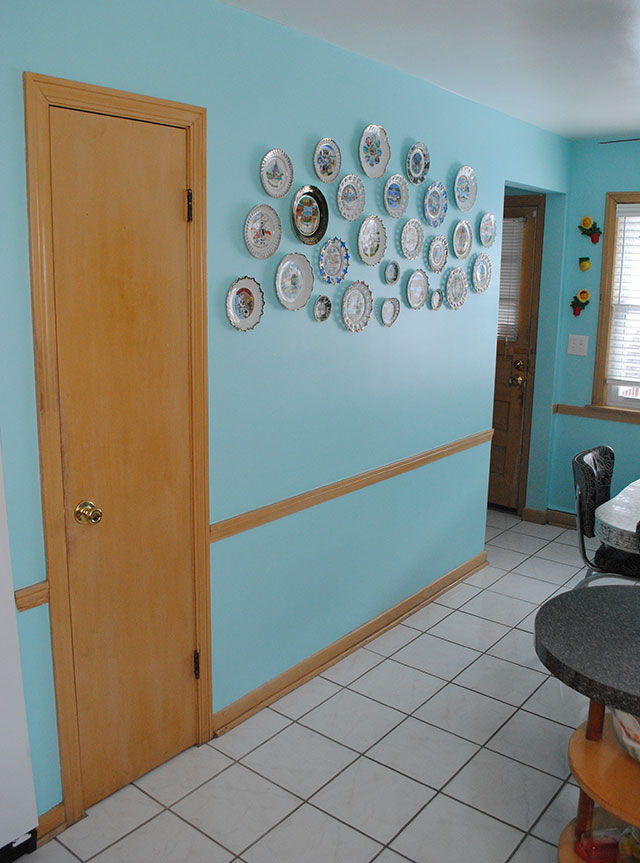
They look so much better against the aqua! Although a bunch of shiny plates are hard to photograph, sorry.
There’s one more original thing in the kitchen, the Colonial trim. Here’s the odd thing though: it’s not stained wood. The trim used to be white, and was actually painted or glazed to look wood-tone. I know that because they did it the lazy way and it stops being “wood” halfway behind the stove and fridge, and goes back to white. I bet the previous owners did that when they stripped the white paint from the cabinets. Check this out:
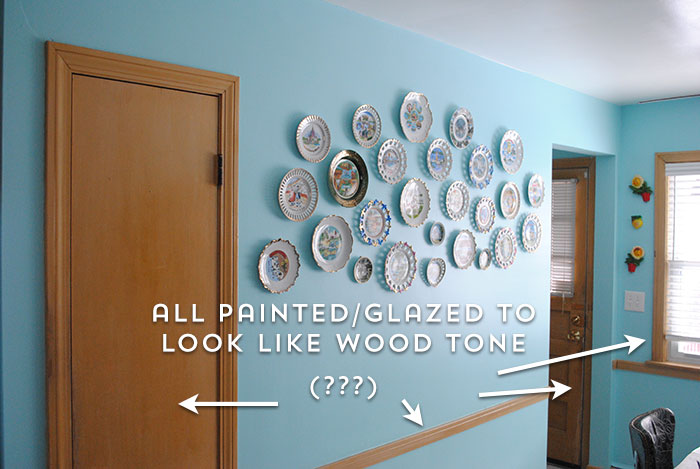
Is that not the strangest thing?? I’ve never seen it before. I’m not positive it was all once white, but at the very least some of it was. I have mixed feelings about it because I like that it’s wood…ish, but the reality is that you’re not actually looking at the grain of the wood. And since some of it getting kind of crummy at this point, I don’t even know how to fix it. So in the future if we do end up painting the cabinets white (or even if we don’t), we’ll likely paint the trim white. But it might involve some fixing up in a couple of spots, so we didn’t want to deal with it during this round of painting. And we’re not entirely convinced of what we’ll do yet, anyway. Another conundrum to tackle at a future date.
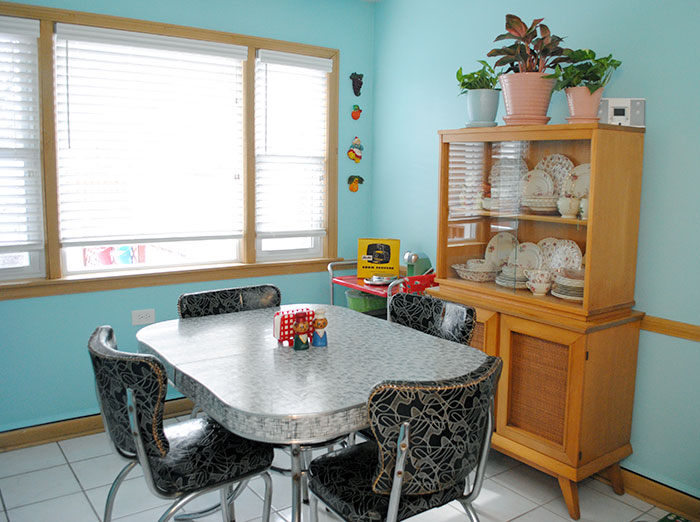
In the eat-in kitchen area, we have our vintage dinette table and hutch that were in the dining room in our condo, but are perfect in our kitchen now! We have the original table extension so we can seat 6 comfortably when we need to. Above (you can’t see it in the below photo, but it shows up in other photos) is a ceiling fan. We have to have one for such a small space, but we’re already annoyingly on our second one, after the first replacement of the boring white one from when we moved in broke. Grr.
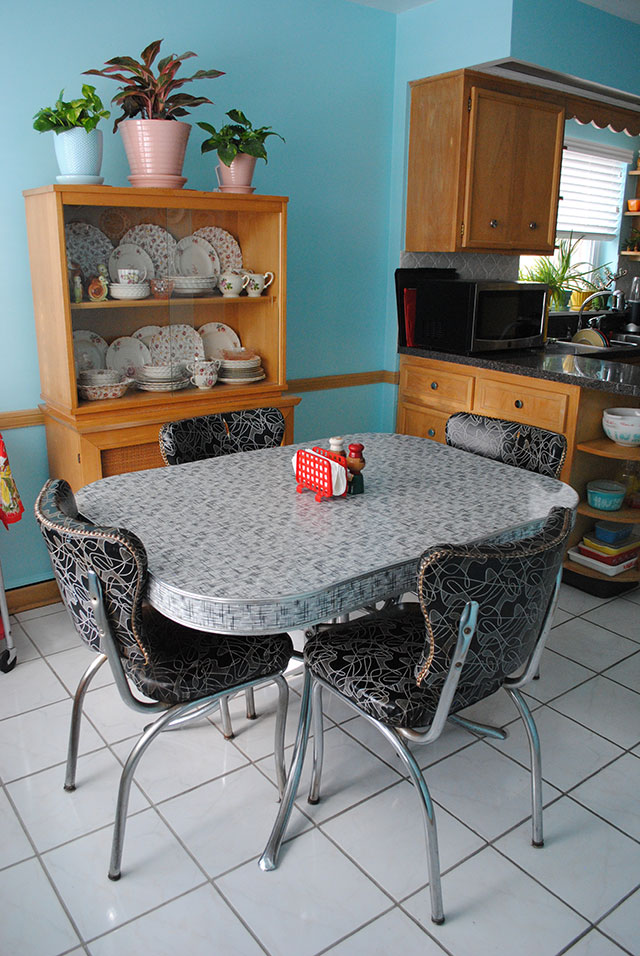
Oh, about six months after we moved in I wrote a post about trying to find a good place for our cat to eat, and never did a follow up! We solved it by getting a vintage Cosco bar cart. We picked it up cheap at an antique mall, probably because someone didn’t do the most amazing job spray painting it red, so up close you can see a few little fuzzies permanently embedded, but who cares.
Dinah eats on the bottom shelf, and we have two more for various random kitchen items (some for display like the vintage box of corn servers from my mom’s friend and the juicer, and some for regular use like the food scale, salad spinner and pans). I may rotate things around and put my white vintage Sunbeam stand mixer on the top shelf at some point, just to mix it up, and I’ve been meaning to try and find a better home for the pans in a cabinet.
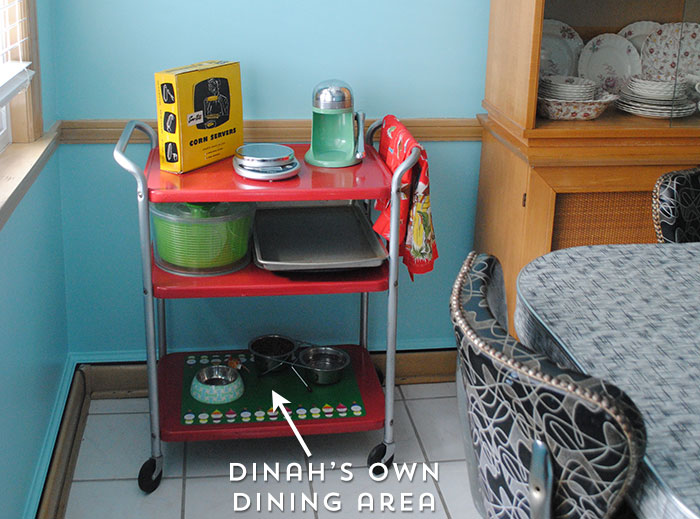
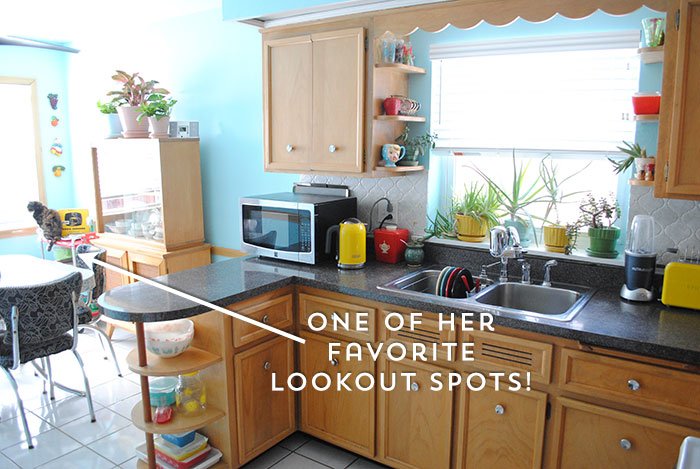
As an added bonus, Dinah really loves sitting on the cart and using it to get to the window to watch the backyard. I spied her doing that when I was taking photos, even! She usually sits there for a minute, then lays down in the windowsill. This photo was blown out but you can see her on the bar cart in the corner!
And phew… I think that’s the full tour!
So, now my thoughts on possible future changes? We have nothing planned in the immediate future, but it’s fun to think about. Definitely new counter tops to replace the dark faux marbley laminate (that I hate and that we coincidentally had in our condo too… I joked with Mel when we moved in, “Why can’t we get away from this counter top?!”). A new sink, maybe a larger single basin with integrated drain board. New down lights in the soffit instead of florescent (my dad suggested we could drywall the bottom and put in nicer can lights). Eventually new appliances, when ours kick the bucket.
Those are all the somewhat smaller things. The bigger wishes would be figuring out how to deal with the WTF stove wall, removing the huge back splash, adding a dishwasher if we can figure it out and not lose too much space that we can’t gain back elsewhere, and re-doing the floors (we like the easy-care of tile but it has pink and gray swirls which are meh, plus a couple are chipped). But all of those are really pretty big things and have their own various challenges, so who knows when we’ll do any of that, and what of it we’ll actually do!
Odds are we probably won’t make any counter top changes until we decide on the bigger items, so likely this is the way our kitchen is going to look for a good while. A valance for the picture window, a couple of things to hang on the wall next to the hutch and fridge, and that’s it for actual plans. And we’re cool with that. Right now, we’re certainly enjoying the mix of 1950s, kitsch, modern and cheerful colors that make up our modest little mid-century kitchen! 🙂
You are right! Your kitchen is a kind of scaled-down version of mine. That must be why I thought it felt familiar to me in the before post. 🙂 And you are right, I don’t have a WTF wall….there is a little room on the other side of the doorway for some cabinets, my wall oven and a bit of countertop. If I were you I’d be hitting my elbows on that doorway all the time! I do it occasionally with our pocket doors, if they don’t get pushed all the way back in — it hurts! 🙂
Kitchen looks great. I know I’ve said this before, but I love your dinette set! 🙂
Thanks, Kate! As for the dinette set, we’ll need to recover the chairs eventually but I’m not sure I’m as brave as you were with your sofas!
And arghhhh, I forgot to mention we have a pocket door there too! I usually only use it when I’m trying to keep Pia at the back of the house when UPS comes. lol
I remember seeing the room where you have the little cabinet, and always have thought if we’re able, and a future fridge allows, possibly building something there too that matches. Either that or perhaps a quarter round shelf next to the stove, but then where do we put the trash can? Small kitchens, a delight and a conundrum. 😉
Oh swoon! It looks so fresh and cheery now, Tasha.
I know there are always more *improvements* to make, but it really does look great with the fresh paint job… Like it’s a brand new kitchen.
Thanks, Liz, and since you’ve seen it in person I’m sure you’re partiuclarly equipped to vote on the new cheeriness! 😀 It does feel like a brand new kitchen in many ways, honestly! So much more livable.
It’s amazing what a little paint can do!! I think you picked the perfect color. It compliments the red and yellow so well!
I think so too, I love it all together!!
Paint makes an ENORMOUS difference! I love that the room is completely transformed by adding a coat of fresh color to the walls. Is it a coincidence that your kitchen accent colors are the same as your blog accent colors? 😀 You’re a lady who knows what she likes!
Mike and I are attempting to pick-up where we left off with our kitchen progress. Last year, we painted walls and removed all the cabinet doors and hardware, painted them and replaced hinges, handles and knobs. It was a much more intensive than I expected, but the result was fantastic. I eventually (7-10 years from now) want to redo the whole kitchen, so I’m trying to invest as little money into changes now as I can, while getting maximum impact. Our current projects include painting a faux back splash and resurfacing our own ugly laminate counter tops. I’m nervous about both; fingers crossed Pinterest hasn’t led me astray. 😀
I know, I’ve been starting to realize it’s similar to my blog colors too… what can I say, I know what I like?! lol
I wondered if that was what you were doing with your backsplash on Instagram, good luck and I can’t wait to see the results! I’ve never thought about resurfacing our counter tops, I’d probably be too chicken so I’ll just continue to complain about having the same ugly counter tops twice, until we’re at the point when we can actually do something. 😉
What an improvement. So happy looking. Have you considered a post for your shoulder buster cabinet? Perhaps something to match the round post on your island. You could have something that could be removed if needed. Just a thought, it might prevent crashes.
I think the fact that we keep the kitchen trash can underneath prevents us from frequently hitting that cabinet (it’s only happened once or twice), but the potential is there. lol One thing I considered was (down the line) building a little quarter round display shelf with a pole that kind of mimicks the peninsula, but then we’d really have no good place for the trash (can’t do under the sink as the recycling bin already lives there).
I love your new kitchen! I’m sorry about the dishwasher, but maybe you can find some space for a 18″. We used to have one in our previous apartment, and the kitchen was the tiniest I’ve seen in my life.
Thanks! I’ve thought about those little ones although I feel like I’ve often heard they aren’t very good, although perhaps that’s just like any other appliance. We don’t really *need* one but if we do any kind of remodeling down the road, it feels kind of weird to not add one. I try to only think about projects we as the homeowners would use/need/love/enjoy but I can’t help but sometimes think about the future resale value. Man, saying that makes me feel like an adult, ugh. lol
WOWZA!!! That’s a mega post – but so awesome to see and read all about your fantastic kitchen. I love it!! Floral oil cloth would be awesome in the cabinets…the patterns and colors would fit perfectly with your vintage vibe. Just a thought in case you can’t find the red gingham you want 🙂
Thanks! That’s a great idea about oilcloth inside the cabinets, at least on the bottom shelves that don’t have anything stuck to them. The only ones with shelf paper are the removable shelves, which she liked to cover top/bottom, I guess so when you look up you can see the paper and not wood? For our old dining room table and chairs, I had recovered each chair with a different oilcloth! 🙂
Oh my goodness – your kitchen is so perfect! Those are the exact colors and era I’m decorating my kitchen in, so I was super excited to see this post! Thank you for sharing in such detail!
You’re very welcome and I’m glad you liked it! 🙂
*wild flailing muppet arms*
It looks fantastic!!!
Thanks!! 😀
what a wonderful vintage (inspired) kitchen! well done!
Thank you! 🙂
Oh my gosh, I love your kitchen! I really want to do a similar makeover in mine (the dark floral wallpaper the previous owner put up is not really my style).
I apologize if you mentioned this in the post, but where did you get that china hutch? I recently passed on a similar one at an estate sale (it needed quite a bit of work), but I’ve been kicking myself ever since…
We picked up the hutch some years ago at an antique mall. We previously had passed on a similar one at a thrift store, too, because they would only sell it with a full dining set, which we didn’t need. For over a year after we kicked ourselves that we didn’t just buy the full set (it was SUPER cheap) and leave them with all the pieces except the hutch. But fortunately we found another one we loved!
Your kitchen is so stunning! I love all the touches you’ve added, and the color is so bright and cheery 🙂
Thanks, Meg! 😀
I love what you’ve done with what you’ve got! I love retro renovation and mid century modest stuff nearly as much as the more desirable mid century modern. My dear friends Jon & Trixi did this with their kitchen in their 1960’s ranch not too long ago.
http://retrorenovation.com/2012/01/17/jon-trixi-create-a-1970s-avocado-kitchen-with-rust-oleum-cabinet-transformations/
I’m so sorry about that countertop. It’s functional of course, and thank goodness it isn’t greige.
Live what you love, love what you live, or some cheesy saying like that, right? 😉 But blast that counter top that I’ve now lived with twice. lol Totally agree though, thank goodness it’s not greige!
Your friends’ kitchen is wonderful, I’m sure I’d seen it on Retro Renovation in the past too. While I don’t love 70s kitchens personally I *really* appreciate it when people go that route since it’s much less typical than people’s love for 50s kitchens!!
It looks fabulous! I love the aqua, red, and yellow. Very perky! I think you will find that there are some things, you will just forget about changing.
After working non stop on our house for a year, we just had to stop and let it be. Although, my house was all chalky pink and mint green. If that doesn’t force you to change things, I do not know what will.
I’m sure you’re right about future changes! I wrote this big long post up, but honestly hadn’t thought that much about the WTF wall in awhile beforehand, so it’s not like it’s actively bothering me to live with it. lol
I love pink and mint green as colors, but I don’t know that I’d want much of it in my house either. 😉
I find myself deeply engrossed in your “how to fix this kitchen layout” dilemma… seriously I’ve had a dozen ideas parade past in my head just now. Though that could also be because I’m tired of reading technical documentation for work….
Have you tried Replacements LTD for expanding your tableware? They carry current as well as antique patterns.
Love the new color! And thank you for sharing all the little details in your kitchen (I’m a gourmette and kitchen gadget lover/ kitchen history geek first, home sewer second!) I’m also a “This Old House” junkie – OK, full-on PBS junkie – but I’m having trouble thinking up budget-friendly or do-it-yourself solutions.
Taking out the soffits and getting taller cabinets would be an option to get a dishwasher while maintaining storage, but that may not work for you. They do make “slimmer” fridges, but they’re pricey. I might normally bust out that broom closet to push the fridge back, but if it’s attic access that would’t work. What your kitchen really wants is the layout completely re-arranged, but I imagine also not an option… See, I’m avoiding work nicely today!
Good luck with your future renovations and enjoy your new space to create!
Ha ha, thanks for your thoughts while procrastinating work!
Yeah, unfortunately the broom closet is not only the attic access but also the bulkhead for the stairs down to the basement, so it has to stay the way it is. My dad did joke we could recess the fridge but that would eat out a huge portion of my closet in the guest bedroom, plus not really gain us anything but foot space there, so that was a big NO from me. lol
I did wonder if we could take the cabinets above the fridge (which are about 36″ wide), somehow take off just the cut-out hood ones above the stove (and its shoulder buster friend to the right), and swap them. However, the above-stove ones are too tall for above the fridge. I suppose if we left the doors off or used a frosted glass door for a different look, we could shorten them to fit above the fridge. But then of course they’d be wider than the fridge, so they’d hang out into space to the left of the fridge. And then what do we do with the cabinet box for the shoulder buster? Perhaps put it on the ground to the right of the stove? Who knows.
Of course none of that is probably actually possibly, but fun to guess. I came up with that one while having tea and staring at the fridge yesterday. lol
I am loving the colour scheme. I have never seen a blind so big!!
captaincharghley.blogspot.com
It was pretty massive! The living room picture window is even bigger and has massive vertical blinds currently, but at least I think that’s more typical. At least in our neighborhood, you see them in lots of front windows. 😉
This is so adorable! What character!
Thanks! 🙂
Oh my so pretty! I want to redo my kitchen so badly, it’s straight out of the 70’s and tiny. I love what you did with your kitchen, it’s beautiful!
Thanks, Lisa! We’re really happy with the small changes we’ve done. 🙂
I adore how it all looks! I love your tea bag holders and the little caddy they are in! And your wooden salt & pepper shakers by the window…I have those and the matching BBQ utensils. Great job!!
Thanks! I love those little tea bag holders, and they say “I will hold the tea bag” which is really cute.
Matching BBQ utensils for the salt and pepper shakers…? Do tell!
Love the color and all the red/yellow accents! The layout is very similar to my ’62 Chicagoland ranch, though our peninsula also had upper cabinets, cutting off the flow from the kitchen to the too big eating space. We fully redid the kitchen (though I still have lots of vintage squeezed in) but I still have my original pink bathrooom and long for the update treatment yours got…
I bet a lot of the mid-century ranches here in Chicago have similar layouts! We toured another one that was a different layout but still somehow felt very similar (down to a different shaped scalloped wood valance and all). Our neighbor’s house is the same as ours and I wish I knew him better or I’d totally ask to see what his kitchen looks like. 😉
I love your new kitchen! The aqua paint looks so good, and the white wood blinds are a nice touch. Thanks for sharing 🙂
Thanks! 🙂
My favorite part of the kitchen – other than the bright and cheery colors – are the wall-hung three dimensional fruit and veggies. They remind me of the retro costume jewelry brooches you wear!
Thanks! I love fruity (or really most) chalkware. 🙂
Your kitchen is gorgeous! I love the color so much. 🙂 Your plates are such a neat addition!
I love Fiestaware! We also have several different colors. We lined the shelves of our rental with red gingham. It is grippy but not adhesive, so it stays just fine but isn’t permanent. http://www.shurtechstore.com/product/smooth-top-12x-10-ft-shelf-liner-gingham-red
You have such a bright, fun, and cheerful looking kitchen! I love it! I want to move in! I can’t stop using exclamation marks because I’m so excited by this and want to do a similar redo on my own kind of crappy apartment so that I actually want to live there!
I love the color you painted your kitchen. Very cheery. Also the plates on the wall, your table and little china cabinet. And I think you need a 40″ vintage stove. You could look into having a carpenter build a small cupboard or shelving for next to the stove to fill the emptiness. someone good at workworking should be able to match your existing cupboards.
My word, what an awesome kitchen you’ve created! It’s fresh, yet classic, bright and beautiful! I love how airy and cheerful the blue walls make it feel, too. That’s the kind of fabulous vintage inspired room I would feel instantly at home in, too.
This is such a detailed, enjoyable look at your revamped kitchen digs, Tasha. I loved it – thank you very much for the time and thought you put into this great post.
♥ Jessica
*PS* Dinah’s own little nomming nook is adorable! 🙂
What a lovely kitchen! That colour blue is beautiful! Its sad when I see people take character out of a house, I’m so glad you didn’t.
I live in a 120 year old home and I’ve got trim painted to look like wood. I’m wondering if it was a thing in the 70’s because thats when major reno’s took place in my house. I’m thankful they left the woodwork though out the house and only painted it woodgrain though. I’ve painted over most of it now because it was dark,dingy and weird.
Your kitchen looks great. I love the color your picked for the walls, the red accents and the amazing dinette set. I know you are not planning major changes right now, but if you decide to keep the tile backsplash I think it would look fantastic if you just have it re-grouted in a contrasting color.
Love your blog and how talented you are!
Martha
Congratulations, it looks beautiful! Just like my grandmother’s kitchen, except hers faithfully maintained the VERY pre-Energy Star appliances from the ’60s.
It’s so refreshing to see someone embrace the mid century look instead of rip it all out and replace with Ikea. I have had to wean myself off HGTV because the pain of seeing that every episode of every show gave me panic attacks. Not really. Anyway! Congrats!
So cute! Can you come and work your magic at my house? 😉 I especially love the fruit by the the wall clock and of course that angry cat vintage apron! <3
I love, love, love it!!! The aqua with the pops of red is a delight…along with all your retro kitchenware!!!
Good morning! I had another thought about your cabinets, if I may. The stove side upper cabinets could be replaced with an angled cabinet box at the door, and the rest redesigned to accommodate a 30-inch hood. The range itself pushed next to the corner cabinet (after removing the counter top extension) and you can have again an angled cabinet box next to the door and I bet there’d be enough room to slip a slender “garbage can” cabinet between the range and an angled cabinet. Actually if you get the right carpenter/ cabinet maker, they will make that happen for you.
Yes that would mean all new cabinets on that wall, but I think that would be the best way to address the situation. As someone mentioned, you could try to find a local cabinet maker to match your existing cabinets, or find a dealer for a custom cabinet maker like Starmark who could fit your exact dimensions, and will even take one of your existing doors and match your cabinets.
As for the fridge wall, I would probably consider floor-to-ceiling shelves, either shallow shelving (8″ deep, up to 16″ wide) or a narrow bookcase (12″ deep, 14″ wide) where the wire cart is now. Another thought is an angled floor-to-ceiling cabinet (another place to put the garbage can) that would encase the fridge, if the upper cabinets were extended to meet it.
As for the appliances themselves, basic appliances have gotten much more affordable – or maybe they seem that way with all the “pro-line” appliances coming out now! And I think you could find a fridge with a better foot print. By the by, I do have a bottom freezer with external ice maker – it’s a french door model. These are pricey of course, but there are even top freezer models with external ice makers these days.
I know these recommendations are far more extensive than working with what’s in place, but I think down the road they’ll provide the greatest enjoyment for you, as well as make the biggest impact when reselling. (Always something to consider, unless you plan on never moving again!)
Smokin’ awesome kitchen, Tasha! Pretty please … where did you get that awesome doorbell cover? We basically have a hole in the wall complete with dangling electrical cords. Need something smart to cover it up with.