
Happy Friday! It’s a gorgeous one here, and I’m in a great mood because Spring is finally arriving in bits and pieces! Not to mention the fact that I discovered I’d completely forgotten I had the afternoon off work, so I excitedly sat down at my sewing machine to work on my current dress project, another rendition of the pattern I used for my Singin’ in the Rain dress. (Thank you for all the lovely comments on it! ♥)
But that’s when I discovered a problem. My (modern) fabric had a few holes in it (possibly manufacturer flaws as I saw another bit that was undyed, too). And I’d already cut out the pieces. Hell, I was already assembling the pieces. The holes were on the skirt both front and back, and I definitely didn’t have enough fabric left to re-cut those pieces.
Alack! Alas! What’s a sewist to do?? Make do and mend.
With Rochelle having recently announced Sew for Victory for the second year, a lot of us are eagerly planning our 1940s-inspired sewing projects. (Me? Not sure what mine will be but I can guarantee it won’t be as ambitious as last year’s project!)

So when I stopped in my tracks at my ironing board, pressing my pocket pieces and spotted those inglorious holes (four of those &^%$ers), I knew what I was going to have to do. The choice was either chuck the entire project or darn the holes. The first option felt like the easy path to take in the disposable culture that surrounds us these days. The second option took more time, and quite frankly, a little bit of balls to know I was going to make myself something from new materials that was already going to have small flaws.
And yes, while the first option could have been accomplished by purchasing new fabric and potentially re-purposing all the non-holey-bits so I didn’t waste much, it still involved spending more money and using more resources to finish the dress. I went with the option that didn’t involve anything more than a few supplies I had on hand already.
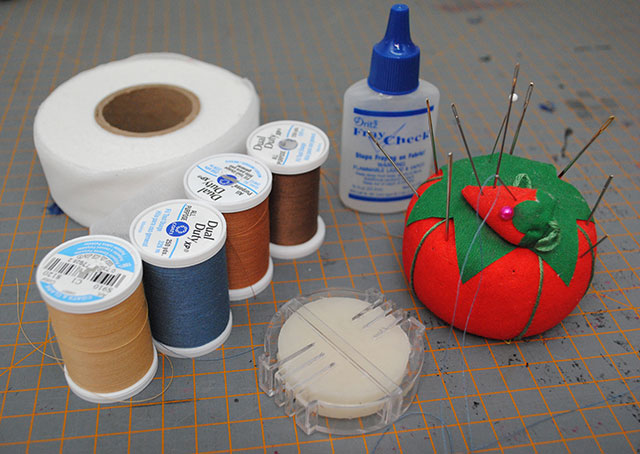
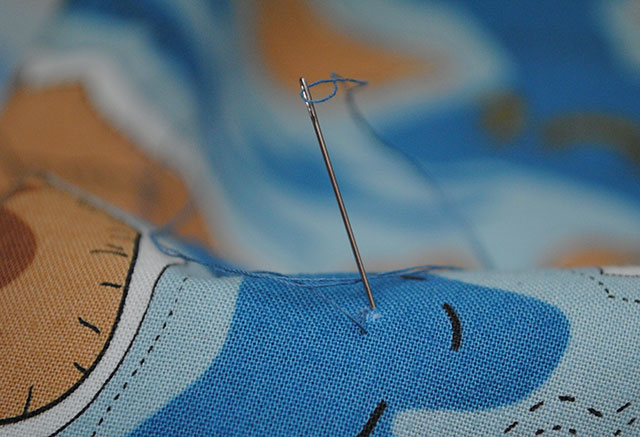
So what I did was simple: I cut a tiny square of fusible stay tape (since it was a bit lighter weight than the fusible weft interfacing I often use), and fused it to the back of each hole. Then, running matching thread through beeswax for extra strength, I stitched over each hole carefully.
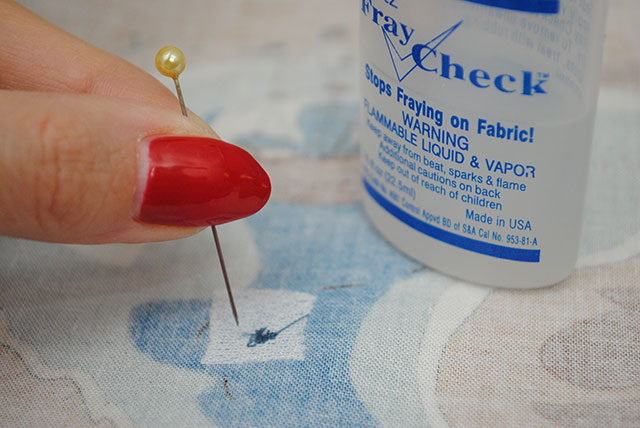
When I was finished, I applied a few tiny dabs of Fray Check delivered on the point of a pin (since these were mighty small holes) to both the back and the edges of the front of the mended spots.
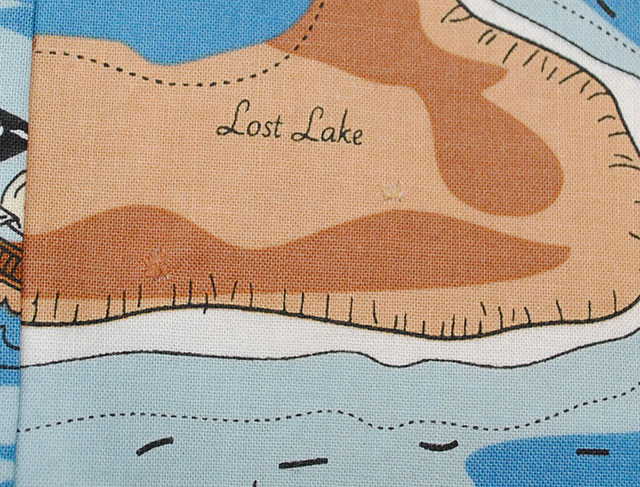
And really, they look pretty… well… not noticeable. The photo below is like a Where’s Waldo of mending. Can you spot the two mends?
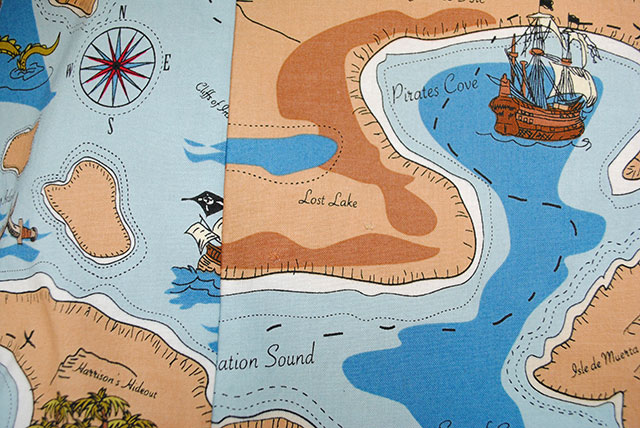
Up close:
And here’s another one, with my fingers for scale. Hint: it’s in the light blue below the ‘a’ and ‘i’ in the word Straits.
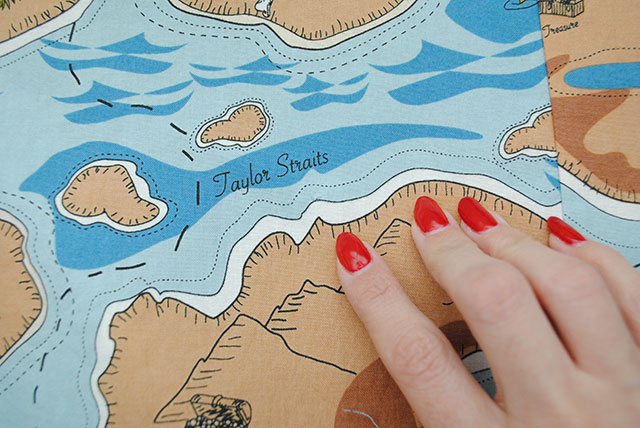
Not bad, right? There’s one more just like them elsewhere on the skirt, too.
It’s not the 1940s. These days, we’re free to buy whatever fabric we’d like; there are no rations. The only restrictions are the ideas in our head and our budget. I could have bought more of this fabric, but I chose instead to mend the fabric. That means when I’m finished, I’ll have four visible mends, which might seem crazy to some of you. But I’ll be proud of the choice I made, using both the skills and resources I already had on hand. Okay yeah, and proud of the fact that the mends look pretty damn good if I do say so myself!
If you’re interested in reading more about visible mending, I’d recommend you check out Tom of Holland’s blog. I like to think I was channeling Tom a bit when I sat down to mending this afternoon.
Make do and mend? Check! Looks like I’m off to a good start for Sew for Victory already.
Now, back to the sewing!
I must again comment on a truly excellent choice of print…love me a good print, particularly a pirate themed one! Great job also on the fabric fix…had it been me it would have more than likely ended up being set aside and floundered away as another unfinished project…I will embrace the make do and mend attitude with aplomb now!
I think you’ve done a sterling job there! x
Great save, the mends blend in really well!
Yay for mending!! I darn my husband’s shirts (even polo shirts) until the point of ridiculousness! I came across a copy of the Butterick sewing book from 1916, and the mending section is the first chapter in the book, and the longest. It definitely inspired me to mend everything I could (within reason). We have saved SO MUCH money from just darning a few little holes here and there, and patching his jeans, instead of buying new. The best thing? Just like you found out–if you do it right, the normal person would never see it. Woot!
Good job on the mending – the fixes are barely noticeable in the photos when you point them out so I don’t imagine they can be spotted when you’re wearing it. Also: that fabric is great! It would have been such a shame to just chuck it, especially when you’ve already cut it and were ready to sew.
You did such a great job with this! I am glad that you did not start over or throw in the towel. I agree that when you wear it that they will not be noticeable at all (I could only see them because you pointed them out and you took a picture directly of them).
Several of my vintage pieces that I own had been repaired by the original owner (they were in estate sales and I know the seller, so I know they were not repaired to be sold). I find that very endearing. They loved or at least cared for the piece enough to spend the time to mend it. That is something that is extremely rare today.
Kudos’ to you for taking the time to mend it! And for pointing us in the right direction to do it ourselves, should the need arise! (Great fabric by the way)
i have a work shirt that developed a hole right in the middle of my bust. we only get new shirts every 2-3 years, and this one was barely 6 months old! i grabbed my 40s sewing textbook and learned how to darn right then and there: and you can’t tell! i love that we all have the ability to fix something so well that only someone looking for the mistake would find it 🙂
You’re making a PIRATE DRESS?! Fantastic! Your mending is invisible – well done!
Yes! This is fantastic. I have a lot of my RTW clothes that are in the mending pile. It only makes sense. You have this lovely fabric and it makes the most sense economically to mend it. And I think its an attitude thing as well, making use of what we have
That looks great! I have been thinking a lot lately about taking care of the things I have and how it is a lot art in our disposable culture. I was lucky enough to get a fabulous midcentury stove for my house and to think that it is in such good condition after 60+ years makes me feel more like a caretaker and guardian than owner of it. It is something I am trying to translate to more aspects of my life, especially now that I own my own home.
Hats off to you lady, what an incredible skill!
Thank you for this important inspiration! I just realized that the fabric of the rtw jacket I bought in the fall from a major department store has started shredding at the lower edge of the seams, grrrr! It is the only thing I’ve paid the retail price on in years because I really liked the style and fit. Figures! Instead of getting mad, I’m going to get crafty so I can get my money out of it!
Oh and you did beautiful job on a cute fabric!
The fabric is great! You can barely see the mends. I’ve started trying to make do and mend more and I should keep this method in mind. 🙂
Honestly Tasha, you have the best blog ever. So inspiring thank you! 😉
You did a really professional job there! I have three children and always have a ‘mending pile’ – let down hems, darning woolly tights (yes really they are so expensive and my daughters always just put one toe out), small holes etc. I do sometimes feel like a relic of the 1940’s as I don’t think many people do this stuff anymore…I do it for the same reasons you mended your new fabric 🙂 Your mends are so invisible, we will be the only ones who know!
Great job! I think mending is a good way to save the fabric, especially when the damage isn’t big. Yes, you could buy more of the same pattern but now you can buy another pretty fabric and have two different dresses, a win-win situation. *^o^*
Really well done! I really like the idea that you’ll have secret mends built into something else that you’ve made by hand. I love darning my handknit socks; there’s something so satisfying in making a neat patch!
You are brilliant, dear Lady!
That’s the spirit! I love that you chose to Make Do And Mend in this situation because the fabric is totally worth saving. Not to mention you have a seriously fine hand for this sort of thing so why not? You can’t even see the holes!! You’re amazing.
Lovely job 🙂 I have darned (poorly LOL) holes before, and patched too. I always felt so proud of myself doing it too 😛
Fantastic job! I couldn’t help but burst out into a wee laugh to myself when you described the finished scene as being like a Where’s Waldo of mending. That’s such a great way of describing it.
♥ Jessica
I can use this technique to repair the fabric on an old chair. Thank you. My grandmother taught me to darn. I use it to mend my 1940s tablecloths. I want to get another 70 years out of that fabulous fabric.