Today I have a big ol’ knitting tutorial for you!
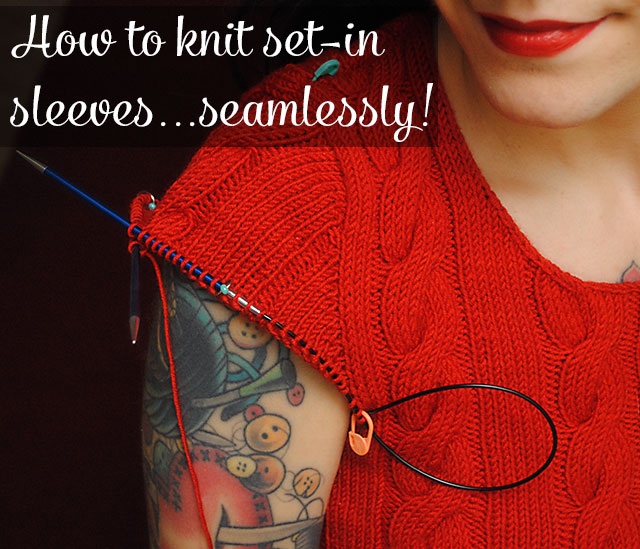
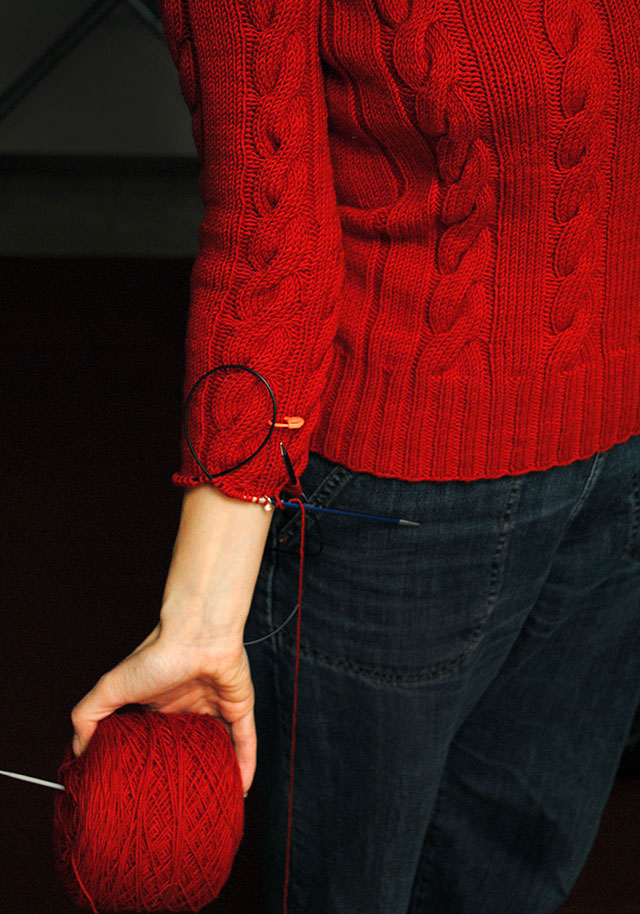
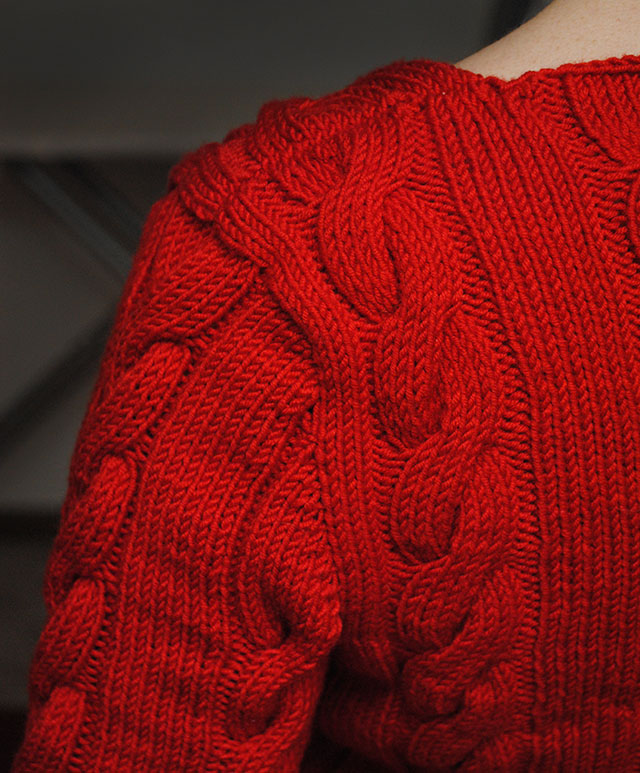
I’m going to show you a technique I sometimes use to seamlessly knit sleeves that look set-in. If you’re not a fan of seaming, then it’s an awesome technique to have in your arsenal. I actually don’t mind setting in sleeves and do that more often than not. But I used this method on my Dragonflies Jumper and a lot of you were intrigued and interested in a tutorial. I decided to do it again for the Cable Pullover in my fitting and knitting a 40s pullover series, so I could share!
You knit sleeves like this by picking up stitches around the finished armhole, working short rows to form the sleeve cap, and then working the sleeve on down to the cuff. I first read about this technique in the book Custom Knits in 2008 and it’s a method many modern patterns use, but the concept of knitting a sleeve out from the armhole is by no means modern. It was traditional in more than one culture, and I’ve seen it in vintage patterns, too. In fact the 1944 pattern Campus Compliments Cardigan I posted free a couple of years ago has you knit the sleeves out from the armhole. But by shaping a sleeve cap with short rows, you really mimic the look of set-in sleeves pretty much exactly.
It can be referred to be slightly different names—top-down set-in sleeves, faux set-in sleeves, afterthought sleeves, seamless set-in sleeves. You get the picture. Sleeves from the armhole out with no seaming. If you’re not lucky enough to be working a pattern with instructions on how to do it, this tutorial will give you guidelines to do it yourself. It’s great…
- If you’re resizing a vintage pattern and feel queasy at the thought of reshaping a sleeve cap
- If you want to convert set-in sleeves to seamless
- If you’re adding sleeves to a vest
- If you just plain don’t feel like setting in sleeves
Everyone has their own special take on how to do this technique, so I’m just going to show you how I personally have come to do it over the years. This is a long and detailed tutorial for something that’s really quite easy to do once you get the hang of it. If you can knit in the round and follow directions, you can totally handle it!
Supplies
- Your sweater, with shoulders and side seams (if any) sewn up
- Knitting needles the same size as you worked the body, but in whatever way you prefer to work in a small diameter (double-pointed needles, one long circular for magic loop, 2 circulars, etc)
- Locking stitch markers or safety pins
- A few regular stitch markers
Things to know
- How to knit flat (for the sleeve cap) and in the round (for the rest of the sleeve)
- How to pick up stitches along an edge
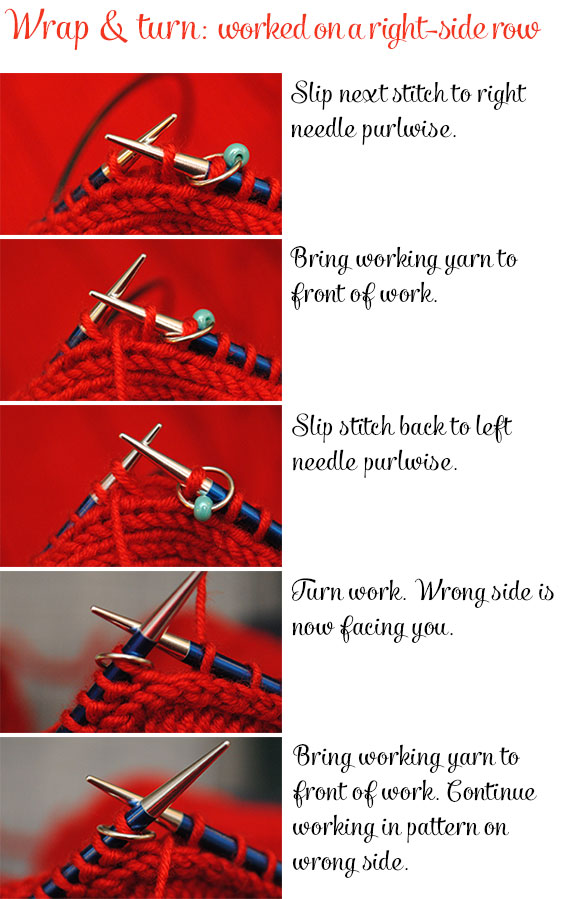
- Wrap & turn on a RS (right-side) row: Work in pattern to the stitch where you need to work the W&T. Slip the stitch purlwise to right needle, bring working yarn between needles to the front of your work, slip the stitch back from the right needle to the left needle. Turn work so the WS (wrong-side) is now facing you. Bring the working yarn back between the needles and starting working in the opposite direction. (You’ll now be working on the WS.)
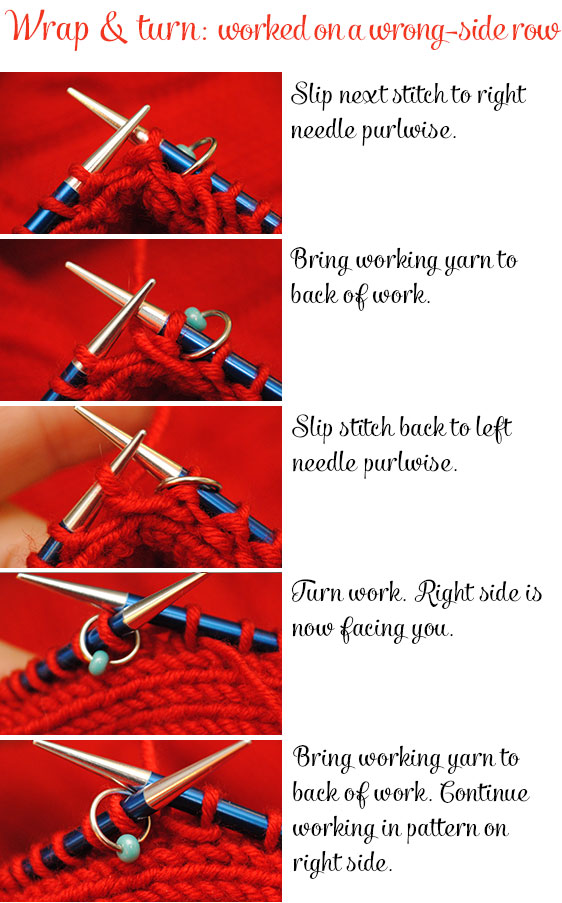
- Wrap & turn on a WS (wrong-side) row: Work in pattern to the stitch where you need to work the W&T. Slip the stitch purlwise to right needle, bring working yarn between needles to the back of your work, slip the stitch back from the right needle to the left needle. Turn work so the RS (wrong-side) is now facing you. Bring the working yarn back between the needles and starting working in the opposite direction. (You’ll now be working on the RS.)
Note: the wrap & turns and how to hide the wraps will be shown with detailed photos in the tutorial.
First thing’s first: determine width of sleeve at upper arm
Figure out how wide you want your sleeve to be around your upper arm. If you’re not sure, measure a sweater that fits you well!
Some recipes for this technique don’t have you do this, they tell you at what interval to pick up stitches. (Some say one every stitch or every other stitch where you shaped the body at the underarm, then every 2 for 3 stitches after that, some just say every 2 for 3 stitches all around, etc.) I don’t usually like to do it like this. Why? Because I don’t want to end up with a sleeve that’s too baggy. I have skinny upper arms, and it’s easy for sleeves to get too big too quickly. So unless I’m knitting from a pattern that actually gives me top down sleeve directions, I approach it this way instead.
First, take your stitch gauge and multiply it by the desired width of your sleeve around the upper arm. That will give you the full number of stitches to pickup around the whole armhole. If you get an odd number (1, 3, 5, etc) you’ll have to round up in the second step. Then divide that in half for the front / back of the armhole. For me that looked like this:
Step 1) 6 stitches per inch x 12.5 inch width sleeve at upper arm = 75 stitches to pick up around armhole
Step 2) 75 ÷ 2 = 37.5 stitches to pick up for each of the front and back of armhole
Step 3) Since I can’t pickup half a stitch, round 37.5 up to 38 stitches. Pick up 38 stitches for the front and 38 stitches for the back of the armhole (totaling 76).
Makes sense, right? This will mean the sleeve at my upper arm will fit me exactly the way I want it to after blocking.
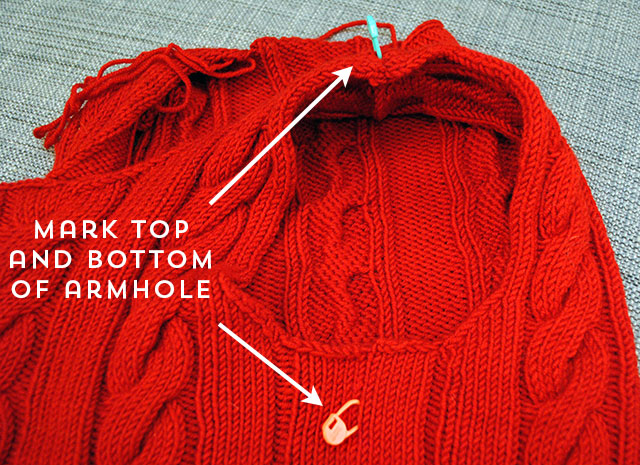
Mark the top and bottom of your armhole
I use locking stitch markers to mark the center bottom and top of the armhole. (You could also use safety pins, or make a loose knot with a tiny strand of contrasting yarn.) I personally put them about an inch in from the open edge just so they don’t get in my way when I start to knit. They’re just to let you know where the top and bottom of the sleeve are, not actually marking a stitch count or anything. You’ll need these as a visual cue.
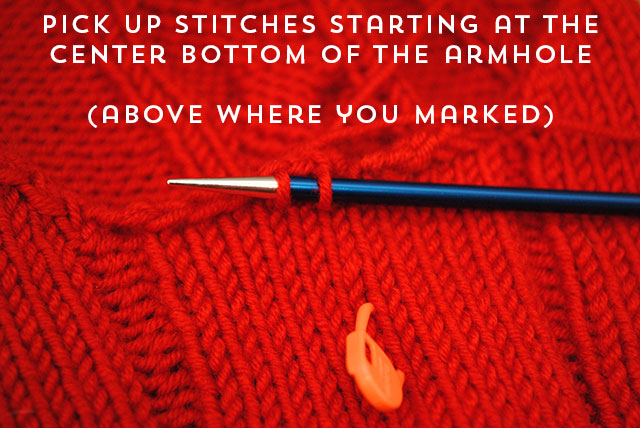
Pick up stitches along armhole
Starting at the center bottom of the armhole (directly above where you marked), pick up the number of stitches you determined you need around your entire armhole. For me, the total was 76 stitches I needed to pick up around the entire armhole.
Use your top marker as a guide for the halfway point. So for me, I picked up 38 stitches between the orange marker at the bottom of my armhole and the green marker at the top. Then another 38 back down the other side. (And that totals 76.)
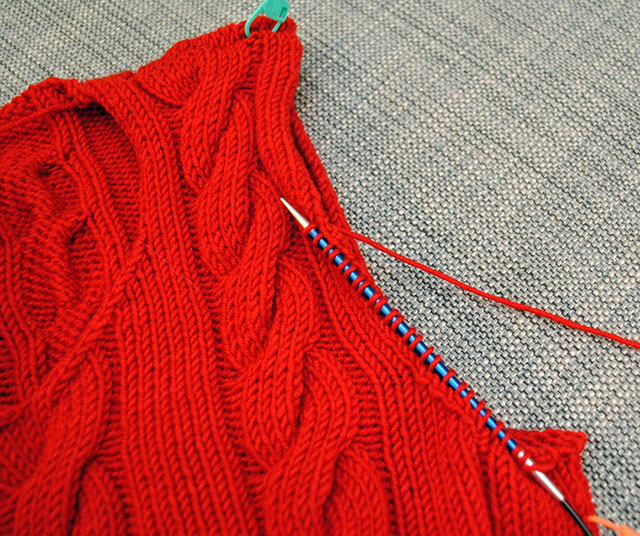
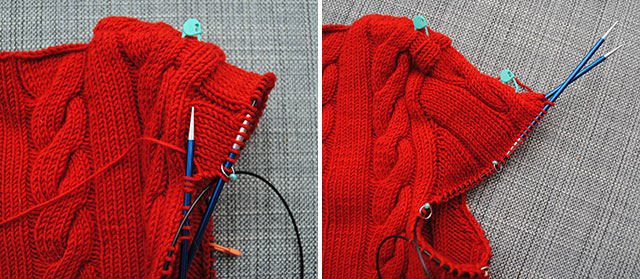
As you go, it’ll look like this…
You may find that you have to rip out your picked up stitches sometimes if you aren’t on track to hit the desired number of stitches you want. For instance, I was trying to pick up 38 each side, but twice I was approaching the halfway point with about 2 inches left and only a few stitches left to pick up to get to 38. So I just pulled them out and did it again, distributing them a little more. It’s pretty easy. I’d rather take the time here to even things out than to only pick up (for example) 2 for every 3 stitches and then run the risk of a sleeve that may not fit. By doing it this way, I know it will fit. Even if the stitches aren’t picked up at exactly an even interval guess what… you’ll never know it in the end!
Optional: if you’re going to knit a pattern stitch or have any other reason to mark the halfway point of the sleeve, go ahead and put in a marker as you pass the locking marker you put in at the shoulder. I did this because I’m centering a cable down my arm like the Cable Pullover pattern. So marking the very center top meant later on, when I had to center a 10-stitch cable at the top of the sleeve, I knew to start it 5 stitches before I hit that marker.
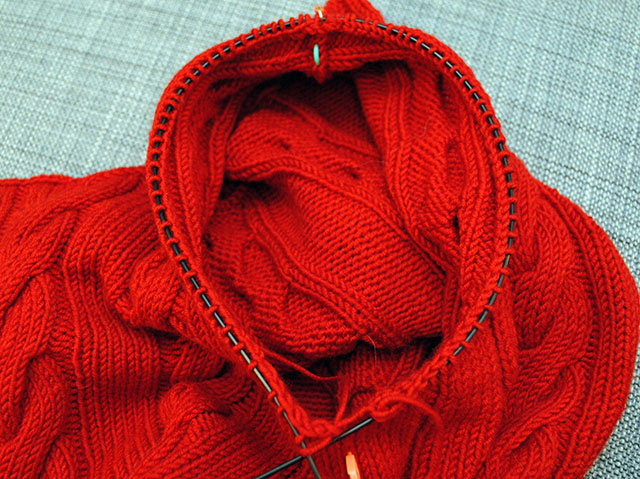
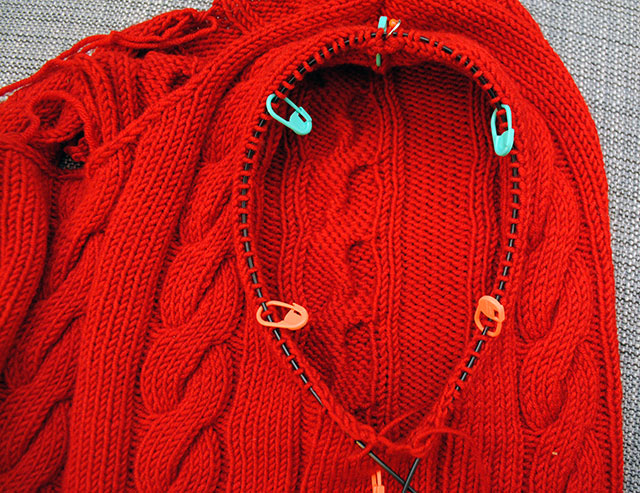
Once all the stitches are picked up, it’ll look like this:
Mark the end of the armhole shaping stitches
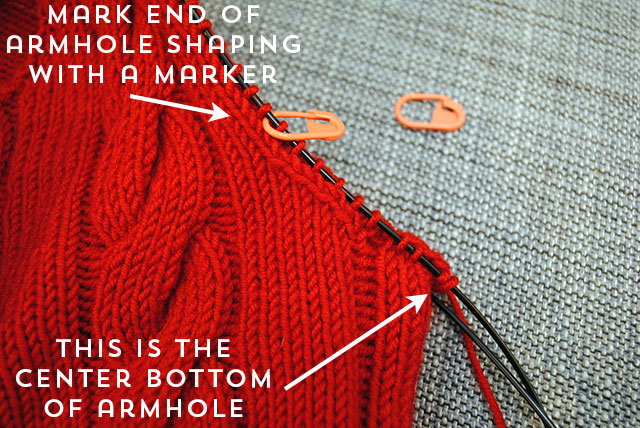
Once all the stitches are picked up, look at the bottom of the armhole You should be able to see your line of decreases where you shaped the armhole. Mark the end of these stitches with a locking marker. When you work the short rows, this is where you’ll stop. I used orange markers here:
Count the number of stitches from that marker to the center bottom of the armhole, and then place a marker the same number of stitches away from the center on the other side. You’re marking this on both the front and back. See?
Mark the top of the sleeve
You marked the bottom, now you’ll mark the top. You work the short rows starting on the upper third of the stitches. Remembering the number of stitches you picked up on each half (38 in my case), divide that by three. Round up or down to the nearest whole number if necessary.
38 ÷ 3 = 12.666, round up or down. I rounded to 12 stitches.
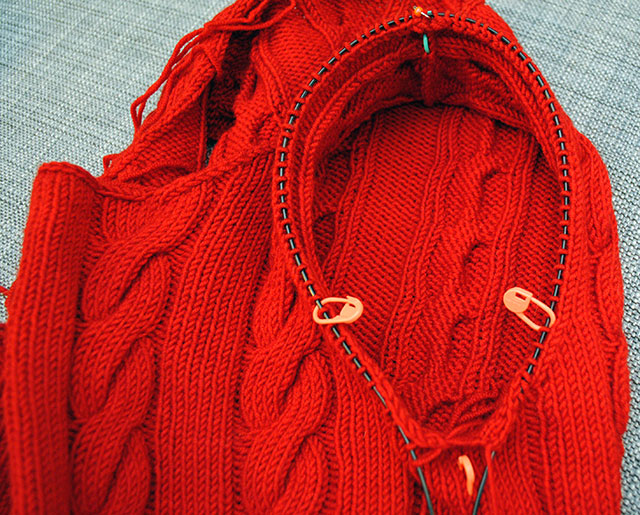
Mark that number of stitches away from the center top of the sleeve, on both sides. I used green markers. Now you’ll see what it looks like with markers at the top and bottom of the armhole:
Start working short rows
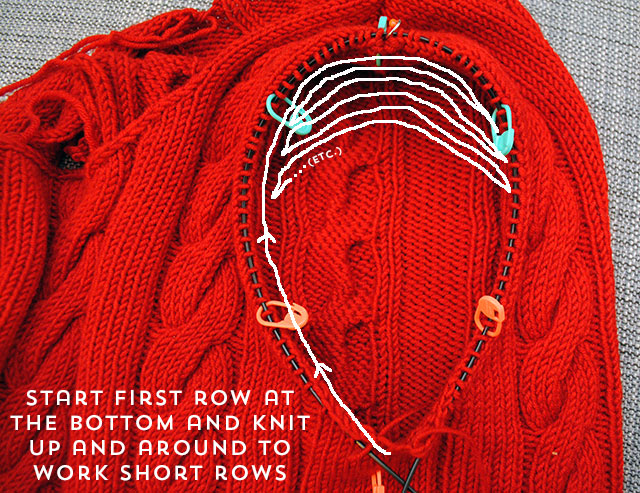
The first time you do this, it’ll feel a bit weird. You’re going to start knitting at the bottom of the armhole and work your way up to the marker just past where you marked the top of the shoulder, work a wrap & turn, work back to the marker on the other side of the marker at the top of the shoulder, work a wrap & turn, and go back the other way. Each row, you’ll work one more stitch than the last row, until you’ve worked all the stitches down to the orange markers. Don’t worry, we’ll walk through it all. But hopefully the below will help you see what the idea is here:
They’re called short rows because you’re never working on the full number of stitches on the needle as you create the sleeve cap. In this technique, as you can see from the above, each row technically gets one stitch longer than the last, but they’re still short of the entire number of stitches you picked up. (I know, if you’ve never done this, it feels funny leaving all those stitches on the right left untouched. But trust me here, it works, and you get to them at the very end of the sleeve cap.)
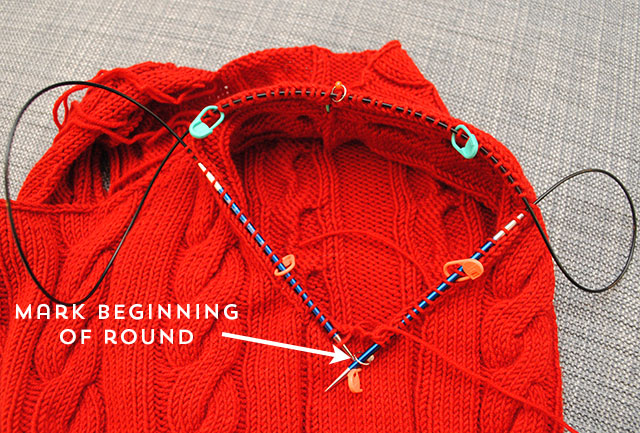
Start at the bottom of the armhole (you marked this with a stitch marker), which is your beginning of the round, and start knitting in the round. If you’re using the magic loop method, you’ll want to mark the beginning of the round with a marker. (And yeah, it’ll look rather like a uterus.)
If you have a pattern stitch, you’re going to have to work that out over the number of stitches you picked up… I did that, so as I went, I just knit in pattern from the beginning of the round. Again, it’ll feel kind of weird since you’re not going all the way around the armhole yet, but just trust that it’ll work out in the end.
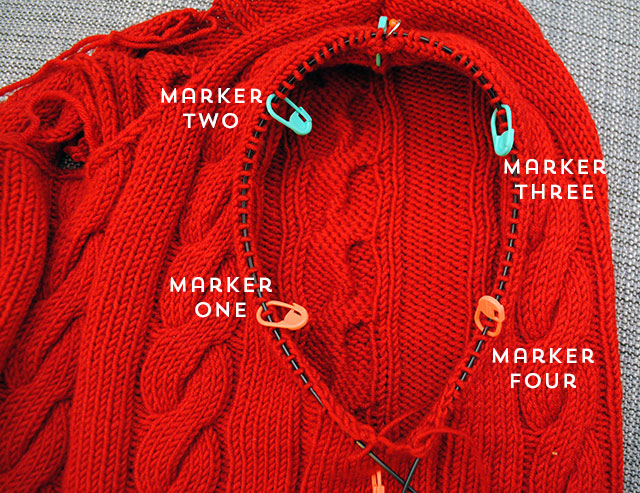
To make this easier, let’s number the markers–one through four. I’ll refer to them by number as we go.
To recap:
- Markers One and Four mark the end of the armhole shaping on the body
- Markers Two and Three mark the top 1/3 of stitches picked up around the entire armhole
Starting at the beginning of the round (at the center bottom of the armhole where you marked it), knit in pattern. When you get to Marker One, slip the marker. If you want to, switch it to a normal marker.
When you get to Marker Two, slip the marker. If you want to, switch it to a normal marker.
When you get to Marker Three (the marker past the top of the shoulder), slip the marker. If you want to, switch it to a normal marker. Wrap & turn the next stitch. Here’s how to work a wrap & turn on a right-side row:
You now have the WS (wrong side) facing you. Work back across the stitches at the top of the sleeve until you get to Marker Two (the marker at the top of the shoulder on the opposite side). Wrap & turn the next stitch. Here’s how to work a wrap & turn on a wrong-side row:
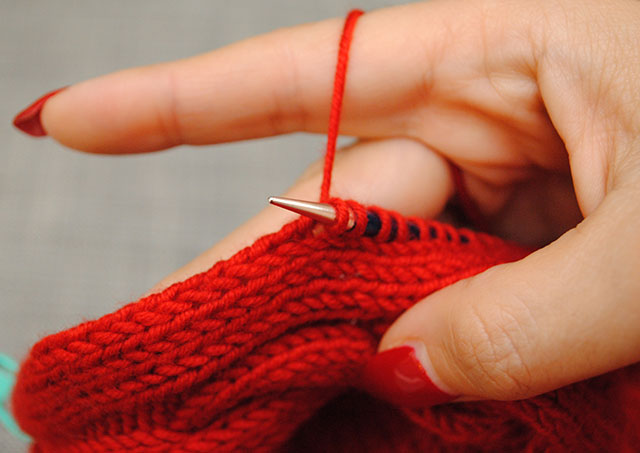
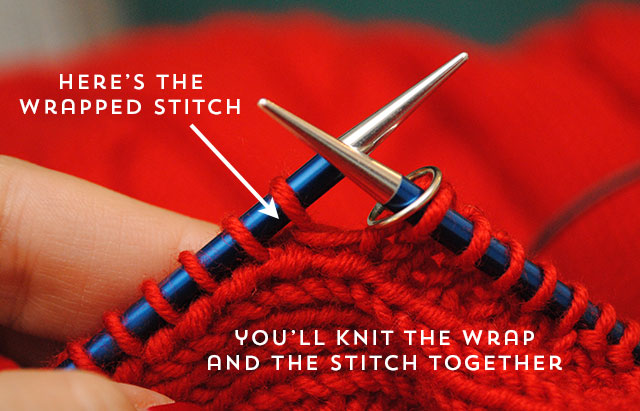
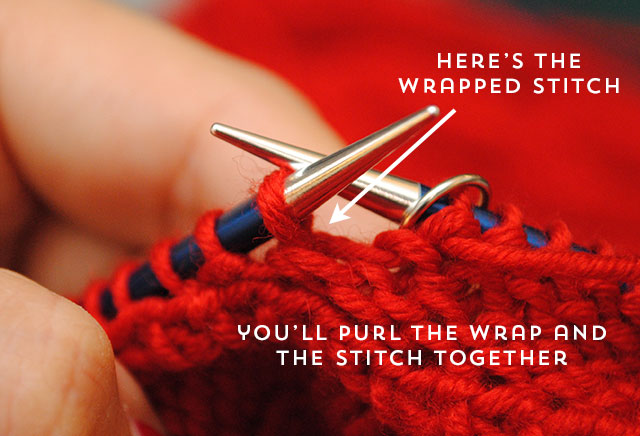
You now have the RS (right side) facing you. Work back across the stitches at the top of the sleeve until you get one stitch past Marker Three, which is the wrapped stitch. You’ll recognize it because there will literally be a wrap of yarn over the stitch, like this:
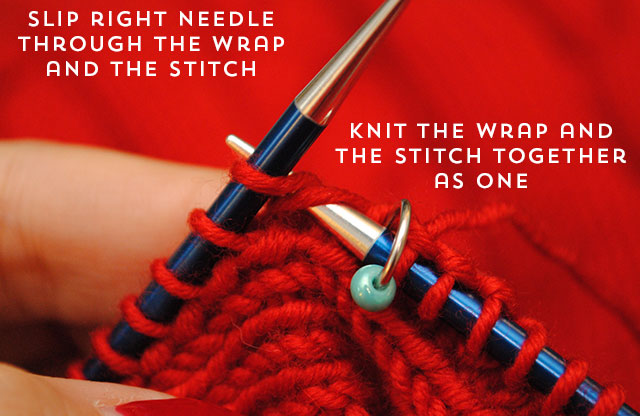
When you work wrapped short rows like this, you have to ‘hide’ the wrap. Pick up the wrap along with the stitch and knit them together, which will close a gap formed by working the short row. Slip your right-hand needle into the wrap and then into the stitch, and knit them together as one.
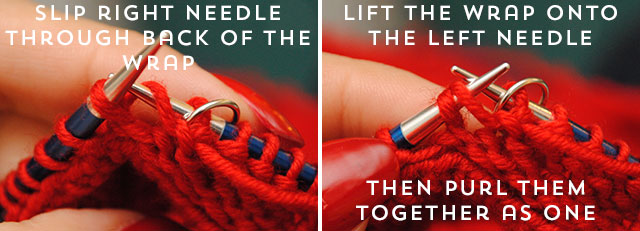
Then wrap & turn the next stitch. Continue working back on the wrong side at the top of the sleeve until one stitch past Marker Two, which is the wrapped stitch from the previous row. Again, you’ll recognize it because there will be a wrap of yarn over the stitch. But this time, it’s on the wrong side of the work, like this:
Again, you have to pick up the wrap along with the stitch, this time purling them together to close the gap. Slip your right-hand needle into the wrap from the back and lift it onto the left-hand needle, then purl them together as one.
Then wrap & turn the next stitch. Continue working back on the right side at the top of the sleeve until two stitches past Marker Three, which is the wrapped stitch from the previous row. As you’ve been doing, pick up the wrap along with the stitch, and knit them together to close the gap. Then wrap & turn the next stitch. And again, you’ll be going back in the opposite way.
See what we’re doing here? Just going back and forth, going one stitch further each row than the last. At the end of each short row, you pick up the wrap and work it together with the stitch it was wrapped around, then wrap the next stitch and turn your work, going back in the opposite direction.
So the short way of writing this is kind of like this:
(RS) Row 1. Starting at the beginning of the round at the bottom of the armhole and joining to work in the round, work in pattern to Marker Three (working on the RS, the marker after you pass the shoulder seamline). Wrap & turn the next stitch.
(WS) Row 2. Work in pattern to Marker Two (working on the WS, the marker after you pass the shoulder seamline). Wrap & turn the next stitch.
(RS) Row 3. Work in pattern to wrapped stitch. Pick up and knit* the wrap along with the stitch. Wrap & turn the next stitch.
(WS) Row 4. Work in pattern to wrapped stitch. Pick up and purl* the wrap along with the stitch. Wrap & turn the next stitch.
*Note: depending on your pattern, you may have to work a different stitch to keep this in pattern, but work the wrap with it regardless
You repeat Rows 3 and 4, working short rows each row on the right- and wrong-side rows to create the sleeve cap, until you get to the lower markers. As you go, you’ll start to see the sleeve develop!
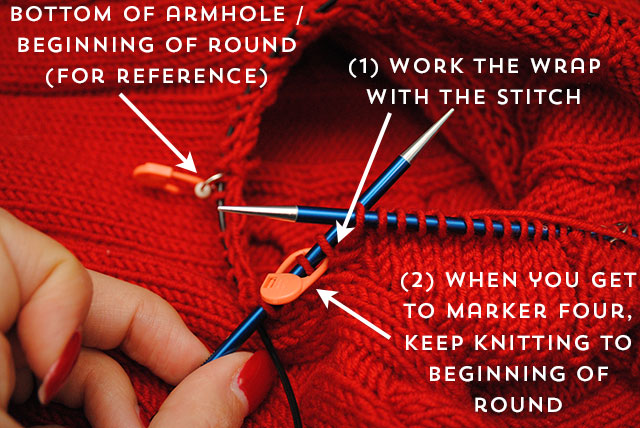
Continue working in this manner until you get to the lower markers (Markers One and Four). You’ll know you’ve hit the last wrong-side row to work, because you’ll wrap the stitch just before Marker One. Here’s a reminder:
After wrapping the stitch just before Marker One, you’ll work back across on the right side until you get to the wrapped stitch, which should be just before Marker Four. Pick up that wrap with the stitch and knit them together, and don’t wrap the next stitch.
Just keep on knitting down to the bottom of the armhole. You’re done working short rows!
Continue working the sleeve in the round
You’re done with the sleeve cap! And you now start knitting on all the stitches in the round, knitting the sleeve down from the armhole. The only last thing you have to do relating to the cap is in that first full round: when you get to the last stitch you wrapped on your last WS row (it’ll be just past Marker One going in this direction), pick up the wrap and work it with the stitch. And then you can take out all your markers (except at the beginning of the round, of course).
You’ll have to work out when to decrease down the length of the sleeve, either figuring this out yourself or reversing the directions from your pattern if it has you knit from the cuff up to the sleeve cap.
And your sleeve will grow and grow, all from the armhole out. Pretty neat, huh?
Knitting a top-down sleeve with a stitch pattern
If you’re knitting a sleeve in anything other than stockinette (or reverse stockinette), you’re going to have to keep something in mind: as you get to the wrapped stitch on the RS,you won’t always be knitting the stitch and the wrap together. You might need to purl the stitch and the wrap together. It all depends on what the next stitch in the pattern calls for! So for that matter, you might need to work something else. If a k2tog is called for, you’d need to knit both the stitch to its left together with the wrapped stitch and the wrap. And so on.
Just follow your stitch pattern and do what’s necessary to keep that wrapped stitch in pattern when you get to it. And if you accidentally mess up, it’s really not that big of a deal. All the wrapped stitches are so close to the faux seam line you’re creating, minor issues are barely noticeable. And that’s a good thing. Like I said earlier, I usually set in sleeves, so working seamless set-in sleeves with a pattern stitch isn’t my usual thing, and I’m pretty sure I messed up picking up the wraps in pattern on one or two occasions. But no one ever has to know but us!
Knitting sleeves from the top down and working short rows to form a sleeve cap is a great technique. Doing it on a vintage or modern knit alike, it’s a seamless way to achieve the look of set-in sleeves when you don’t want to actually knit them separately and set them into the body. And sometimes, that’s pretty awesome.
So, if you haven’t already, think you’ll give seamless set-in sleeves a try? Hope you enjoyed this tutorial!


Thank you so much for your detailed posts about knitting vintage! This is fascinating stuff. I can’t wait to give it a go.
I’m currently knitting a sweater (my first!) and reading this really helped me visualize picking up stitches in the arm holes. I did it just fine for the first sleeve, but it definitely could have gone more smoothly. I expect the second arm will go a little better after looking at this post!
Awesome, I hope so!
Tasha!!! Thank you for such a great tutorial! With written AND step by step photos! I am a visual person so just reading instructions in never helpful for me! I am getting ready to knit the sleeves for the Fireside Sweater and I have read multiple comments about people having difficulty with the sleeve caps and matching them up with the armholes! I am going to give your tutorial a go and for the first time in my sweater knitting history am excited to try out sleeves! Thank you!!
Yay! I’m so happy you’re excited about sleeves! I admit they can sometimes feel like a dreadful part of knitting, so anything to make you excited about them is a good thing. 😉
That was perfect, thankyou. This has been a lot of work for you and I thank you so much.
Ooh… I love this 🙂 I’ve done top down sleeves before- but never with the shaped cap! Nice 🙂 Thanks for sharing!
Brilliant tutorial! I’m bookmarking it for future knits, thanks for taking the time and effort to explain it so clearly and with such beautiful photos too!
Wow, you’re amazing. Thank you so much for this tutorial! I always end up with lose sleeves at the top (I don’t get why they always look so skinny in the pictures) + I hate sewing the pieces up. This will be a great help with my next knitting project. Can’t wait to see what your sweater looks like finished 🙂
A million thanks for all your time and effort! Your knitting is so beautiful, you have been a major inspiration for me! I’m still pushing for you to write a knitting book!! 😉 Thank you for sharing!
You are so sweet to say that Rebecca. I don’t know about a book, but maybe someday, who knows! 😉
Thanks for a great tutorial! This is a little advanced for me but I think your tutorial will help me learn it a lot faster than I would have.
You are completely fantastic! I have only ever knit top down sleeves in raglan form, & I am so excited to try this! Thank you so much for this tutorial, (this post, & for this sweater in general) it is just what I’ve been looking for! 🙂
Thank you so much for the. I have half knitted a cardi where I did this, but I wasn’t happy with the results. I think I might frog it and do it again with your tutorial as I just know it would have made a huge difference if I had seen this before attempting it. Your pictures make it so much easier to understand. Thanks for taking the time to do this 🙂
Thank you so much! I will be sure to try it on my next knitted sweater:)
Absolutely excellent tutorial! You have left no questions unanswered. I definitely have been given the confidence to use this sleeve in my next tutorial. Thank you so much for your time and effort you have been a great help to this frustrated knitter.
Thank you
Marie
Great tutorial.
How can this method be used if the body of the sweater is striped and you want the stripes in the sleeve to match up with the stripes in the body?
Thanks for your response.
Dee, I think it would be pretty easy to match the stripes… IF the stripes are between the shoulder and the underarm seam.
As you knit the sleeve from the top down, you will come to the first stripe and KNOW it is time to change yarn color, then continue the stripe the same number of rows as on the body.
Once that stripe is complete, change the yarn back and knit the same number of rows as on the body.
It is really pretty straight forward. You will see once you knit your first stripe. All you have to remember is to knit as many rows of each color as prescribed for the body.
BINGO! You are in like Flynn. And you are going to LOVE, LOVE, LOVE this seamless set in sleeve!!! By Gum By Golly knocked this tutorial out of the park!!!
Have fun… KNITTING!
Thanks so much for this great tutorial! I too have a striped sleeve pattern but I’m confused about the color changes. I have 14 rows MC and 2 rows CC, but I can’t pick up 14 + 2 sts along the entire armhole as this would make the sleeve too wide. So instead, I picked up the number of stitches that I wanted for the circumference of the finished sleeve. That’s problem number one. The next one is, how do I knit the stripes using short rows back and forth? I’d have to join a new ball of yarn for every stripe as I knit around the armhole which would be a nightmare.
Any ideas on how I can solve these two issues?
Thanks!!
Wow! What a great tutorial! And so well presented!
Thanks for the awesome tutorial, the pictures are great :). I read all the posts in the series while working on a ribbed pullover for a friend, she asked me to recreate one my mom made for me in high school. Your organized instructions helped me a lot, the bodice is done and now I’m going to try these top down set in sleeves for the first time. I remember reading somewhere this tip for picking up stitches: measure the armhole length and mark every inch (or every 2 in), Then you divide the number of stitches you need to pick up by the number of inches of the armhole. This way you will know how many stitches to pick every inch (or every 2 inches) and you’ll never have to rip the picked up stitches again!
This is such a great post. Thank you! I definately want to try this for myself. I want to knit the Hedy cardigan with long sleeves. I loved your version and I now I think I know how you did it 😉
Love this tutorial… In fact, love this blog.. Just found it yesterday searching for a Susan Crawford book… Still have not ordered it because i am exploring this blog…:-)…
Grtz form Holland
this is absolutely great stuff, i liked your detailed details ^_^ pretty amazing and directly to the point
can’t wait to give it a try but i would like to ask another question what if i don’t have a pattern to work on and i want to customize a sleeve, how would i do the decreases and what should i do to knit the lower half of the sleeve ?
What a blessing and a help to come upon your tutorial. Love it! I’ve done it several times, but not explained so well and so universal! Thanks!
Kathy
Well I know you can’t see me, but know that right now I am doing the happy dance! Thank you so much for your well written tutorial with all the wonderful pictures! I have bigger upper arms and this tutorial will make it so much easier for me to tailor a sleeve that will have a good fit and clean look.
Awesome tutorial. I can actually understand what you are doing!!!! One question….what is that brand of needles? I am struggling a little bit finding one that is smooth.
Thanks so much.
Thanks! Those are Signature needles which are quite pricey and have great tips, but I don’t find the joins to be ideal, especially if you want to try Magic Loop. My favorite needles are ChiaoGoo red lace needles (and I don’t do ML often, but it’s worth noting the cable is a little stiff for that).
This is such a lifesaver! I’m a beginner and I had knitted the cardigan (without any pattern) but not the sleeves yet and couldn’t figure out how to shape the sleeves to match the armholes. This makes it so easy! Thanks so much for sharing!
Thank you so much for the great tutorial! Your pictures and explaination of how the short rows work have helped me a lot! Keep up the good work!
Awesome tutorial, I sort of figured out this way the other day, but I really love it
I love this idea! I have a question, though –
I have a very tall armhole (roomy underarm), and the distance between my top third and my shaping section is very narrow. I did short rows until I reached the bottom markers, but I barely got more than halfway down the armhole opening and the sleeve cap seems way too short to start working in the round! Should I keep doing short rows until I reach the flat bottom of my armhole? I.e. the place where I did the initial bind off stitches?
My armholes are asymmetrically constructed. There is a back panel that is just straight up with no armhole shaping, and the front panel includes the bind off for the entire underarm area and some slight curving to shape it in the front. So, I started picking up stitches halfway across my armhole bind off since that is the center of the underarm, and just picked a place on the unshaped back that was an equal way up the armhole as the shaping on the front.
I am designing this pattern myself to copycat a store-bought sweater, and I know I can figure it out with trial and error eventually, but I was hoping you might have some suggestions. Thank you!
Valery, how did that turn out? What did you do? It seemed the same is happening to me. I have very thin yarn. I kept making more short rows as I had plenty of picked up stitches and eventually started knitting in the round. Not sure yet if it has worked.
I know what you mean, like you I am copying a shop jumper and trying the sleeve top down. I kept moving those markers to check they were correct, as my number of stitches differs from Tasha’s. I think, as its my first time doing this, I will just use my eye and best judgement and do what looks right. The best thing about knitting is you can always undo it. …and Tasha you should definitely do a book you explain things so well and the pictures are really clear. Go girl
OMG! I’ve been wondering if this could be done. I hate seaming–I’m notorious for knitting every possible thing in the round–and I was wondering if one could do sleeves by picking up stitches. I think I’d even half-formed the idea of short rows before I decided to Google it and landed here. This rocks. I can’t wait to try it!
I had to say a most wonderful post for the w&t on the sleeve, I have been stuck for 2 days and now that I have read your tutorial it all makes sense. Thankyou so very much
Thank you for these brilliantly detailed instructions. I’ve put a link to your blog on mine so others can find you.
Thank You VERY much for this tutorial. I am knitting my first top down sweater and the instructions in my pattern were like mud! You made the water (knitting steps) crystal clear! Off to knit.!!
Love this – can’t wait to try it out!!!!!
i love you so much for this post!!!!!!!!!
Thank you so much for this tutorial! It’s the second time I’m using it. I bookmarked it the first time, and was exceedingly happy to find it again. I really think that sewing sleeves in does not result in as smooth a seam as knitting them in. Thanks again!
Lovely clear photos – a pleasure to learn from!
Thanks so much for this detailed tutorial. I never heard about this method before and it was very easy to understand.
Absolutely stunning tutorial. Well played!
Hi Tasha
What an absolutely brilliant tutorial. You have made it look so easy and I am going to give it a try. I have just knitted a jumper which has no sleeves and was wondering how to do it, now I know.
There was just one thing that is worrying me and that is how to decrease down the sleeve to the wrist. My arm size is the same as yours (going by the measurements) but my gauge is 8sts to an inch.
Could you possible help me work it out please.
Beautiful photos. Thank you for taking the time to display the stitches step by step. This was just what I was Googling for.
Been looking at this vest I knit and the two extra balls of yarn wondering how I could add sleeves!! Voila!! Thank you for the tutorial and now the confidence to add sleeves!!! THANKYOU!! Super detailed, thorough and well written, fabulous graphics!!! You are a natural teacher!!
I have a question and I’m hoping you will not mine helping me please.
I’m trying to knit my first ever Sleeve Caps with Short Rows and I deeply believe that I may have mess up somewhere.
I need 64 stitches total for the sleeve before I start the short rows but I have 108 stitches on my needle now.
If you can help me reduce these stitches and get on the correct track I would appreciate it dearly.
Thank You
Debra
I’ve only made a sweater with set-in sleeves once, not pretty. I’ve avoided the issue by making top-down raglan’s instead.
I’m going to try your technique and stop passing up so many lovely patterns because of the arm seams.
Thanks for posting and including so many clear photos : )
Thank you so much, it is really useful … Love it so much…
I just wanted to say thank you for your tutorials.
Excellent tutorial. I am about to start my own sleeves on a custom sweater and I wasn’t sure of the points when you started and stopped working the short rows so thanks for this. I’m hoping that My armholes aren’t going to be way bigger than the slim fitting sleeve I want. Do you have any tips for decreasing down as you go along if this happens?
This tutorial is really great!! Thanks for your sharing. I am going to try it out tonight on my project! Can’t wait! p.s I am your reader from Taiwan. ^.^
Great tutorial. Many thanks. Can’t wait to try this.
Brilliant ! Thank you so much! I’m on my way now.
Hi Tasha,
I loved your tutorial, I can’t wait to give it a go. I have been avoiding knitting set in sleeves, the last couple of times I tried they felt quite bulky in the underarm. For that reason I have started a raglan sleeve cardigan, I was wandering if your technique could work or be adaptable to work for a raglan sleeve, not sure how to go about this.
Thank you 🙂
Excellent tutorial. Thank you!!
Thank you so much for this excellent tutorial, I have not sewn in a sleeve since I found your method and have even taken a previously made sleeveless top and gave it a little cap sleeve for a new look. Do you have any tips to share for lace stitch patterns? I’m finding that a bit tricky.
What a vivid color! Excellent tutorial! That is exactly how I add my sleeves when I write my own pattern.
Really useful, thank you…going to try it tonight!
Thank you in mega bunches! I just followed your steps and am looking at a really nice sleeve cap. You are terrific and I love your detailed explanations and pics. Would you ever consider doing a book on your techniques, projects, favorite yarns, and so on? Thank you so much, you lil’ knittin’ guru!
This is just genius! Thank you so much for sharing!
Found your tutorial while browsing Pinterest. I have done one pattern with seamless set in sleeves in the past, found it to be a great technique but didn’t quite understand what I was doing (just blindly followed directions). Now it’s all very clear. I finally understand how it works, so I can use that technique in the future when making up a sweater with the sizing and pattern I want, instead of having to rely on a tutorial. Thank you, thank you, thank you !
great tutorial.. I’ve recommended yr website on ravelry. I would like to request a mini tutorial on how to pick up stitches around the arm hole, when finished knitting the strap on a saddle shoulder.. I’m clueless.. thanks
Thank you for taking the time to write such a good high quality tutorial. Iis most useful for beginner knitters.
I have a question – what method do you prefer to use when you knit top down sleeves
?
I used the magic loop and it is rather time consuming and it will leave holes in my sleeve if i don’t pull the threads after every row.
Thank you, Tasha, you saved my day, out here in The Netherlands! 😉 I knitted up a cardigan last year, and found out that in the end my row gauge didn’t match the one in the pattern description. So the pattern instructions for the seamless set-in-sleeve wouldn’t work for me. Then I found your extremely helpful tutorial, and it worked! Oh, I am really happy: now I can finally finish this cardigan before spring will arrive! Thank you so much!
thanks for the picturial tutorial. this combined with the video on youtube helped me understand more. Also your tutorial has let me speed up my knitting… instead of spending 3 hrs to line up a sleeve to sew onto the armhole and constantly ripping when things didn’t line up, I now spend 5 mins tugging things in place, and spend the other time on making my other sleeve, withoit worrying if it will fit properly in the armhole.. NO more UFO’s
one of the best articles I have come across illustrating this technique. Have been knitting many years and have never tried this, but will now that I understand how it works. Thank you for such a detailed and easy to follow tutorial.
Thank you, a very well done tutorial. It really helped me visualize this technique!
Awesome tutorial, so easy to follow.,. the pictures make everything so simple.. followed all the steps and beautiful sleeves happened as a result. Thanks a ton and keep up the great work.
Thank you so much for this post! I found it on Pintrest. I have used it for two sweaters already, with different patterns. Now, I plan to make the 1940’s sweater. I love the visuals. The written directions are clear.
THANK YOU SO MUCH! ( yeah, with caps on! 🙂 )
Tasha, Is there a tutorial on using those very short round needles? I can not seem to do this and would really love to see how it is worked.
thank you, Pauline
What a help this tutorial has been! Have a WIP that I had put a lot of time in and got to the sleeves…..got so frustrated I put it up for a year or more. Took it out to try to work the sleeves again. Pattern said to “work to next marker” . I searched and searched through the pattern to see what I had missed and there was no mention of placing any markers! So put it down again even more frustrated than before. This tutorial is so detailed and I am now excited about completing this sweater. Thank you for sharing your expertise.
Thanks so much!!!!!!!
From Holland thank you so much!
Yesterday I was thinking how to knit a sleeve top-down, but my solution didn’t work 🙁
Today I will start again with the help of your great tutorial.
You have made me very happy!
Dear greatings
Marjan
Am knitting Farmstand Tee from Interweave Knits a couple of years ago and liked pretty much everything except for those huge, hang-y sleeves! Had started trying to work sleeves this way using another website but their explanations/photos are nowhere near the quality of yours. Thank you SO much — pretty soon you should have a conga line of us doing our happy dances!
Gracias, se me complica un poco por el idioma pero voy a intentarlo con la imágenes.
This is a clear and comprehensible guide to knitting short-row, set-in sleeves, with lots of hints and suggestions so I could make it work on my unique project. Thank you so much.
Hallelujah, thank you thank you thank you. I am finally getting around to knitting a wrap cardigan that I bought the pattern and yarn for nine years ago (!) but when I got into the pattern, almost all of the math was off for my size. I’ve had to recalculate almost the entire pattern but the armscye bit was by far the most messed-up, and trying to re-draft it has been frustrating. This, by contrast, looks super easy as I’ve done short rows loads of times. Thank you!!!!!
This is the most helpful tutorial I’ve ever followed. Every time I had a question I just scrolled down and the answer was right there! With photos! I hate seaming so I was so happy to find this alternative.
Thank you! After decades of knitting, I am enjoying your method for sleeves. Beautiful fit! Seamless! Bliss…..
Great tutorial! It might even get me to knit some sweaters.
How can print this post without printing all the side matter and comments?
Can’t find enhanced printer version anywhere.
Only have iPhone to send to my printer
Thanks
I am knitting my first sweater. Should I block the front and back pieces before knitting the sleeve?
Using knitting rods, how would I block the finished sleeve?
I learned this sleeve construction from Custom Knits as well. It’s great in its simplicity but, in my opinion, the pick up (virtually) always shows and detracts from the polish of the finished sweater. One small fix I discovered is to pick up around the armscye with your smallest possible needle and a lighter weight yarn if you have one.
I prefer Barbara Walker’s simultaneous set-in sleeve using 1/4 width of the top rather than 1/3 as she uses, either top down or bottom up.
Absolutely amazing! I’m beginner knitter and dont have so much experience about all these theoretics or tecniques.. But your tutorial was so well written and well pictured, even i got my sleeves done! I dont particulary like making seams so this was even more suitable for me. I will absolutely be using this in the future too. I’m sorry about typos and such, english is not my first language. And that makes you tutorial even more usable, because its so clear and easy to understand. Thanks you so very much!
Great tutorial, I will start with my knitting sweaters and this tutorial just clarify a lot of doubts
Thank you so much
Lilia
Thank you! This is the best short row tutorial I’ve found. I finally get it.
This is a fantastic tutorial and such a good idea! It worked perfectly first try. The photos are incredibly helpful with all aspects, especially the short rows. It’s not often you find a simple solution to something, that’s so well explained and works first time. Thanks very much.
Thx for remind me how to do it! 🙂
I used to knit the sleeves this way, but I didn’t do it like a year and forgot how to count where to begin the short rows, now i remember 🙂
Nice tutorial
Hi. July asked a question on pinterest and it led me to your instructions. The sweater I just made had no instructions for the armhole or the cap sleeve. Didn’t realize this until it was time to sew shoulder and side seams. So, now there is a sweater with no armholes, side seams and shoulder seams come together. Can I just sew shoulder seams and count stitches from shoulder down 38 sts. front and back then join them at the side seams.
You need to sew the side and shoulder seams before you start this method. To calculate the number of stitches to pick up at the armhole it is not a matter of picking up 1 stitch for every row of your front panel as your row gauge is likely to differ from your width gauge. When doing a sleeve you are knitting according to the width gauge. You will need to pick up 1 for every 1 stitch at the under arm straight bind off and then as per your gauge for the rest of the shoulder. So if you have 4 sts per inch width and 5 sts per inch rows then you pick up 4 sts for every 5 rows. I would also measure my actual arm and the ease I want to make sure it matches the number of rows picked up. If the 2 are different then I can adjust – usually I reduce down a few stitches in the first few rows of the shoulder.
Thank you for your help
Thank you so much
Your a god send.
Thank you for making your knowledge of complicated knitting sound so simple. You are a kind hearted person. Thank you for making it free…May God shine on you today.. Excellent well informed tutorial..are you on youtube??? I
Thank you very very much….
I try this top down set-in sleeves for the first time, I speake usually french, but you explained very well!!
Best regards
I’ve just found this post. This is a great explanation for seamless-set-in-sleeves. I find knitting sleeves from the top down gives me a better fit at the shoulder and the correct length for my long skinny arms. Double bonus! I’m sure this blog post took a long time to prepare. Thank you for this gift.
Thank you so much for your wonderful tutorial! It was the most detailed, help information I have found during all my searches on the internet!
I have a 60-year-old top down raglan cardigan pattern that begins by knitting the BACK NECK BAND. You then pick up the sts needed for your neckline, adding markers as you separate them. You maintain the front bands (using a sl 1 to make a fold line so the facing easily turns inside) as you knit the rest of the garment.
Are you familiar with this pattern? I have some questions about it – as I can’t remember how I used to figure increases, etc…that’s a long time ago! I’m converting the pattern from a 4/in to an 11/in gauge – and need these last few ‘details ‘ so I can keep on knittin’! Any help or suggestions would be appreciated. Thanks! Linda
Dear Tasha,
Thank goodness for you. I’ve been doing Andi Satterlund’s Salal and her instructions are sparse and assume so much that unless you’ve made many of her sweaters and know her techniques, you get very lost. So, when I found this, I could have kissed the ground you walked on. I’ve never done a sleeve on short rows nor have I done a cardigan from the top down so thank you, thank you, thank you. Your instructions and images are detailed and so very clear. Very generous of you. Warm Wishes, Lu (@wildaboutyarn
Good Heavens! This. Was. AWESOME!!! I can’t thank you enough for taking the time to do this!
Great teaching inspires confidence ~ thank you! Working up to my first sweater/cardi, this well written info will serve greatly. Kudos and great appreciation!
Discovered your website yesterday, it a such a detailed instructional video. Thank you. My problem is this I am knitting a sweater for my grandchild, she lives far away, how do I determine how many stitches i should pick up for arm cap, I had followed a pattern that left off at 48 stitches to start shaping the sleeve top should that be my guide ?? Obviously it didn’t work looked so messy when I sewed it up. Thank you for your response.
I was searching for such a beautiful tutorial. Thanks for your efforts.
I am trying to recreate a beloved JCrew fisherman knit pullover, and the sleeves have been terrifying me, but this post–it is FANTASTIC! Clear, specific, well-illustrated. . . . thank you so much!
Dearest Tasha, thank you so, so much for taking the time to create this post. Your photo under “Start working short rows” is suitable for framing – I’ve filched and will be sharing far and wide (with proper attribution and the link, of course!) with fellow knitters struggling to get their heads around the concept. Best to you and Mel, and thanks for all the lovely tuts and hacks. xxxx
Thank you so very much. This is so awesome, I spent a whole day trying to figure this out yesterday following someone else to do it. You have made my day because I read this one time and feel I now have the idea. Thanks so very much, again.
I seem to be late in finding this post, but I agree that it is wonderful. If I follow sleeve patterns they are too long and too baggy. Problem solved with your instructions. Thanks so much.
Wow, thank you so much. Many years ago I too JC Briar’s class using similar technique and sadly lost the paperwork on it. I have been trying to figure this out and you explained it so clearly.
Thanks for your great post and pictures!!!!
Wow, thank you so much. Many years ago I too JC Briar’s class using similar technique and sadly lost the paperwork on it. I have been trying to figure this out and you explained it so clearly.
Thanks for your great post and pictures!!!!
I cannot thank you enough for this! <3
Tasha,
You have have made the world a better place for knitters;
you are an angel.🙌
Hi I am 73 and have fond memories of relatives and myself wearing these fabulous hand knits my Grandfather could even knit my Grandmother was an allrounder she could do any craft as could my Mother also, I have been the only child to follow them, so finding your site is fantastic you are so kind and helpful with the instructions you present not like other sites they are good to but your goes beyond and I commend you on it, I have some older patterns not many though, I was in Australia when my Mother passed away she had the best collection of old patterns which must have gone to the tip or charity shops there is no one left to ask, so finding and looking at your super site has taken me down memory lane
you are a blessing keep up your amazing site and thank you for warming the cockles of my heart many kind regards Jennifer
Could you please clarify where or how you are measuring the upper arm? I was thinking that you were measuring in a loop from the shoulder to armpit and back up around to the shoulder, but now I’m not sure that makes sense. Are you measuring around the arm horizontally at the armpit level or something else? Thanks.
THANK YOU!!! So much for this excellent tutorial. I am a relatively new knitter, and this type of super detailed tutorial helps me immensely. I’m getting ready to give it a try!
Really impressive write-up! Well done!
Thanks for taking the time!
So far so good. I have one last short row, and will then start on the arm. Will have to figure out the decrease bit though. Any advice?
Great clear post. I was looking this up this morning. I am fixing a lseeve that I did notlike the pattern for. I am glad ou kept this site up. Now I need to read your fair isle tension tutorial
This is fantastic tutorial – clearly written instructions, great photos – exactly what I needed for my first time converting a cuff-up, set-in sleeve to a top-down, seamless sleeve. I’m still working on the first sleeve, but it’s looking great so far! Thanks so much for your help.
Thank you a thousand times over! This is EXACTLY what I was hoping to find. Awesome instructions, love the red nail polish too!
Hi, sorry for my english, I only speak dutch and french. I would like to make the same kind of sleeves starting from the top but puffed. Any idea how I have to do it of where I could find some explanations ? Thanks for your reply
I would do a test but you would distribute double or triple increases or as many as needed across the top of sleeve the row after you picked up stitches. I would test it on a mini sweater because the effect will vary greatly by where to add the increases It would be good to see the shape of sleeve you are trying to create.
Ok, but where do I have to decrease then ? Knit 2 stitches together on the part from marker 1 and 4 ?
It seems I cannot send pictures, sorry
I would do a test but you would distribute double or triple increases or as many as needed across the top of sleeve the row after you picked up stitches. I would test it on a mini sweater because the effect will vary greatly by where to add the increases It would be good to see the shape of sleeve you are trying to create.
@ingrid- I just saw this. It has been a while sinceI did this so I need to read through the whole text then I will be able to answer correctly. I need to get ready for work nnow.
VERY HELPFUL. I have never done a set in sleeve top down before and the instructions were very clear with helpful, large clear pictures. THANK you Bygumbygolly.
Finally a well thought written guide ! Always have to lose so much time with the videos. Thank you, love your blog!! so great!! such a good space to hang out during the rainy days where my knitting gives me trouble and I need to find peace…!!! wishing you a good evening!
I was lost with my first attached sleeve and your explanations helped me a lot. Finally a well thought written guide! Always have to lose so much time with the videos. Thank you, love your blog!! so great!! such a good space to hang out during the rainy days where my knitting gives me trouble and I need to find peace…!!! wishing you a good evening!
well, this is an 2013’s post? It helped me a lot in 2021 💘
Thanks a lot for the help ^ ^
Thank You very much. I am doing the East Hale Cardigan pattern with this type of short row top down sleeve and was a bit confused but now it seems quite clear. Will try it immediately.
Just came here to say that almost 10 years later, this is still my go-to tutorial for knitting top-down short row sleeves. So detailed and clear with great photos. Thank you.