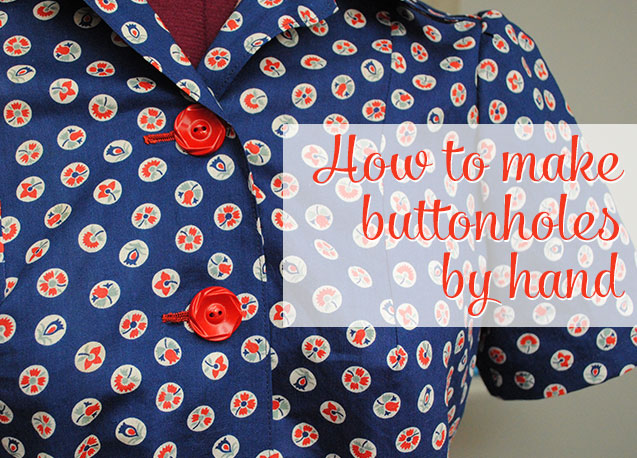
We’re in the home stretch of the Fall for Cotton sew-along (can you believe it?), and you might be thinking about little final touches. So let’s talk about making buttonholes by hand, shall we?
When you use older vintage sewing patterns, you may find that you just skip over the part about how to make buttonholes, since nowadays we’re all so used to doing them on our sewing machines most of the time.
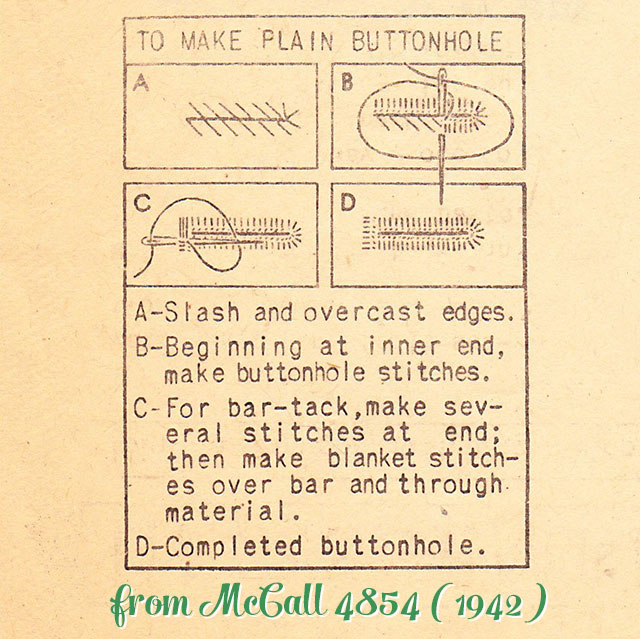
Many of the patterns I sew are from the 1940s, and often have a little diagram and pithy explanation on how to make buttonholes by hand (as well as how to make bound buttonholes). This is from my blouse pattern:
The first time I hand worked buttonholes was for my Sew for Victory jacket. Since I was doing it on a jacket I spent a whooole lot of time researching the topic. I read Sunni’s tutorial on hand working buttonholes, the tutorial on the art of hand-tailored buttonholes from Williams Clothiers, looked through all my vintage resources, and scoured the web for any tips I could pick up.
Why would you want to make buttonholes by hand, anyway?
Why do we make any choices in our sewing adventures to use one technique over another?
I think handmade buttonholes can add a beautiful touch to a garment. For me personally, they shine in a way bound buttonholes (another alternative to machine-made buttonholes) don’t, as they can be equally at home on a tailored jacket or a casual blouse or skirt. And I might be going out on a limb here, but I really enjoy the handmade nature of them. I’m not a tailor, working hundreds of these regularly, I’m a home sewist who works a few now and again. They aren’t perfect. They’re handmade. Each stitch is unique and is made with my own two hands. And I kind of love that.
In the end, it’s just a matter of what you’d like to do and what you think will work for your particular project. I certainly use my sewing machine for most buttonholes, but on occasion I like to slow down and make buttonholes by hand. Here’s how I do it.
Special supplies
- silk buttonhole twist—to work the buttonholes (see below for more on that)
- buttonhole gimp (or cord), upholstery thread, or button and buttonhole thread—to reinforce the edge of the buttonhole as you work
- beeswax—to wax your thread
More on buttonhole twist
Silk buttonhole twist is the ideal thread to use for hand working buttonholes, but it’s not exactly the easiest resource to find in a weight you like. And since opinions vary, I thought I’d give you a rundown of options.
- Vintage silk buttonhole twist—This is my favorite, but of course it’s a limited resource! I mainly have used it from the brand Belding Corticelli (as an aside, Karen talked about sewing with Belding Corticelli silk sewing thread). It says “Button & Buttonhole Twist” on it. This my ideal thread for working buttonholes by hand… unfortunately. lol It’s about the thickness as upholstery or button thread, but extremely smooth and pliable since it’s silk, so it has a totally different hand.
- Japanese silk buttonhole twist—This is thicker than vintage buttonhole twist by quite a bit. It’s kind of like a couple of plys of embroidery floss. I wish it was half the weight, then it would be perfect. However the thinner the thread the more difficult it can be to work with, so take that as you may.
- Japanese 30 weight silk thread—This is described as topstitching thread, which we know is thicker than normal. While I haven’t tried it, I’m very curious! Regular silk sewing thread is far too thin, but this might be a good weight. There aren’t oodles of colors, but possibly enough to find something to match or contrast with your fabric.
- Silk buttonhole thread from B. Black and Sons—I’ve never tried this, but this is a tailoring web site and goodness knows they know their buttonholes. This is Size F that’s referred to in the the Williams Clothiers post which is rather thick, and might be similar in weight to the Japanese twist. Colors are limited.
- Gutermann silk buttonhole thread—Also referred to in that post, this is thinner, and from his description, might be very similar to the vintage buttonhole twist I have. Relatively limited in colors as well, however, and you’ll note this is clearly meant for tailors as it comes in 437 yards (as opposed to 22 yards for the Japanese buttonhole twist). So at $21 each, you’re not likely to want to buy it in several colors, unfortunately.
Non-silk options that might work:
- Topstitching thread—This was suggested by reader Beth, who said she’s waxed it and used it for buttonholes by hand. This is partially what makes me think the Japanese silk topstitching thread would work nicely.
- Pearlized cotton thread—I’ve seen this mentioned a couple of times as worth trying.
Be prepared that your first ones will suck
Big time. I’m not kidding. If you read anyone’s comments about their first hand-worked buttonholes, you’ll see they almost always say they were terrible. My first attempt looked like something the cat barfed up. I made one and was pretty much convinced I’d never be able to do them in a way that wasn’t laughable. But then I did another and it was a little better. And by the third, it actually looked damn nice! So stick to it. Your first one might be frustratingly bad. But they’ll get better, I promise. And remember they don’t have to be perfect to be beautiful. Mine are never quite perfect but I still think they’re wonderful. 🙂
How I do it
Your best bet is to interface the buttonhole area first. I used small strips of fusible weft interfacing for my lightweight cotton fabric.
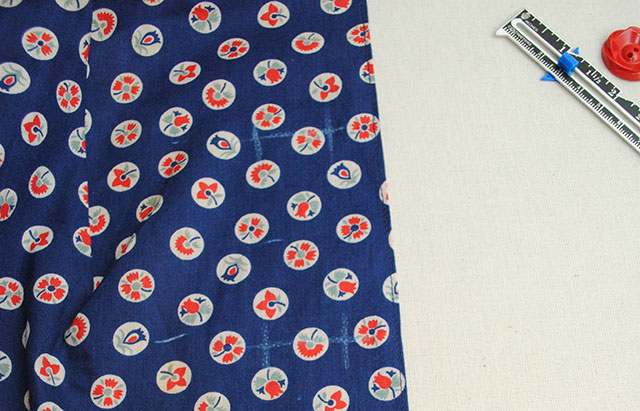
Mark your buttonholes as normal. My buttons were 7/8″ wide and 1/8″ thick, so I marked 1″ buttonholes.
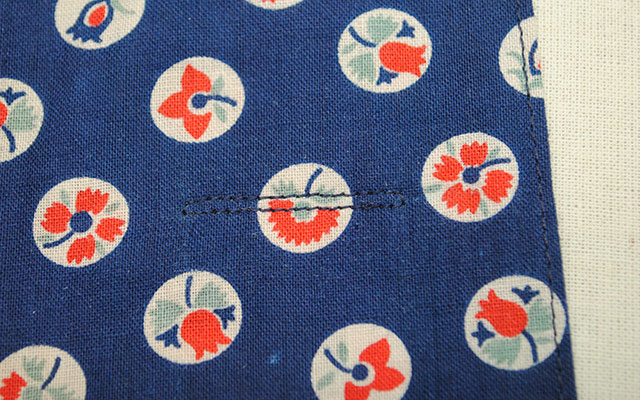
Traditionally from what I’ve gathered, tailors slash the buttonhole and then overcast the edge, and this is the same thing my vintage pattern shows. Instead, I do the method Sunni outlined, which is to sew a little ‘window’ on your sewing machine, around 1/8″ wide. You can do whichever method you prefer.
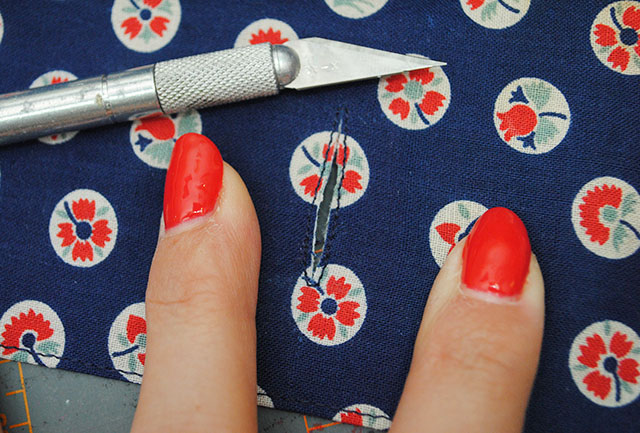
Then carefully slash through the opening like you would if you were opening up a buttonhole sewn on your machine.
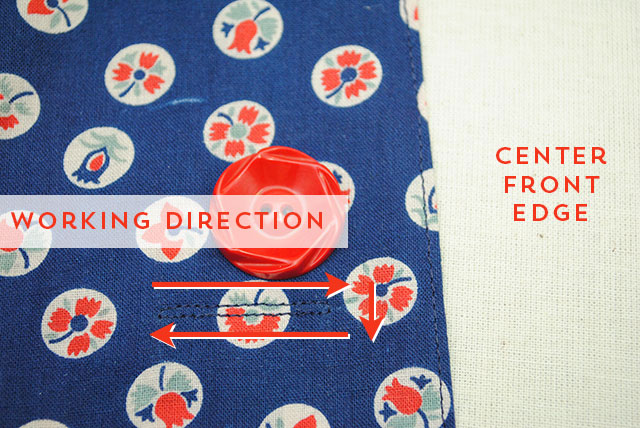
For reference, as you’re looking at the garment as worn, you work the buttonhole as follows: top edge, down the side, then bottom edge, and finish up with a bar tack.
In the image below I show you the working direction right-side up, but you’ll actually flip your garment upside down when you start the buttonhole…I just wanted the picture to be less confusing.
Take a length of buttonhole gimp about a foot or so long. (I use upholstery thread for this because that’s what I have on hand… tailors would probably object since it’s 100% nylon but it’s fine for my purposes.) Use a color that’s close to the color of your fabric because it can peek out a little bit between stitches, although it’s almost imperceptible.
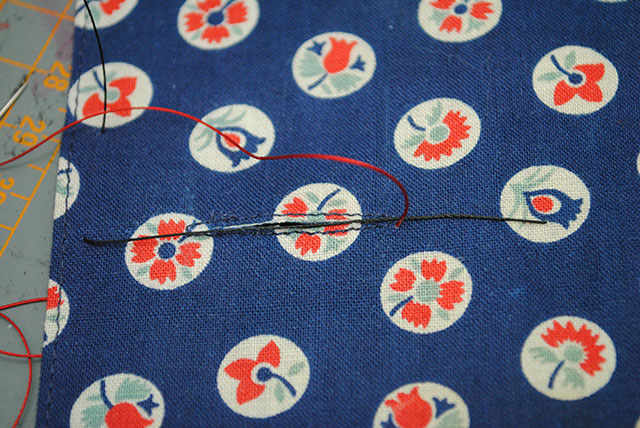
I like to start the knot on my garment a few inches away from my buttonhole (so it’s easy to clip off later), direct it over the top edge of the buttonhole (bottom to you viewing the photo below), then take one or two huge stitches in the fabric just to anchor it in place temporarily as I work. The purpose of the gimp is to reinforce the edges of the buttonhole, which makes it nice and sturdy. Leave the tail long as you will use it when you move the gimp to the bottom edge as you work.
Cut a length of your buttonhole twist. For a 1″ buttonhole, I cut a 2.5′ length of twist. Run it through beeswax a couple of times. You can either press the thread (with a press cloth so you don’t get wax on your iron or board) or just run it between your fingers to coat the twist thoroughly with the wax (which is what I do). Knot it at one end… I actually like to run the knot back through the beeswax for a little extra oomph.
Hold your fabric so the top edge is facing you like shown above. Start at the right bottom (which is the top left of the buttonhole when worn). Depending on the fabric, I try to bury the first knot between the layers of the slashed buttonhole. This wasn’t possible with my thin cotton fabric, so I just left it at the back of the buttonhole. You’ll pretty much sew over it either way, and can always add a small dab of Fray Check at the end. (I do.)
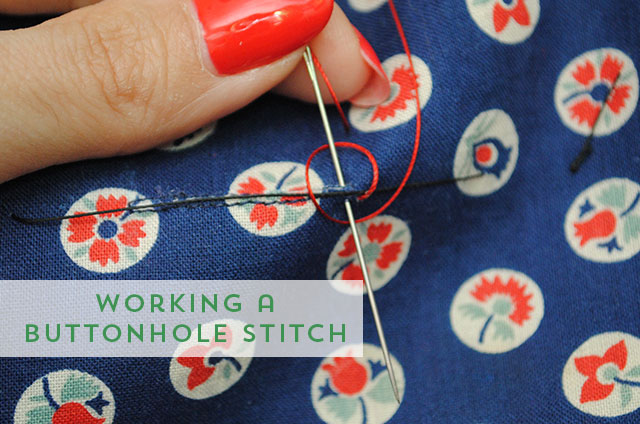
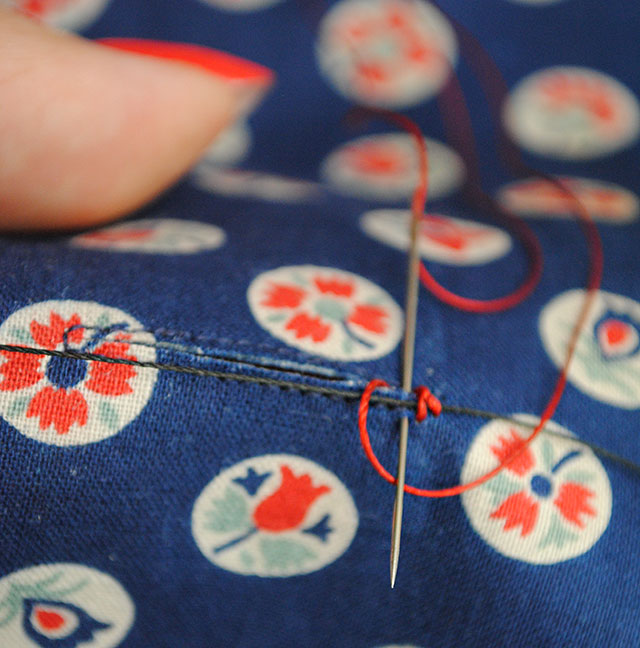
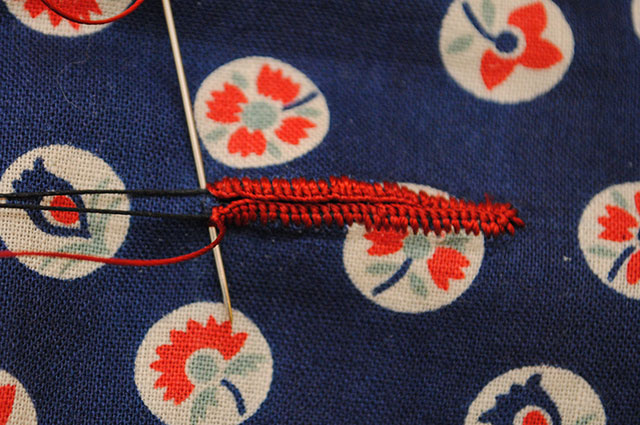
Come up through the fabric and make your first buttonhole stitch. To do this, the thread goes behind the needle, down and under it as so, and pull the needle through.
Here it is from another angle, just so you’re sure about working this stitch. It’s easy!
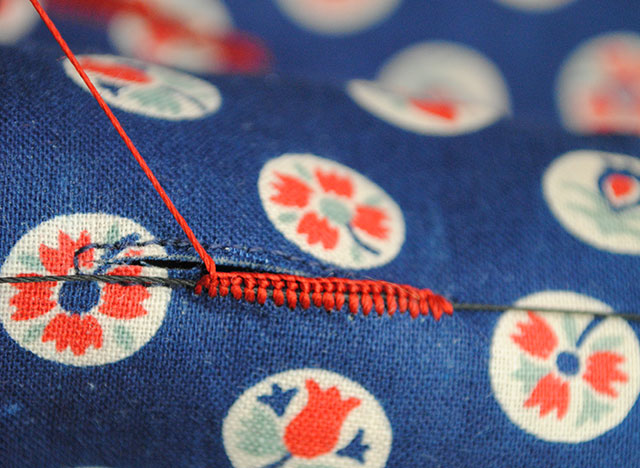
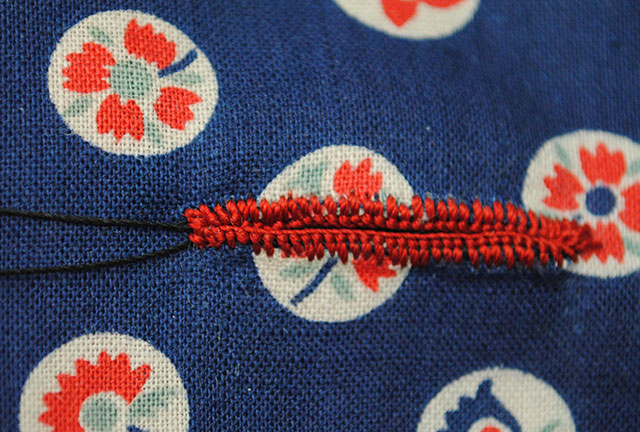
Pull the thread tight (don’t crank down too hard). This forms a little purl bump at the opening of the buttonhole. Continue making small buttonhole stitches next to each other. You’ll see that the nice purl edge starts to form after you have a few stitches worked.
The purls should touch without a big gap, but you don’t want to stitches so tight that they’re bunchy. If you screw one up, you can easily just use your needle to carefully unpick it. And you’ll notice below the purls should line up with the edge of the buttonhole, they’re not sticking straight up into the air, if that makes sense. You can also see how the stitches are formed on top of the buttonhole gimp.
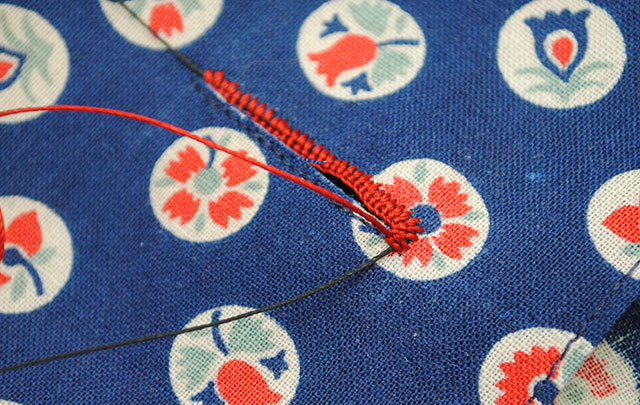
When you approach the edge of the top of the buttonhole, you need to start rounding the corner with your stitches. (Alternately for a vertical buttonhole, you can make a bar tack, which I’ll talk about when you get to the other end.)
At about the halfway point on the side edge your buttonhole gimp will start being in the way. At that point I pull out the large stitches I made with the tail of the gimp and then lay it across the side edge of the buttonhole, taking the final couple of stitches around the corner before anchoring it off in the other direction so it lays across the bottom of the buttonhole.
I forgot to take a photo of the gimp laying across the bottom at this stage, but you can see it in the photo below, anchored off to the left temporarily so that your bottom stitches are worked over it, too.
Continue working buttonhole stitches along the bottom edge of the buttonhole.
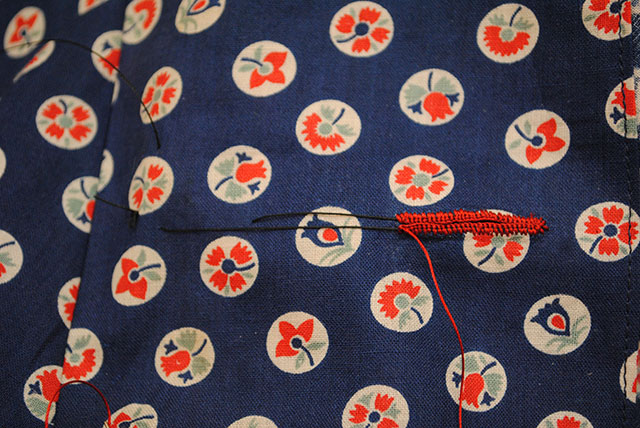
When you get to the opposite edge, you’re ready to make a small bar tack to finish it off. Make a couple (depending on how thick your thread is) long stitches that go from the top to the bottom edge of the buttonhole.
Then make a few small horizontal stitches over the long stitches, tacking them together. It’s so small it’s almost impossible to photograph, so it kind of looks like, well, not much. But you get the idea.
You’d done! Pull the tail of the buttonhole twist and the gimp to the back of the fabric. I don’t bother anchoring the buttonhole gimp, I just clip it close to the fabric (the gimp isn’t going anywhere, it’s wedged underneath all those stitches). I do anchor the buttonhole twist through the base of a few of the stitches, and dab a little bit of Fray Check for added insurance.
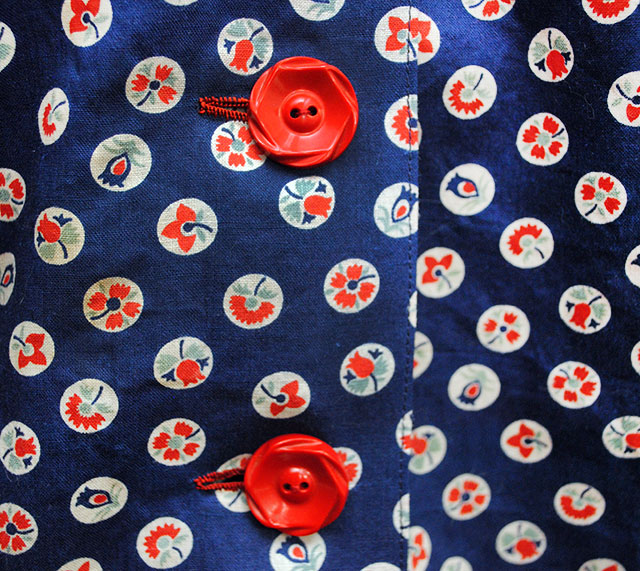
Repeat for all other buttonholes. Press them when you’re done, sew your buttons on, and marvel at your work!
Some tips:
- Make sure your stitches are on the outside edge of your overcasting or machine-sewn window. Those stitches are meant to be covered by your buttonhole stitches.
- Make sure the buttonhole gimp is inside your stitches. You make the stitches over it.
- These buttonholes won’t work well on loose weave fabrics or knits. Test one with your fabric to make sure it will work. Be sure to treat the test buttonhole exactly as you would the real garment, including interfacing.
- After you’ve practiced a couple of these buttonholes on scrap fabric, start with the least obvious buttonhole on your garment because they’ll get better as you go along. I start at the bottom and work my way up. In the case of my jacket, I did the cuffs first, then the bottom front buttonhole, then up to the top.
- If you’re daring, try using a contrasting buttonhole twist. I got this idea from Sunni ages ago, and she’s one smart cookie. I used red twist on blue fabric. This is the second time I’ve used a shade of twist that matched my buttons but not my fabric, and it’s fun!
But here’s the best tip of all: Don’t fret about perfection. You are not a machine. Unless you work hundreds of these like a tailor does, you’ll be hard-pressed to get each stitch exactly the same length as the next.
Embrace the hand-worked nature of these buttonholes and take pride in your stitches!





These look amazing – and I really love that you are encouraging the embracing of perfect imperfections 🙂
I have several buttonholes to do on my dress, hmm.. I may attempt this but I have to admit I am afraid, very very afraid. If they would turn out like yours I would do them, but I certainly do not have the experience you have. Yours are lovely!
Thank you SO much for this tutorial. I’ve been sewing my own clothes since I was 12 but have still not perfected a button hole. When I made my first bound button hole, I felt like a sewing genius. In sewing, it’s the small, hand worked details that make a garment really special.
My buttons arrived this morning- I decided to treat myself to some pristine old stock vintage ones. I hadn’t considered doing the buttonholes by hand, but now I’m tempted!
just the tutorial i needed, since my sewing machine refuses to sew buttonholes lately.. thanks for posting this 🙂
Thank you for this very helpful information. I have a sewing machine for ages but I still don’t know how to sew buttonholes with the machine…
wow! This is so impressive 🙂 and it looks so special. I can only imagine how special it must feel. Great Job!
I may never do a buttonhole on my machine again. This is great, thank you so much for demystifying the subject!
Assuming working buttonholes isn’t _too_ far off from using buttonhole stitch to work eyelets, I’ve found linen thread works nicely too. Still wax it.
My buttonholer hates me so this is just perfect! Great tutorial and I will be trying out soon!
Oh, lovely – like all your posts. You’ve also just cleared up a little mystery..in my ex-dressmaker grandmother’s sewing box that I inherited there was a block of wax with thread marks all over it – now I know what she used it for!
Your stitching is just wonderful! I dread hand sewing, hate it but I must admit it does look worth the work on your project!
I LOVE this shirt! Which pattern did you use for it? (If you used one!)
Great post! I love hand-worked buttonholes, but I need more practice with the right stitches (I’ve kind of winged it) so thanks for showing the way to properly do it 😀 . I did my very first bound buttonholes for my FFC dress, and love those too. So easy, never would have guessed! So glad I joined the challenge, learned so much 🙂
what a wonderful tutorial-thank You for sharing it! You do it exactly like my grandmother teached it to me when I was a young girl 😉 So I also remember about that time-thank You! Ines
Thanks for your excellent tutorial. It is clear as day and I feel confident to attempt it when I next sew buttonholes. I do love hand sewing 🙂
Thank you for this wonderful tutorial! Your photos were very helpful and I hope I’ll use it soon. Maybe not with this current project for the sewalong since I’m running behind, but for sure with another future project.
Thanks for this very comforting tutorial. It’s been ages since I made buttonholes by hand, and I have a new machine and have not learned how to make buttonholes. I made a blouse that is actually too big for me now (bragging) but I’m going to make buttonholes anyway because you showed so carefully and generously how to do them.
Great buttonholes. I remember back in the day when I first started sewing I always did my buttonholes my hand, until I learned how to do them on a ziz-zag, but what is so amazing are the buttonhole making thingys on the newer machines. Of coarse the machine ones don’t compare to the hand crafted ones.
Great tutorial! My sewing machine can’t handle buttonholes on light-weight fabrics (still working on getting them right even on shirting weight), so when I made my first blouse I had to figure out to make them by hand. Wished your tutorial had been around then! I do mine a little bit different, but the basic is the same. I’ve found that if I machine-stitch round the buttonhole and overcast the edges, I can sew the buttonhole-stitch with either buttonhole-twist or a double, waxed ordinary thread. The overcasting I find help to keep stray threads from the fabric in place, and makes the buttonhole-stitches appear even and covering the fabric.
Def going to look through the links you’ve supplies, always great to read up on different methods!
I have another method for handworked buttonholes (no machine stitches to define the button hole and no “gimp”)…but yours seem to result in buttonholes that look much smoother, so I might give it a go!
This looks so good, your tutorials are so fab and much appreciated. For the first time I think I would enjoy a hand sewn button hole making session. It looks much simpler than bound buttons and more interesting and homemade which I love. I was going to try bound buttons for my upcoming shirt dress, but now I think I will just get some nice buttonhole silk and leave the bound variety for another time. Thanks.
Thanks so much for this tutorial! I’ll definitely give this a try the next time I make a vintage blouse. I wonder if silamde thread would work. It’s a waxed nylon thread used in beading but some milliners really like using it on hats because it doesn’t get tangled. I found out about it in a hat class I took this summer. It comes in a range of colors and varying lengths. I haven’t use it so I have no idea about the weight, etc. It may be worth checking into.
My grandmother sewed buttonholes by hand but machine stitched seams! Corded buttonholes (per Mac Berg, ace seamstress extraordinaire at Vogue Fabrics, are the way to go…and will exceed even the quality of RTW buttonholes (look at ’em closely sometime. They are sub-par even to what you do on the sewing machine)
* make your own buttonhole twist using your main sewing thread. It involves using your bobbin winder. It’s a little more involved (email the store with question directed to Mac Berg) …but a great $ saver and all threads will match (button hole thread and the twist)
* use Solvy stabilizer on top and bottom of your buttonhole. This will lift your stitches, and your buttonhole will never look wonky.
Tasha, I’ve recommended this tutorial at my own blog where I’m currently presenting short tutorials on the complete process of making handsewn buttonholes.
Since my fabric is a very busy black and white print it’s next to impossible to visually present all the details of the hand stitching. This is why I’ve referred my readers to your tutorial. The information, photos and presentation are excellent. Good job!
I do have one question. What size hand sewing needle did you use for the silk buttonhole twist? I tried making buttonholes with Gutterman’s silk buttonhole twist and ended up using an embroidery needle because it was too thick for a #4 or #5 sharp hand sewing needle. Due to the larger size of the embroidery needle my buttonholes were too thick and very clumsy looking.
I ended up using a double strand of Guttermans poly/cotton thread. I didn’t use beeswax because it dulls the color of the thread. Instead I used dryer strips to condition the thread. The results came out very nice, small and without added bulk. You can see them in the next to last photo of my tutorial at http://wp.me/p3y3fG-cX
I look forward to your reply.
I learned to make buttonholes by hand in the forties, but I haven’t made any recently and needed a refresher. Thank you so much for such clear instructions.
thank you for this tutorial. easily understood. great tips.
Just saved my life with this article! 🙂 I had no idea how to make the buttonholes and I was about to break down! Thank you!
Hi!! I’m so glad I came across your tutorial. I have never sewn buttonholes in my life, and I have only started sewing a few months ago. I was so nervous when it came to making buttonholes myself, but your tutorial was very helpful! Mine turned out nicely, thanks to your pictures and your tips. I really enjoy your blog. Thank so much for taking the time in making this tutorial.
I was so glad to come across this!! I needed to adjust an anime costume for my daughter and had to make it a little bit bigger. I found someone who had posted making a corset back on a dress and used button holes to run the lacing through.
Well, I am not someone who sews, I can fix a seam that has ripped but that’s about it plus not knowing how to use a sewing machine doesn’t help me either…
This site is wonderful and I was able to learn fairly quickly with the step by step instructions and the buttons holes turned out well for my first time using a proper stitch.
Thank you!!!! I will return to learn more 🙂
This is a great tutorial, thank you!!
With a sigh of relief I say, “Thank you!”
Cheers,
Lyric
Great tutorial! Thanks! Made my first buttonhole today!!!
Wonderful tutorial! I will be putting this information to use in just a few minutes.
I’ve done these on a few projects, the most recent turning a barrel cuff shirt into a French cuff. Their fun and relaxing, as well as add a nice contrast to a machined article. Thanks a lot for the write up!
YEAH!!!!!!! I have BEEN looking for directions on how to do this!!! Even my grandmother who is 91 couldn’t tell me because she hadn’t done it in so long!!! Great job and so happy I now know how! Michelle
This is great stuff! I love everything about you and this blog, Not my style but oh what a style it is! I thought I was the print queen but I bow down to you and your creations! I’m sharing this tutorial with my face book peeps.
Wonderful tutorial!thank you!!
Thank you for this!! I have been attempting to get my machine to work on the buttonholes of a garment I’m making and it just won’t work (for some reason this machine has NEVER done good buttonholes) and this is the PERFECT tutorial to get things done! Thank you again~! <3
I love the pattern you used, fabric and button choice is also incredible! Thank you for sharing!
Hurray! I only recently started sewing, and my mom gave me her 1960s Singer Featherweight, which doesn’t do buttonholes (or zigzag). I’ve collected a few “how to sew” manuals, but they all assume we have modern machines — this is wonderful detailed information that will come in real handy! Thank you!
Thank you so much for this exhaustively informative tutorial!! My sewing machine stopped doing buttonholes and I had no clue how to finish the Halloween capes I made my kids & myself!! Mine aren’t near as pretty as yours, but they’re strong & functional!!
Thanks so much for the easy to understand directions. The buttonholer on my machine stopped working and I had a granddaughter holiday dress deadline. Later I fixed the buttonholer but now find myself wanting to make buttonholes by hand on certain garments simply because they add such a lovely detail.
I don’t have all the fancy thread types so I used a heavy thread for my gimp and plain old thread (doubled so it was 2 strands of thread) for the twist. I’m just doing drawstring holes for a renaissance faire skirt (made out of a sheet, ha!) so I didn’t need anything too wonderful.
It would be pretty easy to take out the threads later when/if I get some proper buttonholing stuff. I am pretty pleased with it, though! I’ve never done a buttonhole in my life and I’m scared of doing it on the machine so….hand sewing! Thanks for the tutorial it was perfect – except the part where you end the button hole. I was a little confused but that may well just be my problem. Anyway, yay! Button holes!
Great tutorial – thank you!!!
Found my machine buttonholing just plain doesn’t work – that’s a couple of hours of my life I won’t get back.
Followed your steps, so clear and easy! I added a line of tacking thread to help me keep the edges (vaguely) straight, and now have a buttonhole I’m really happy with, and so much nicer than any I’ve done before.
Hi,
I know the moon has passed may times since you posted this, but I still want to thank you. I was sent here by The Closet Historian on YouTube, as a resource when I for the firs time in my life at 50-and-a-bit I have bought a sewing machine to figure out if I like sewing. Outside my door there is a pandemic going on and I will be in isolation for the duration. My machine is from the late 1950’to early 60’s and don’t come with automatic buttonholes, obviously, so she sent me here to learn how to do them manually. She did well. I’ll start practicing so that I’m ready when I ned them. Without this I would have had to use hooks and bars(?) or magnetic buttons on all my future projects. Thank you so very much.
Yours,
Ann
With some tailor’s chalk and a ruler or straight edge, you can add two guide lines that will help you be a little more regular when it comes to the length of your buttonhole stitch. It will still look handmade, but it will be a little more regular and precise-looking, and will brush off or wash out with the next wash.
Don’t skip the gimp. It adds to the look as well.