
Hello, Fall for Cotton sew-alongers! How is everyone’s project coming along?
I just got going on mine. Unfortunately my thoughts of doing a smart outfit consisting of trousers and blouse flew out the window when I started facing the reality of the amount of work I need to put in for a special project I’m working on right now. I’ve had to scale back my goal, so now I’m only going to sew the blouse. It was a difficult decision that disappoints me a bit, but I know I’ll get to those corduroy trousers later this fall. (Plus the special project is pretty awesome too. 😉 ) But speaking of corduroy, have you checked out Rochelle’s most recent Fall for Cotton post on winterizing your wardrobe with corduroy? It’s the perfect fabric for fall!
Anyway, today I wanted to talk about setting in sleeves! In vintage sewing patterns, it can be a bit of a pain in the patoot. So I thought we could chat about it for awhile. And if you have some tips to share, you know I want to hear ’em!
Sleeve cap ease
Vintage sewing patterns often have a lot of built-in ease in the sleeve cap. This can feel really frustrating when you go to set in a sleeve if you’re expecting it to ease in like you might see pictured on a nice, smooth sleeve on a pattern envelope, but what you end up with is a gathered or puckered cap that you weren’t expecting! For the example, the pattern artwork for my 1942 blouse pattern shows smoothly set-in sleeves.

Normally, about 2″ of ease in a sleeve cap in woven fabric is good for a well-fitting, smooth set-in sleeve. That means the perimeter of the sleeve cap is 2″ bigger than the perimeter of the armhole (or armscye). This is something you can easily measure yourself to check.
A few years ago, Casey did an excellent post on demystifying sleeve ease. I won’t reinvent the wheel here—go read Casey’s post. Seriously. Since she posted that, I always measure both the sleeve cap and armhole in every vintage pattern I sew, so I know exactly what amount of ease I’m dealing with.
Basically, you measure along the perimeter (overlapping any yoke seams like my pattern had), and compare the results. Easy, right?
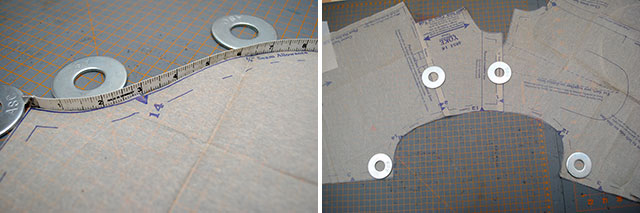
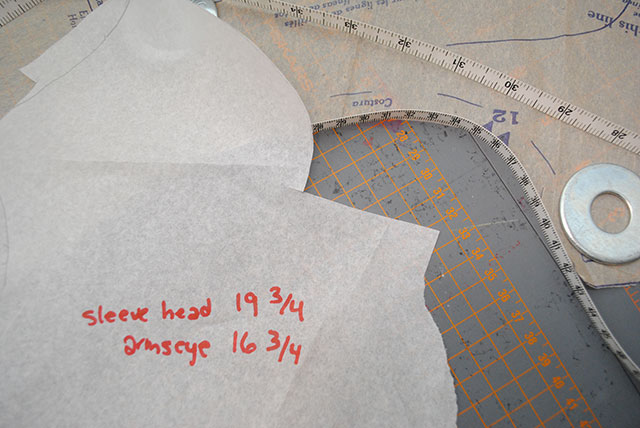
For my pattern, I discovered there was a 3″ difference between my sleeve cap and the armhole, meaning about 1″ more than I could expect to ease in and get a smooth sleeve. So my pattern artwork lied!
Now fortunately for me, I actually wanted gathered sleeves, so this worked out in my favor. If you didn’t want that, however (and usually I do not), you can do a bit of trimming along the top of your sleeve cap, as Casey explains in her post. Essentially you’re just whittling away that extra ease as evenly as you can, until you’re close to a 2″ difference. I do it with pencil on my pattern tracing and measure a bunch of times until I get it right, then cut off the excess (transferring any markings of course).
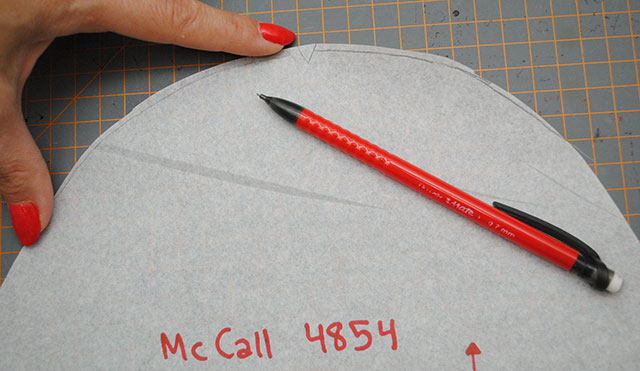
Having done this many times, let me just tell you that it takes more than you think to get rid of even an inch of ease! That little bit I marked in the above photo would definitely not be an inch. But keep marking with pencil and re-measuring, and eventually you’ll get there. Make sure to read Casey’s post to get all the details. It really is one of my favorite sewing resource posts.
Mark the new sleeve cap on a tracing of your pattern, and you’ll always have the right amount of ease for future versions!
Setting in sleeves
Now how about the next step, setting in those sleeves? There are two different ways that I do it: by using two rows of ease stitching in the seam allowance of the sleeve cap, or by easing with pins only.
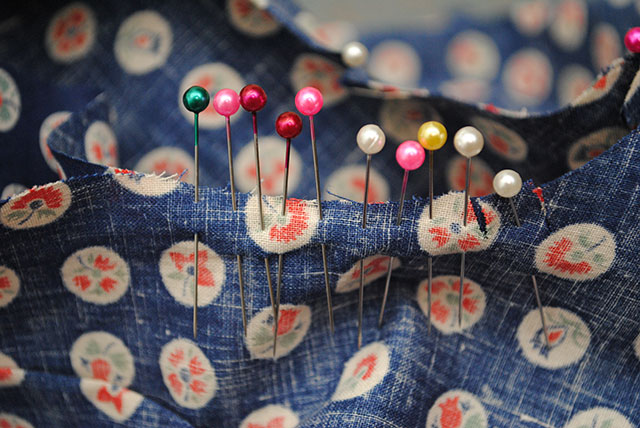
Two rows of ease stitching is probably the most common method to help ease in a sleeve. I like to put them 1/4″ apart, and use the biggest stitch length and loosest tension that I can. So if my seam allowance is 1/2″, I put them at 1/4″ and 3/8″ within the seam allowance (um, more or less… they’re kind of wobbly, ha ha).
One tip: I always use contrasting thread from my project so I can see it to remove it after sewing, and I also use a different color bobbin thread so I know which ones to pull on when easing!
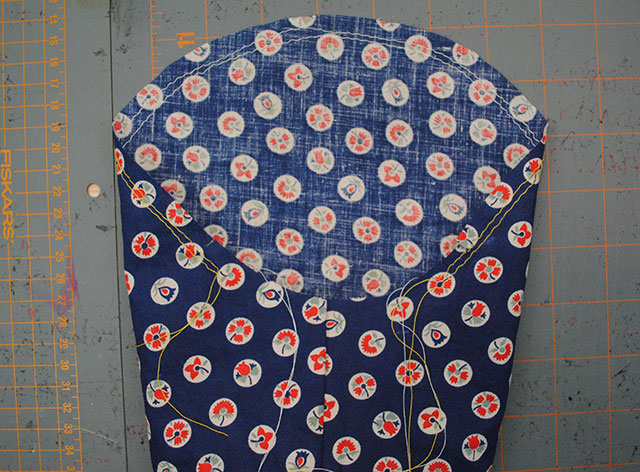
Here’s how I personally do it: I pin the underarm seam, the top of the sleeve, and where the notches are on each side. Then I pull on the bobbin threads more than needed.
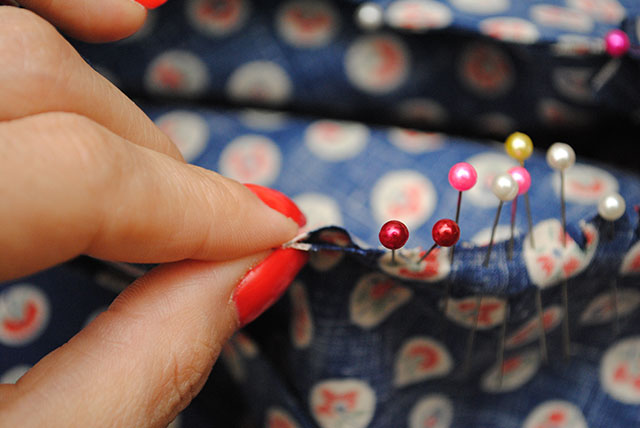
You’ll see below that the sleeve cap is bunched really tightly, more tight than it needs to be to set it in. I like to work this way because then I can pull out the excess ease more easily, rather than a continuing juggling game of pulling on the bobbin thread, spreading out the ease, etc. Just a method that works for me.
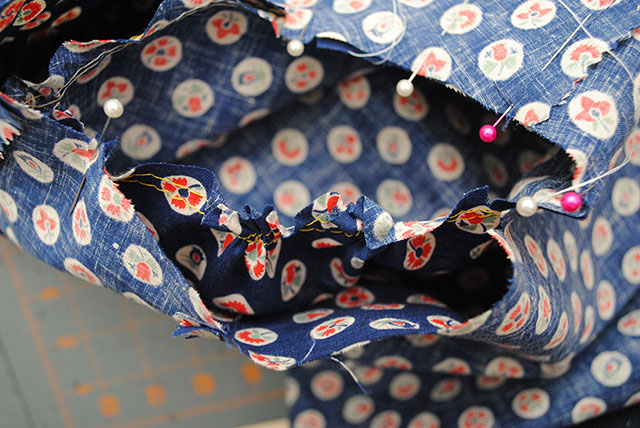
Now there’s also pin basting (or pin easing). I first read about it in this post on Gorgeous Fabrics (note: that blog is no longer active but the blog post is still up). You don’t run any ease stitching, you just use pins. A lot of pins. Like, a lot a lot of pins. You go crazy with the pins. In the areas where you’re easing (between the notches), it’s going to look something like this… but over the entire sleeve cap.
The key is really to work the fabric back and forth with your fingers, so you work in the ease as you go. You take a little bit at a time between your fingers and go slowly and pin. As you pin (and pin and pin and pin), you’re distributing the ease. I usually start at the notches on one side and work my way up to the shoulder, then do the same on the other side. If I end up at the top of the shoulder with too much ease leftover, I start working my way back down, moving pins around until I get it right. And I’ll admit, it can take a few passes to get it right.
But if you have problems setting in sleeves with other methods, I’d recommend you try it sometime. The results are worth it!
I haven’t used this method in awhile and couldn’t fully try it out since I was doing gathered sleeves, but now I’m thinking I may give it a shot again the next time I have sleeves to set in!
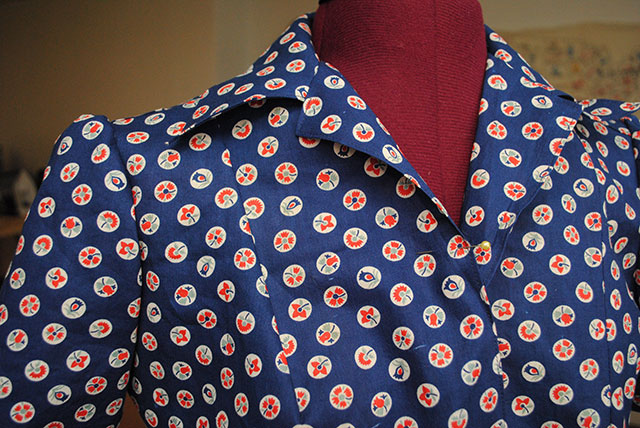 Not pressed yet, but set in…don’t mind all the weird collar wrinkles
How about you? What tricks do you have up your sleeves (har har) to get a nice result when setting them in? Please do share!
And keep sharing your projects in our Flickr group. We have over 230 members at this point! It’s been fantastic seeing all of the Fall for Cotton love out there and watching the wonderful projects roll in. Your momentum is amazing!
Ooh, your fabric is beautiful!
At university I studied costumes and we had a whole day of just practicing easing in sleeves…I can now do it almost every time with no basting/easing stitching and no pins. It’s all about feel! But when you go to measure to compare, you should actually measure along your stitching lines. Since you could have any number you like for your seam allowance, the perimeter measurement really means nothing and only gives you a rough idea if they’re close…whereas the stitching line is a constant.
Thanks, it’s a vintage cotton that I just love! It’s lightweight but a pretty firm weave, so hopefully I won’t find it too stiff. 🙂
That’s impressive that you can set in sleeves without basting! I totally get your point about measuring along the seam line instead of the perimeter (although the method I showed wasn’t my creation as I explained), and I agree it would be a more precise method. However from my experience in the last 2+ years doing it the way Casey outlined, I haven’t had an issue with measuring the perimeter vs. the seam line. And it saves drawing/re-drawing a seam line on my sleeve cap pattern piece several times as I re-shape the curve, which would be necessary if you measured that way. I know armscye and sleeve cap shaping is a sticky business whether you’re talking sewing or knitting (heck, I even bust out the Pythagorean theorem to re-shape sleeve caps in knitting), but at least I’ve found this way to work nicely for me even if it’s a little less precise. Mileage/opinions may vary as they say. 🙂
I never thought to use different colored bobbin thread to make it easier to know which thread to pull. Love the tip, thanks! As for the chanllege, I am just in the process of cutting out my dress, I have to do some fabric patching on the back bodice because there wasn’t enough fabric, but I think it will come out just fine.
ohh ahh! Amazing, thanks for this great tutorial!
My favorite sleeves are the 1940’s darted ones that don’t really involve any easing, which is awesome for me because I’m lazy and I don’t like dealing with sleeve ease lol! (Which is funny because sewing four tiny darts is more time consuming than just doing a normal sleeve but whatever.) BUT, now I know where to refer to the next time I encounter a sleeve that needs easing 😉 😉 Great tutorial!
Interesting! I haven’t seen that pin method before and will have to give it a try. I had such trouble with sleeves when I first started sewing, it was really a source of insecurity! Casey’s post really helped, but I still get really nervous when it’s time to ease in a sleeve and sometimes purposely pick patterns without set in sleeves to avoid frustration and failure…
Great post! This is a good reminder for me to check the ease amount before sewing, as I get super frustrated setting in sleeves. I think it is my least favorite part of sewing.
An older lady also told me that an easy way to do sleeves is before you sew up the side seams. Then you have a flat surface to work with and can really decided how you want to gather (if necessary) for the ease. Then you can just sew in the sleeve, fold it in half, line up the side seams, and sew from the end of the sleeve all the way to the bottom of the shirt without stopping! This also prevents weird bunching at the side seam/ sleeve bottom seam if you didn’t gather quite right.
When I set in sleeves I always turn the actual blouse or dress upside down and then place the sleeve inside of the blouse the right way round. Might be an obvious thing to do, but it took me a while to come up with that on my own 😀 I also start by pinning the seems in the armpit first and then the top of the sleeve and the seem on the shoulder so I won’t get into trouble with that especially if the sleeve is gathered.
I use 3 rows of gathering stitches at my normal stitch length but with a really loose top tension. The third row goes in at 6 or 7/8″ and I find I never run any risk of puckering that way.
I once read about a sleeve setting method (I can’t for the life of me remember where!) that recommended sewing gathering stitches around the entire sleeve cap – from underarm seam to underarm seam, rather than just between the notches. This way, there’s less “extra” fabric at any given point on the sleeve cap, making it easier to evenly distribute the ease and avoid any puckers. I’ve been using this method for the past couple of years and it’s worked wonderfully each time; sleeves go in perfectly pucker-free on the first try.
I’ve never had the reasoning behind gathering only between in the notches explained to me – is it because typical arm movements would require more ease in that area? At any rate, I’ve never run into any problems ease-wise using the fore-mentioned method. I don’t notice a difference in the look of the sleeve, either; it just looks really smoothly set-in (though I feel I should add that, previous to this method, my sleeves were never 100% pucker-free, so maybe you CAN notice a difference if you’re used to seeing perfectly set-in sleeves using the traditional method). At any rate, I’d say it’s worth giving this method a try.
I never would’ve thought to measure and determine the amount of sleeve cap ease– that’s really smart. Here’s a link to an amazing YouTube video that shows how to ease in sleeve caps using bias strips instead of gathering stitches… it’s a cool technique: http://www.youtube.com/watch?v=trGrZPgrN5M
As someone who loves vintage clothing and can manage repair and alteration but is new to garment construction, posts like this are a dream come true (and remind me that Casey has a treasure trove of posts too!) Thank you so much!!
The blouse is coming along so well, and I just adore the fabric choice. The sleeve tips are so handy! I am terrible at setting in – practice practice.
And I can’t help but really believe that we should petition McCall’s to reissue vintage patterns the way the other companies have, there are so many great ones, like the pattern you are using.
goodness, I am letting things falter!
But yes, you do the sleeves a whole lot like I do. I usually like to have the gather, to be honest, primarily because it kind of evens my shoulders out!
Like Vicki Kate, I recommend three rows of stitching, one right on the seam line, one just above, and one just below. I do this whenever I gather, but especially on sleeves. I then pin, hand baste sloppily, take the pins out, check how the sleeve is looking, then sew. I know this is a few extra steps, but this is how I was taught, and I really don’t have trouble with sleeves, so maybe it is a good method because I have plenty of trouble with other things!