
Hello my dear readers! I hope those of you in the U.S. had a lovely Thanksgiving. I know I did!
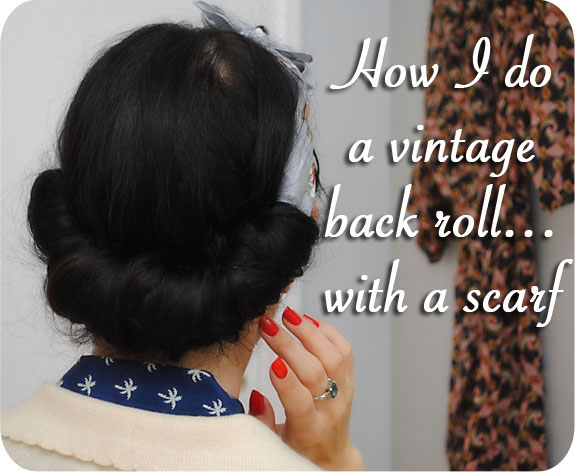
Today I’m excited to share a quick hair tutorial with you. I love the look of a 1940s-style back roll. It can be an elegant evening style or wartime factory worker casual. There are several great tutorials for this type of hairstyle, including at Va-Voom Vintage and Eileen’s Basement. My version is a little different, as it doesn’t use a rat to form the roll, but a scarf instead. So this hairstyle is a little twist on an old favorite.
I whipped up this style a couple of weeks ago on a particularly blustery day. I just needed something quick and easy for running errands and I knew my second day set would look like crap blown about in the wind. I’m sure many women in the 40s sported versions of this hairstyle. In fact Lauren Rennells does a lovely scarf roll style in her book Vintage Hairstyling using a different technique, a hot roll set and a front updo, but my take is a bit more casual and less involved, and can be done on un-styled hair. And it barely takes 5 minutes!
This hairstyle works best on un-styled hair or second day (or older) curls. I don’t recommend it on freshly set hair as the curl tends to make the roll look more sloppy. In these photos, my hair had been wet set with foam rollers two nights prior and was slept on with no rollers the night before the tutorial, leaving me with loose curls.
How to do a vintage back roll using a scarf
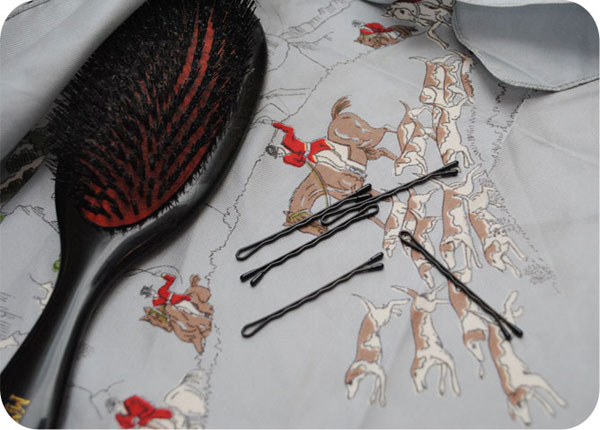
Supplies
- hairbrush
- several bobby pins
- a pretty scarf
Instructions
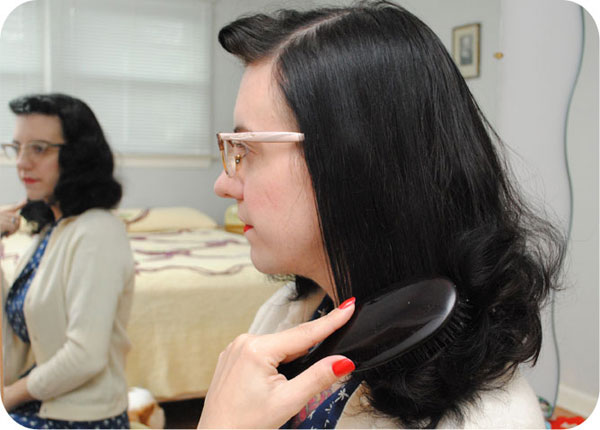
Start off by brushing your hair well. If your hair was set, brush out as much of the curl as you can. Soft waves or loose curls will be just fine.
If you have bangs, now is the time to style them as you’d like. (By request, I plan on doing a curled bangs tutorial soon!)
As you go, smooth down your crown. (This is also my attempt to tame the truly un-tameable whorl at the back of my head.)

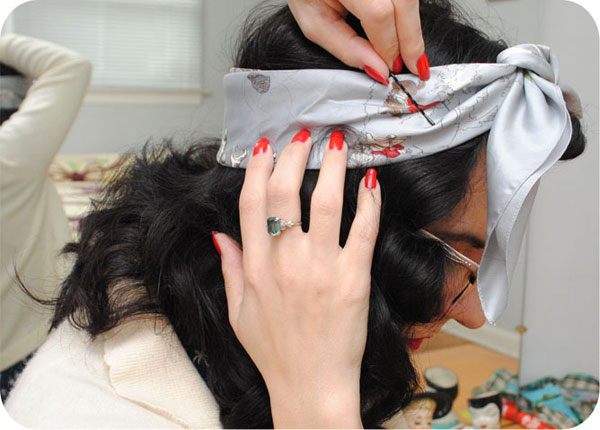
Roll up your scarf (diagonally to get enough length, if it’s a square scarf) until it’s a few inches wide. Holding the ends in your hand, place it at the base of your head, pulling the ends up towards the top of your head.
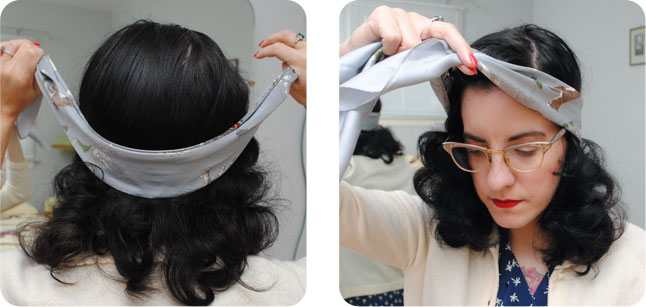
Tie it in a knot at the top of your head, rather tightly.

On either side of the knot, place a bobby pin back to front, anchoring the scarf to your head. This is especially important if you’re using a slippery scarf, otherwise it will never stay put.
(You can later remove these as needed, or hide them better.)
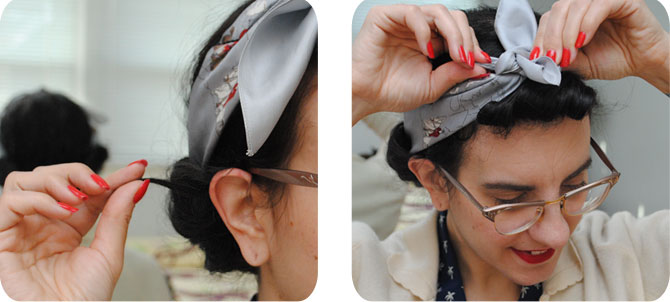
Grab a small section of hair (one or two inches wide) at the very side of your head. Pull it up towards the crown of your head.
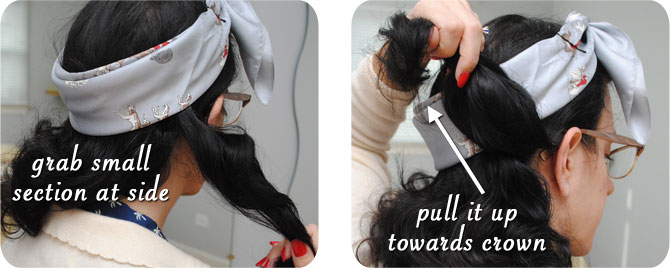
Tuck it down under the scarf and tug gently to pull the hair all the way through.
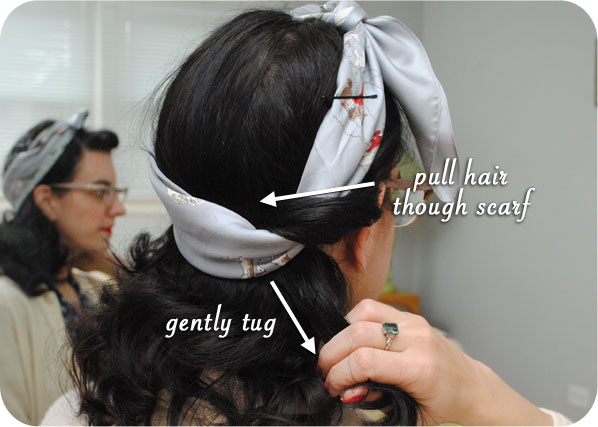
Adjust the hair to neaten it up slightly, but don’t put in any bobby pins at this point.
Repeat on the other side. It should look like this…

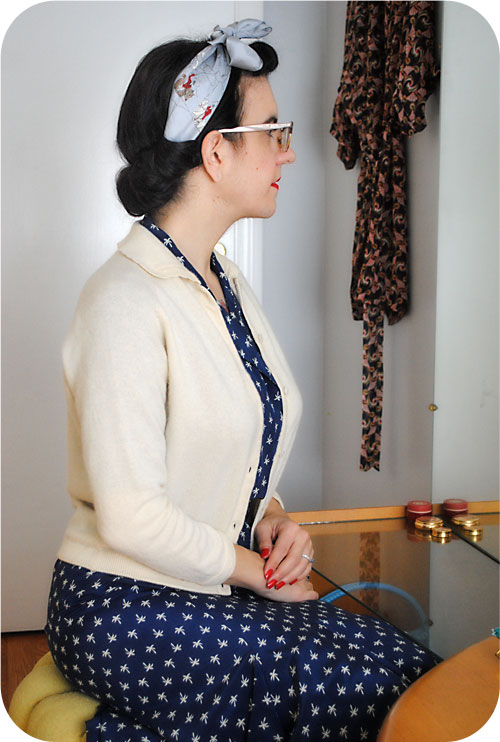
Grab all the rest of your hair…
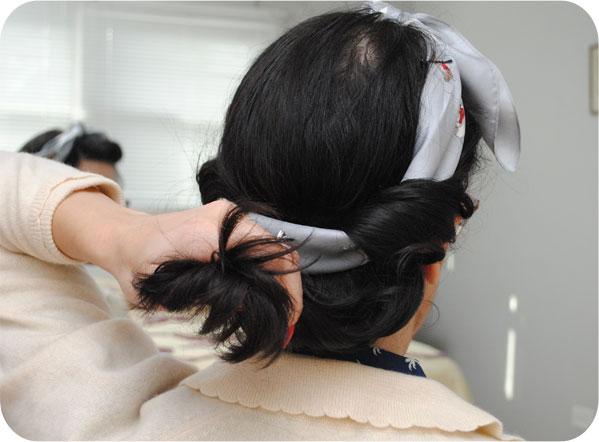
Take that hair, and start tucking it into the scarf. There’s really no precise way to do this, just start shoving it in until it’s all tucked in. Each time I do this I never think it’s going to work, but like magic, it does.
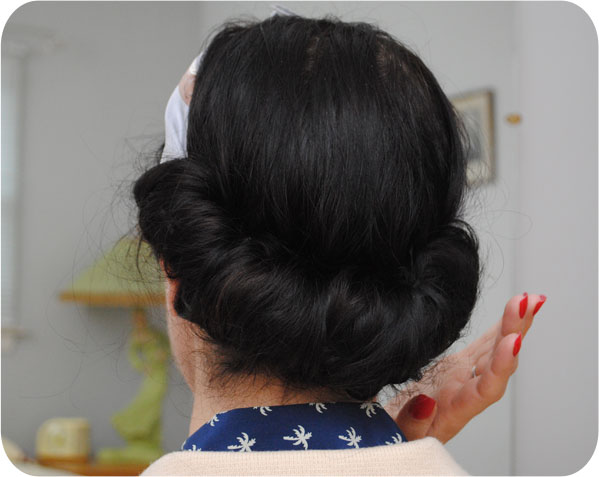
And what you get is a back roll!
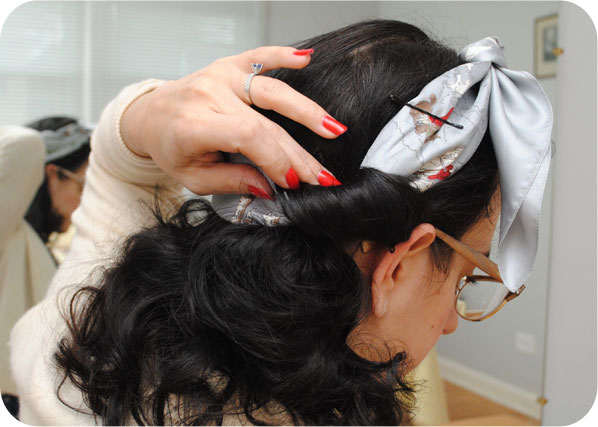
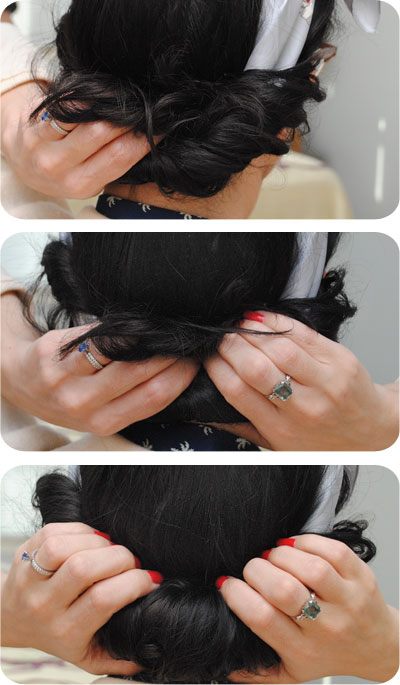
Now is the time for bobby pins. (Do not use bun pins! You need the grip of bobby pins.) Slip pins inside the top of the roll, where it meets the base of your head. Try to grab a bit of hair from the roll and a bit from the base of your head.
The important thing here is to place your pins as shown below. If you place them like shown in the photo on the left, it will anchor the roll in place. If you do it like the photo on the right, it basically won’t do anything except jab you in the nape of the neck when you tilt your head back.
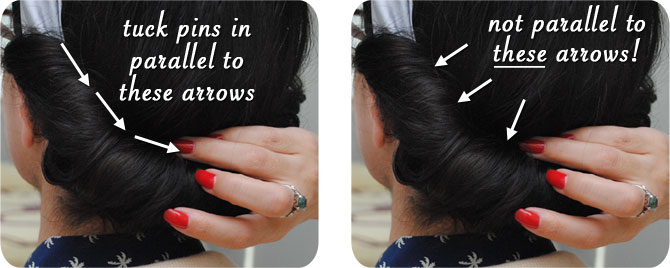
(Note: I’m a leftie, so my arrows are going left to right… if you’re right-handed, you’d just be doing it right to left.)
You’re done here, except tidying up. If you have any loose bits that poke out, tuck them in and anchor with a pin. Feel free to use a little pomade or hair spray. At this point you can either re-tie your scarf if it loosened up or tie it off into a bow. Whatever you’d like.
The end. Now go about your day with your quick new hairdo and be merry!
Thank you so much for this!
Manchester is so blustery at the moment, it feels like whatever I do with my hair, it’s messed up by the time I get to wherever it is I’m going.
I’ve been looking for some fun new ways to keep my hair in place and this is perfect! Will try it this week for sure 🙂
This makes me want to grow my hair the extra inches needed to do this style, it looks a treat! Great tutorial! Jx
Wow, this is an awesome look! Thanks so much for sharing!!!
Ohh thank you so much for this! I’ve never been able to get this exactly right, I’ll have to try it sometime soon!
xo,
Em
Wow!!!! I must try that even if I think that my hair are a bit too short…
Thanks to have shared!!!!
Very nice! I’ve been wanting more casual hairstyles for around the house. This will be great and I’ll finally get to sport my scarf collection about.Thanks!
I love this look – so simple and effective! I just cannot wait until my hair gets long enough (will it ever?!) to try it out!!!
Oooh lovely! This is how I quick-curl my hair, only instead of putting all of the back sections in at the same time, I do it piece by piece. Never thought to make it a pretty-do like yours! 🙂
This looks great… I’m definitely going to give it a whirl once my bob grows out!! My hair is naturally dead straight, so I love having styles like this in my arsenal for days when I can’t be bothered to set it 😉
Thanks for the tutorial! It makes it look a lot easier. When I first looked at the hairstyle I thought there would be some way you rolled the hair up with the scarf before tying it. This looks much easier though!
This is fantastic, Tasha! 😀 Thank you so much for sharing it. I’ve been wearing scarves a lot lately (since the rest of my clothing has gotten a bit “boring”, scarves and vintage costume jewelry have rescued me from maternity wear doldrums. lol.), and am going to try this tomorrow! Hopefully my hair isn’t too long right now to pull it off… 😉
Thanks for the tutorial, definitely trying this one!
I’m always trying to figure out a new way to wear my altogether too long hair up at work…this one looks so easy, breezy, and glamorous! 🙂 Can’t wait to try it, thanks!
Going swing dancing this week and definitely trying this! 🙂
I totally did this today and then blogged about it! Thanks for posting this. I always want to do a roll or wear a scarf and I end up with a headache. This is much better and so easy to do. Been wearing it all day and no headache 🙂
That is such a cute idea!
Omg Tasha you are like my hair fairy godmother-I freaking love this! I am going to try it this week and if it goes well I will post it on my fb and blog…wish me luck!!! xox
Thank you for this! I saw a few women rocking this look at a vintage-fair and have been trying to figure it out myself. Perfect timing 🙂 xx
I’ve tried doing this hair in the versions where you roll it all up from the bottom, but it never works. This looks so much more simple though, so I can’t wait to try it!
Great tutorial! And I love to see your bang tutorial!
Gorgeous! I’ll be trying this soon, looks like the perfect hair style for crazy windy Wellington. 🙂
Thanks for this tutorial! I’m wearing my hair in a back roll quite a lot lately, but your way sounds like a fun twist on this ‘do! I’ll sure give it a try!
We do our hair the same way! I have NEVER been able to roll up and then “spread out” my hair like most tutorials suggest. I use this method with a rat – but I shall now have to try this with a scarf 🙂
Love this! Thanks for sharing!
Very, very useful! Thanks for sharing this!
It looks fab! I will try it but I have a sneaking suspicion I dont have enough hair for it 🙁
That’s a good one, that I can do, thanks!
Clever. I never seem to be able to roll properly, but this is doable!
I love your tutorial; but even more than that, I love the scarf!
I have waist length hair so, alas, I think this wouldn’t work for me. These vintage up-do’s are just about the only thing that makes me consider cutting it.
This is, hands down, the best step-by-step howto I’ve encountered before on this particular rolling technique. Seriously helpful and so, so easy to “get” (which I find is not always the case with hair tutorials, be they yesteryear or modern). Thank you very much for sharing this terrific ‘do with us – you look gorgeous with your back rolled hair.
♥ Jessica
This is so handy! I do very similar thing with elastic headbands. I just do several separate sections before tucking the rest under with pins. It is so handy and quick. And you can even do loose curls with it if you leave it for the night.
Have to admit, I never even thought about doing the same with scarf. Thanks for the tip 😀
Rhia from
http://www.evildressmaker.com
You little star! I was messing around with a scarf today and failed hopelessly. This is a brilliant tutorial and a gorgeous look, I shall try it out tomorrow. xxx
This is perfect for the wet raining weather of the north west. I am always curling with no hope that they will stay. Thank you!
I used your tutorial and did my hair like this today. I’ve gotten so many compliments! And it was super easy to do, even though my hair is pretty long and has lots of layers. You’re right — I just kept tucking it in, and it totally came together. Thanks for the great tutorial!
What a smart little hairdo! My hair is getting pretty long (for me) these days and I’m running out of things to do with it. I can only wear it in pigtails so many times before I start to feel silly. This is really clever!
Thank you for the great tutorial. I am going to try this!
Interesting! I always struggle with keeping the tops of the roll in check when I simply roll up my hair. Part of my problem is that my hair is really slick, but I also just struggle with keeping that in place while I tuck up the back, and your method totally solves that problem. I wonder if I could adapt this to work with a sausage shaped rat?
Oh, thank you. for some reason, despite being fairly hair adept – I’ve always been unable to get this right. now I have a new go to for days when I was too tired (or drunk) to set my hair the previous evening. Heh. 😛
I think I have a new lazy-day hairstyle! I have always used a rat for my rolls, but I like how this incorporates a scarf right into it. Genius!
♥ Rebecca Jean
Midnight Maniac
you are seriously the cutest 🙂
Simple and so good-looking! Thank you, Tasha 🙂
Oh, my gosh! It actually worked and only took a couple of minutes.
AND I didn’t have to have curly hair first for it to stick (I have naturally straight hair).
I love it!
Thank you for sharing!
Thank you so much for sharing!
I tried this out today and am totally over the moon for it!
Super easy and super cute.
Worked very well with my stick straight hair, too.
Hooray!
You are so good at doing tutorials! I like this style because it looks vintage-y but it won’t take up too much time, plus I don’t need either super long or super short hair to make it work. I’ll be trying it for myself this weekend!
So cute and easy! I love it! I’ve been trying to have pretty hair every day and not just throw it into a pony tail. This fits the bill for pretty and casual! I tried it yesterday, I’ll be doing it tomorrow, and for sure on Saturday too! Thanks for such a great tutorial!
Lovely! 🙂
I love this, so simple yet so pretty. I love the way used did the step by step tutorial instead of a video, so we can follow at our own pace. Thank You,
Love Lil x
http://www.littleliloflondon.blogspot.com
I cannot wait to try this! It looks so pretty. I wear my hair in a bun a lot and this will be perfect for the day after bun hair. It’s sort of textured and full but not tight curls. Thanks for this cool tutorial!
OMG THIS IS SO GREAT!!!
thank you so much for sharing this great tutorial. i will try this roll tomorrow. 🙂
Sheeesh, you are so good at this hair stuff Tasha! I love the look of a vintage scarf in the hair, kinda 60’s bandeau style. But can never get it to look right. It either won’t stay put (even with pins it just slides right off) and/or looks weird the way it adds bulk under my hair at the nape. I think I have a weird shaped head!
Anyway, you are looking gorgeous as ever!
Px
Thank you for this- I am totally going to try it tomorrow. I have a ton of vintage scarves but never really knew what to do with them; plus I am growing my hair out a bit and it looks kind of sloppy…so this will be perfect! 🙂
I’ve been trying, unsuccessfully, to figure out how this was done for a long time. Thank you for sharing the tutorial! I finally wore my hair this way for work yesterday–love it!
I really can’t wait to try this out. I also now have a reason to not give up on all those small cuts of vintage fabric… That are big enough for hair scarves. World. Changed.
This was the most helpful hair tutorial ever! Thank you so much. Trying it tomorrow!
Works a treat, so easy. Your instructions were clear and easy to follow, and now I can wear my lovely vintage headscarves in a new and stylish way. Thank you 🙂
I almost peed my pants when this post popped up in the general browsing hair/beauty section of pinterest!!! 🙂
I tried this hairstyle out the other day, and it’s brilliant! It stayed in (and looked reasonably tidy) through an entire windy Wellington day. Thanks so much for posting it. 🙂
(You can see how mine looked after a full day out and about here if you’re interested: http://macskakat.wordpress.com/2012/12/07/wednesday-wardrobe-challenge-retro-cadet/
Ohhh this is so useful! Thank you so much for sharing!
ok, i found out that my hair is far too long for this …
Hi!
Lovely blog. I’m not much of a DIY-girl (never did learn how to sew, and haven’t priroitized it much), but I do love hair.
And retro clothes are so much easier to find than the hair!
But I do wonder… Right now, I have a nearly shoulderlength 1920’s-or-’30s-inspired haircut with a fringe reaching just below my eyebrows. My hair is also – alas – very….slippery and smooth.
WIth that length, and completely straight from nature’s side, and that slipperyness… I find even the scarf hair roll a bit of a challenge, actually. Do you have any tips – or links – to things I can do with such hair?
My hair is very slippery too. So doing this on freshly washed hair is really difficult for me, as the sides want to keep puffing out annoyingly. I’d recommend to try it on a day your hair is dirty, which for me means a lot less slippery. I find more and more that with my slippery hair, the second and third day after I wash it are the best for styling it, including how it holds a curled set too!
I totally tried this! http://crafternoonnap.wordpress.com/2012/12/21/sing-soft-kitty-to-me
I need some practice, but eventually it may work out alright haha. 🙂
I found this yesterday via Elegant Musings and I just wanted to say a mighty thanks. It was suprisingly easy to do for even a ham fisted lady like myself and it has remained intact and up for the past eight hours.
Oh my goodness I LOVE YOUR BLOG!!
Thanks for sharing.. I need to try it out now.
A great “dirty hair day” style! I can’t wait to try it!
Love your idea to create vintage back roll, so simple and easy instructions, Thanks for putting great effort in styling vintage hair!
What a great tutorial. And you are so so pretty! And have such sense of style. Thank you for this wonderful blog. Greetings from Stockholm, Sweden.
I am so Pleased to see how this style is done because during WWII, as a little girl, I recall my mother doing her hair this way. She was not skilled in doing her own hair normally and always had it done by a hair dresser, but this one style she could do by herself. I remember the summer before I started first grade and we spent time in a hot and windy climate, she wore her hair this way to keep in controlled! Thank you also for the seamless knit-in sleeve tutorial something I have wanted for a long time!
How wonderful of you to share this memory– thank you!
And happy to hear the sleeve tutorial helped. 🙂
Bloody Genius!!!
Love this! My hair is growing out of a bob and I hate leaving it down, yet also hate styling it (so much tiiiiime and fiddlyness!) so I am SO grateful for a quick yet cute style like this. I’ve also been experimenting with making sock buns with a vintage scarf as the base. They seem to work like magic (the way you describe here – how does it stay put? And yet it does) with the added bonus that if you mess it up a little and your “base” fabric shows, it’s ok because it’s a pretty scarf!
I just tried this today and it worked! I feel like I have two left hands whenever I usually try to do my hair and this was something I could figure out! Thank you!!!
This tutorial is so cute! I hope it works with my hair length. ^.^
How clever, I love it, thank you for sharing!
oxoxo
This is amazing! I am typing with my hair perfectly coiffed just like you showed, it was so easy. I’ll be honest, I read the directions and thought “no way will this work for my naturally curly hair”- well it does! I just modified a little. So curly ladies who want to try, here’s what I did: First, of course I didn’t brush my hair, but I didn’t wash it either. I washed my curls yesterday, so this morning they were a bit flattened, but still intact. Instead of brushing I wet my hands and just sort of smoothed it, I detangled any tangles, but I didn’t try to make it perfectly tight and straight. Then I followed your instructions, I just left it a little looser so that the texture of my curls was still visible (instead of pulling them out). Natural curls are much more soft and flexible than set curls, so they sort of just naturally curled around the scarf. THANK YOU SO MUCH, I will be wearing my hair like this all the time.
This post is so awesome, I love the way you show the various styles!
Kendra
http://LittleBlackScarf.com
What a gorgeous look! I am always looking for vintage hairstyles
Awesome, i have tried it and it was so easy and i look more gorgeous, thank you so muchhh!!
I recently cut my hair short and have no clue how to style it successfully, and I did this and it looks great!!! Thank you!
Hi. My mum used to wear her hair like this in the forties and fifties. I tried to do but could never get it right. Now, by following your tutorial, I may be able to do it. Thank you.
This style is super cute! Would you be able to do this with a ribbon as well? I am looking for a style to wear for prom and I would like to use a ribbon instead for a more subdued look.
I’d say with a wide ribbon it’s certainly worth giving it a shot! Since it’ll likely be slippery, pinning it to your head on both sides might be important when you try it. 🙂
will this work with my hair? when I search long hair styles stuff comes up for hair that is shoulder length. My hair is midback-a little longer and very fine, but I have a lot of it. I will try this over the weekend to see. I normally wear my hair just in a ponytail since I can’t get much else to work for me. this would make a nice change!!
I so love this. I don’t have curly hair but neither do I have the thick hair I once had thanks to getting older and daily meds.
I so hope this works for me.
Thank you Tasha.
I am going to a tea dance but had no clue what to do, my hair is so thin long and a horrible colour, this is absolutely perfect