Yesterday afternoon I picked back up a sewing project that I had abandoned last Fall. I didn’t do a lot of sewing last year, and I know that’s due in large part to being an on again, off again sewist over the years, even though last year I was really determined to make it more of a habit. I didn’t. I’m usually pretty adept at reading vintage patterns but sometimes my execution leaves something to be desired, and that left me frustrated last year. I’m determined to sing a different tune this year, however.
I’ve recently come to realize that a lot of my issues with garment sewing is due to my own poor fabric selections. (Let me just put this out there: the world needs to stop making so much stinkin’ cute quilter’s cotton.) A great resource that really helped me is the guide to sewing series of posts that Casey over at Elegant Musings did, which is tailored for the vintage sewist. Reading that really set the light bulb off in my head about making better fabric selections. I swear I’m going to put all my fabric that’s not so perfect for garments in the back of the closet so I’m not tempted to use it!
Back to that sewing project from last Fall. Using, you guessed it, quilter’s cotton. I mean, I couldn’t very well resist a pattern with retro blenders on it, could I? I know now it wasn’t a great choice, but rather than leaving it crumpled up sadly in a bag in the closet, I decided to try and see it through. Even if it means it’ll be slightly too stiff and it’ll wrinkle if you look at it cross-eyed. It’ll still be cute.
But the real reason for this post is actually to share a great tip that I read about many months ago that I filed away for future reference. It’s an alternate technique to setting a sleeve into an armhole. My pattern recommended, as do many people, to baste around the sleeve cap, then pull the lower thread loosely as you’re pinning the sleeve into the armhole to distribute the ease. (And if you prefer that method, there’s a great tutorial post over at Sew, Mama, Sew with lots of photos.) However, I read this post at Gorgeous Things (whose new blog is now here) about pin basting to set a sleeve into an armhole, so I tried it. And I loved it!
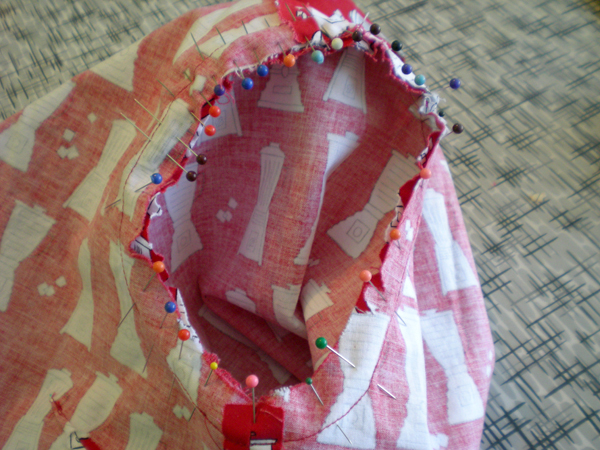
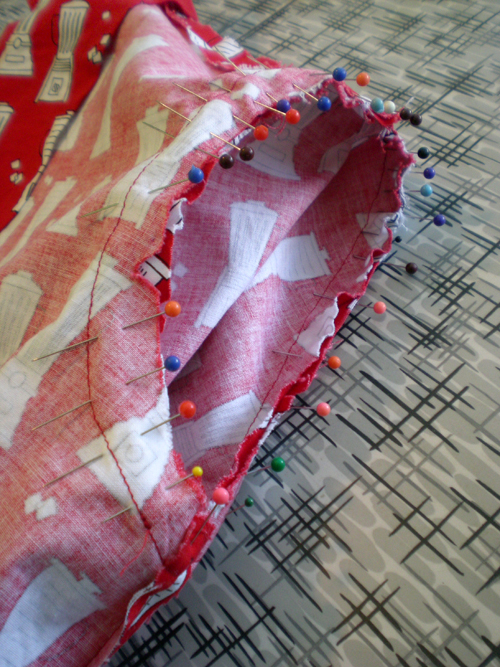
Of course, I didn’t take any photos while I was setting the sleeve into the armhole, so you’ll have to make do with a simulation.
Pin basting a sleeve:
Essentially what you do is turn your body inside out and your sleeve right side out as you normally would do, and begin to pin the sleeve into the armhole. First, I pinned together the sleeve and the body at the top and the bottom. I would say I pinned at the notches next, except when I cut out my sleeves I must have laid the pattern upside down so my notches were all off, so I didn’t actually do that. I then started easing in the fabric into the armhole with pins. Lots of pins. Lots and lots of pins. More pins than I even pictured above. You don’t need nearly as many pins towards the bottom of the armhole where there isn’t as much ease, but you’ll want to go just crazy with the pins at the sleeve cap. As you pin, carefully distribute the ease as you go.
And it’ll take awhile. You’ll find you often have to move pins around, getting the ease just right. And in some sections it’ll be easier than others. I did one half of a sleeve in about 5 minutes, but I swear the second half took twice as long or more. If you attempt this method don’t get frustrated, because the end result is worth it. (And honestly, it’s probably not much more work than the method where you baste the sleeve cap first, anyway.)
When it was time to sew, I started at the bottom of the armhole and worked my way around, going very slowly on the sewing machine and removing pins as I went. As I got to the sleeve cap area I started really distributing the ease with my hands as I went, stretching the fabric from both directions, making sure I didn’t sew in any creases. I admit I sewed over many of the pins because there were just so many. It’s hard not to when you’ve got pins every 1/4″ or so.
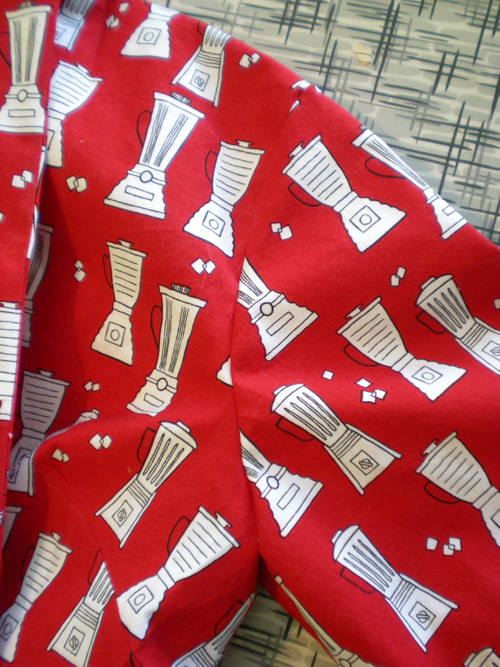
In the end, I had a perfectly smooth set-in sleeve! And in the photo below, I hadn’t even trimmed the seam or pressed it yet.
And that’s all there is to it! I felt it was worth the effort for the nice result, and I’ll definitely do use this method again. Yay for new techniques!
Resources from this post:
- Casey’s Elegant Musings Guide to Sewing
- Gorgeous Fabrics Setting a Sleeve into an Armhole
- Sew, Mama, Sew! Learn How to Attach a Set-in Sleeve


This was a post after my own heart. I, too, admit having a brutal weakness for the quilter’s cotton. It’s nearly all I ever sew with. Yes, it’s a wrinkle festival, but for the awesome combination of adorable prints, price and ease of washing care, I just can’t beat it. So my addiction will carry on.
And the sleeves… oh my god, sleeve ease is the bane of my sewing existence. Especially with vintage patterns as it seems like they are always extremely generous with the ease, to the point where it seems ridiculous. I have been making a practice of just pre-trimming a good inch or so of ease off most my sleeves, which seems to do the trick in the Tim Gunn “Make It Work” ethos, but I often feel quietly guilty for not trying to pin baste it like the instructions suggest. But if you can tackle it so bravely and win, then I think I’ll give it a shot on my next project.
Ooh, I like the idea of your little cheaty trick! I admit as I was pinning I was thinking there is just no way this ease is EVER going to get all sorted out, but like magic it did. I really do hate sleeves though. For a long time, even in my knitting I refused to knit set-in sleeves, instead finding ways to work them top down, or other seamless methods. Finally last Fall I did and realized it was no big deal. I don’t think I’ll ever feel like that about setting in sleeves in sewing, but at least this method gives me hope that I can do it without wanting to stab my eyes out with pinking shears!